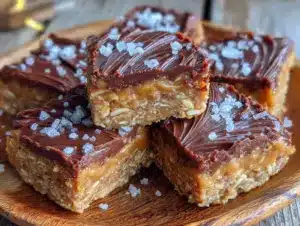
One rainy Saturday afternoon, I found myself craving something sweet but didn’t want to turn on the oven—not even for a minute. The idea of melting chocolate and mixing peanut butter sounded comforting, but I wanted it quick, no fuss, and absolutely no baking. After a few attempts (and a slightly sticky countertop), I landed on this no-bake peanut butter chocolate bars recipe that’s become a lifesaver for me. It’s easy, done in 20 minutes, and seriously hits that sweet and salty spot every time.
The best part? I don’t need to plan ahead or wait for the oven to heat up. Whether it’s a last-minute dessert, an afternoon pick-me-up, or a treat to pack for the kids’ lunchboxes, these bars deliver. Plus, they’re a fun little project I can whip up while catching up on a podcast or chatting with friends.
Oh, and if you’re a fan of rich, creamy chocolate paired with that classic peanut butter punch, this recipe is for you. I’ve made these bars at least a dozen times now—each batch disappearing suspiciously fast—and I’m pretty sure you’ll be reaching for the pan again and again.
Why You’ll Love This Recipe
This no-bake peanut butter chocolate bars recipe has completely changed how I approach sweet treats at home. Here’s why it’s become such a favorite:
- Ready in just 20 minutes — From start to finish, these bars come together fast. Perfect for when you need a quick fix or surprise dessert.
- Minimal ingredients — You likely have everything in your pantry already. No hunting for fancy or expensive items.
- No oven required — Great for hot days when you don’t want to heat up the kitchen or for times when your oven’s out of commission.
- Perfect balance of flavors — The creamy peanut butter and rich chocolate make every bite irresistible. It’s that classic combo done right.
- Kid-friendly and crowd-pleasing — I’ve brought these bars to family gatherings and potlucks, and they always get devoured.
- Customizable — You can add nuts, coconut flakes, or swap peanut butter for almond butter for a twist. I’ve had fun experimenting.
Honestly, these bars are my go-to when I want something indulgent but simple. They’ve turned me into a no-bake convert, and I bet they’ll do the same for you.
Ingredients You’ll Need
Here’s where the magic starts. This might look like a handful of ingredients, but most are pantry staples, and I’m going to share my favorite brands and tips along the way.
- Peanut butter (1 cup / 240g) — Creamy or chunky, your call. I prefer creamy for smooth bars, but chunky adds a nice crunch. Use natural peanut butter with no added sugar if you want it less sweet.
- Unsalted butter (½ cup / 115g) — Adds richness and helps the bars set properly. Don’t substitute with margarine; butter makes a difference here.
- Powdered sugar (2 cups / 240g) — Sweetens and thickens the peanut butter mixture. Sift it to avoid lumps if you can.
- Graham cracker crumbs (1 ½ cups / 150g) — This gives the bars structure and a slight crunch. You can pulse graham crackers in a food processor or buy pre-crumbled.
- Semisweet chocolate chips (1 ½ cups / 270g) — For the topping. I always grab a good-quality brand like Ghirardelli. Dark chocolate lovers, feel free to use bittersweet.
- Vegetable oil (2 tablespoons / 30ml) — Helps the chocolate topping stay silky and smooth when it hardens.
Optional Add-ins:
- Chopped peanuts for extra crunch
- Toasted coconut flakes for a tropical twist
- A pinch of sea salt on top to balance the sweetness
Quick tip: If you want to try almond butter instead, check out my no-bake almond butter chocolate fudge bars for a similar but nutty twist.
Equipment Needed
You don’t need fancy gadgets here, which is one reason I love this recipe.
- 8×8-inch baking pan — I use a glass one because I can see the layers, but metal works too. Line it with parchment paper for easy removal.
- Medium saucepan — To gently melt butter and chocolate. A small pot works just fine.
- Mixing bowl — For combining peanut butter, sugar, and crumbs.
- Spatula or wooden spoon — To mix and spread the layers evenly.
- Measuring cups and spoons — Accurate measurements make a difference, especially with powdered sugar.
- Microwave-safe bowl or double boiler (optional) — If you prefer melting chocolate this way instead of the stove.
Pro tip: If you don’t have parchment paper, lightly grease your pan with butter or oil, but the parchment makes cleanup so much easier.
How to Make It: Step-by-Step

Alright, let’s get down to business. I’m walking you through everything, including the little tricks that make these bars turn out perfectly every time.
- Line your pan (5 minutes): Start by lining your 8×8-inch pan with parchment paper, leaving a little overhang on two sides. This makes lifting the bars out a breeze once set.
- Make the peanut butter base (5 minutes): In a medium bowl, combine the peanut butter and softened butter. Stir until smooth and creamy. Add the powdered sugar gradually, mixing well after each addition. Finally, fold in the graham cracker crumbs until evenly combined. The mixture should be thick but spreadable.
- Press the base into the pan (2 minutes): Transfer the peanut butter mixture into your prepared pan. Use the back of a spoon or an offset spatula to press it down firmly and evenly. This helps the bars hold together once chilled.
- Melt the chocolate topping (5 minutes): In a small saucepan over low heat, melt the chocolate chips and vegetable oil together. Stir constantly to prevent burning. You want a smooth, glossy mixture. Alternatively, melt in 30-second bursts in the microwave, stirring in between.
- Pour and spread the chocolate (2 minutes): Pour the melted chocolate over the peanut butter base. Use a spatula to spread it evenly and cover every inch.
- Chill and set (at least 1 hour): Place the pan in the refrigerator and let it chill until the chocolate topping is firm, about 1 hour. For impatient moments, 30 minutes in the freezer speeds things up but watch carefully.
- Slice and serve (2 minutes): Lift the bars from the pan using the parchment paper edges. Place on a cutting board and slice into squares or rectangles. Serve immediately or store for later.
Quick troubleshooting: If your chocolate topping looks grainy or dull, it probably overheated. Next time, melt it gently and stir constantly. And if the bars are too crumbly, add a bit more butter to the peanut butter base next time for extra binding.
Expert Tips & Tricks
After making these bars countless times, here are some nuggets of wisdom I’ve picked up along the way:
- Use room temperature butter — It blends more smoothly with peanut butter and keeps the base creamy.
- Don’t skip the parchment paper — It’s a game-changer for removing bars cleanly without a mess.
- Press firmly but not too hard — You want the base compact but not rock solid. This helps the bars cut nicely without crumbling.
- Vegetable oil in the chocolate — This is my secret for a silky chocolate layer that doesn’t harden too stiff or crack when sliced.
- Store leftovers in the fridge — These bars keep best chilled. They soften a bit at room temp but can get too melty if it’s warm.
- Try layering flavors — Add a sprinkle of sea salt on top before chilling, or mix in chopped peanuts for extra texture.
- Don’t rush the chilling — Give the bars enough time to set. If you cut them too early, they’ll be gooey and tough to handle.
One time, I skipped chilling and tried to cut straight away. Let’s just say it was a gooey mess that my family happily devoured anyway—but you’ll want to avoid that if you want neat bars!
Variations & Substitutions
Once you’ve nailed the basic recipe, it’s fun to switch things up. I’ve tried a bunch of these variations and they all work great:
- Almond butter swap — Use almond butter instead of peanut butter for a different nutty flavor. This is similar to my no-bake almond butter chocolate fudge bars, which are fantastic if you want a paleo-friendly option.
- Add toasted coconut — Sprinkle ½ cup toasted coconut flakes into the peanut butter base for extra chew and flavor.
- Mix in chopped nuts — Walnuts, pecans, or extra peanuts add crunch and depth.
- Dark chocolate topping — Use bittersweet or 70% chocolate for a richer, less sweet taste.
- Mini chocolate chips inside — Fold ½ cup mini chocolate chips into the peanut butter mixture for surprise chocolate bites.
- Peanut butter cups — Chop up your favorite peanut butter cups and swirl them into the base for a decadent treat.
- Vegan version — Swap butter for coconut oil and use dairy-free chocolate chips. The texture is slightly different but still delicious.
For a fun party dessert, I sometimes pair these bars with my no-bake tiramisu cheesecake cups. The contrast of flavors always impresses guests!
Serving & Storage
This is the kind of treat that works well for anytime—dessert, snack, or even a little indulgence with your afternoon coffee.
Serving Suggestions:
- Serve chilled straight from the fridge for that perfect firm bite.
- Pair with a glass of cold milk or a cup of coffee to balance the richness.
- For a fun twist, serve with fresh berries or a drizzle of caramel sauce.
Storage Tips:
- Refrigerate: Store bars in an airtight container in the fridge for up to 5 days. They’ll stay firm and fresh.
- Freeze: Wrap individual bars in parchment and freeze for up to 3 months. Let thaw in the fridge before eating.
- Room temperature: Not ideal for long periods, especially in warm weather, as the chocolate topping softens and peanut butter base gets sticky.
If you plan to bring these bars to a picnic or potluck, keep them chilled in a cooler to maintain their shape and texture.
Nutrition Information
I’m not a nutritionist, but here’s a rough breakdown per serving assuming 16 bars:
| Nutrient | Amount |
|---|---|
| Calories | 210 |
| Protein | 5g |
| Carbohydrates | 18g |
| Fat | 14g |
| Saturated Fat | 5g |
| Sugar | 13g |
| Fiber | 2g |
| Sodium | 90mg |
These bars are definitely a treat with their sugar and fat content, but they also offer some protein and fiber from the peanut butter and graham crackers. If you want to lighten them up, try swapping powdered sugar for a natural sweetener or reducing the amount slightly.
Final Thoughts
So, that’s my easy, no-fuss, no-bake peanut butter chocolate bars recipe! I’ve probably gone on enough, but when you find a dessert that’s this fast, delicious, and versatile, you want to shout it from the rooftops.
This recipe has saved me on more than one occasion—whether I forgot to bake a birthday cake or needed a quick snack that didn’t involve running to the store. Plus, it’s a simple way to feel like you’re treating yourself without a lot of stress.
Make it yours: add your favorite mix-ins, play with the chocolate topping, or serve it alongside some fresh fruit. And if you’re curious about other easy, no-bake treats, my no-bake tiramisu cheesecake cups are a creamy dream worth trying next.
If you give this recipe a shot, drop a comment and tell me how it went! I love hearing your tweaks, successes, and even the funny mishaps. Cooking is all about making it your own and enjoying the process.
Happy no-bake baking! And here’s hoping your kitchen smells as sweet and comforting as mine does right now.
Frequently Asked Questions
Q: Can I use natural peanut butter instead of creamy processed peanut butter?
A: Yes, but natural peanut butter tends to be oilier and less stable, so your bars might be a bit softer or greasier. You can reduce the butter slightly to compensate. I’ve done this when I ran out of creamy and it still turned out tasty, just a bit more delicate.
Q: Why did my chocolate topping harden with a dull finish?
A: This usually happens if the chocolate is overheated or mixed with too much oil. Melt the chocolate gently over low heat and add just the amount of oil called for. Stir constantly and remove from heat as soon as it’s smooth. If it does harden dull, it’ll still taste great but won’t look as glossy.
Q: Can I substitute graham cracker crumbs with something else?
A: Absolutely! Digestive biscuits, crushed vanilla wafers, or even gluten-free cookie crumbs work well. Just make sure the crumbs are finely ground so the texture stays consistent. If you want a healthier twist, try crushed nuts or oat flour, though the texture will change.
Q: How long do these bars last in the fridge?
A: Stored in an airtight container, they keep well for about 5 days. The chocolate topping stays firm, and the peanut butter base remains tasty. I don’t recommend leaving them out at room temperature for long, especially in warm climates.
Q: Can I melt the chocolate topping in the microwave?
A: Yes! Microwave in 30-second bursts, stirring between each, until smooth. This is my go-to method when I want to get it done quickly. Just be careful not to overheat and burn the chocolate.
Q: Is there a way to make these bars vegan?
A: Yes, swap butter for coconut oil and use dairy-free chocolate chips. The texture will be slightly different—coconut oil melts faster—but still delicious. I’ve made this version for a friend who’s vegan, and it was a hit.
Q: Can I double the recipe?
A: Definitely! Just double every ingredient and use a larger pan (like 9×13 inches). The chilling time might be a little longer because of the thicker layers, but everything else stays the same. I do this when I want to have treats on hand for the week.
Pin This Recipe!


No-Bake Peanut Butter Chocolate Bars
- Total Time: 1 hour 20 minutes
- Yield: 16 bars 1x
Description
Easy no-bake peanut butter chocolate bars ready in 20 minutes, combining creamy peanut butter and rich chocolate for a sweet and salty treat without using the oven.
Ingredients
- 1 cup (240g) peanut butter (creamy or chunky)
- ½ cup (115g) unsalted butter
- 2 cups (240g) powdered sugar
- 1 ½ cups (150g) graham cracker crumbs
- 1 ½ cups (270g) semisweet chocolate chips
- 2 tablespoons (30ml) vegetable oil
- Optional add-ins: chopped peanuts, toasted coconut flakes, pinch of sea salt
Instructions
- Line an 8×8-inch baking pan with parchment paper, leaving a little overhang on two sides.
- In a medium bowl, combine peanut butter and softened butter until smooth and creamy.
- Gradually add powdered sugar, mixing well after each addition.
- Fold in graham cracker crumbs until evenly combined; mixture should be thick but spreadable.
- Press the peanut butter mixture firmly and evenly into the prepared pan using the back of a spoon or offset spatula.
- In a small saucepan over low heat, melt chocolate chips and vegetable oil together, stirring constantly until smooth and glossy. Alternatively, melt in 30-second bursts in the microwave, stirring in between.
- Pour melted chocolate over the peanut butter base and spread evenly with a spatula.
- Chill in the refrigerator for at least 1 hour until the chocolate topping is firm. For faster setting, chill in the freezer for 30 minutes, watching carefully.
- Lift bars from the pan using parchment paper edges and slice into squares or rectangles.
- Serve immediately or store for later.
Notes
Use room temperature butter for smooth blending. Press the base firmly but not too hard to avoid crumbling. Melt chocolate gently and stir constantly to avoid dull finish. Store bars in the fridge for up to 5 days or freeze for up to 3 months. Optional add-ins like chopped nuts or coconut flakes add texture and flavor. Vegan version possible by substituting butter with coconut oil and using dairy-free chocolate chips.
- Prep Time: 14 minutes
- Cook Time: 6 minutes
- Category: Dessert
- Cuisine: American
Nutrition
- Serving Size: 1 bar (assuming 16 b
- Calories: 210
- Sugar: 13
- Sodium: 90
- Fat: 14
- Saturated Fat: 5
- Carbohydrates: 18
- Fiber: 2
- Protein: 5
Keywords: no-bake, peanut butter, chocolate bars, easy dessert, quick recipe, no oven, sweet treat, kid-friendly