One rainy Saturday afternoon, I found myself craving something sweet but didn’t want to spend the whole day in the kitchen. I had a box of ladyfingers, some mascarpone cheese, and a few other staples hanging out in the fridge. I decided to combine everything into no-bake tiramisu cheesecake cups, expecting a decent treat at best. To my surprise, these little cups turned out insanely creamy, rich, and just the right balance of coffee and sweetness. Since then, they’ve become my go-to dessert whenever I want something impressive but easy—no oven, no fuss, just pure indulgence.
What makes these no-bake tiramisu cheesecake cups so special? It’s the combination of classic tiramisu flavors with a creamy cheesecake texture, all layered in cute individual cups. I’ve made this recipe more times than I can count, tweaking it each time to get the texture just right. Whether you’re whipping this up for a last-minute gathering or treating yourself after a long day, it always hits the spot.
And here’s a secret—I love serving these with a fresh cup of cold brew iced coffee with vanilla sweet cream (my favorite morning pick-me-up). They’re basically a match made in heaven. If you’re a fan of easy, creamy desserts that feel fancy but don’t require hours in the kitchen, keep reading—this recipe will become your dessert hero.
Why You’ll Love This Recipe
If you think tiramisu is complicated, this recipe will totally change your mind. Here’s why I keep coming back to these no-bake tiramisu cheesecake cups:
- Effortless elegance — This dessert looks like it took forever, but it comes together in under 30 minutes with zero baking. I’ve served these at parties and everyone thought I’d spent hours.
- Creamy, dreamy texture — The mascarpone and cream cheese blend makes it silky smooth without being too heavy. It’s the perfect balance between a classic tiramisu and a cheesecake.
- Individual servings — The cups make portion control easy and they’re super cute for entertaining. Plus, no slicing or messy serving.
- Customizable layers — You can jazz it up with cocoa powder, espresso-soaked ladyfingers, or even a splash of your favorite liqueur. I love adding a little coffee kick to mine.
- Make-ahead friendly — Assemble the cups the night before and let the flavors meld. It tastes even better the next day.
- Perfect for any occasion — Whether it’s a casual family dinner or a fancy celebration, these cups fit right in without stress.
Honestly, these no-bake tiramisu cheesecake cups have saved me on more than one occasion when I needed a quick, impressive dessert without the hassle. Once you try them, I bet you’ll feel the same.
Ingredients You’ll Need
Here’s the best part: most of these ingredients are probably already in your fridge or pantry. I’m pretty picky about a few key items, and I’ll explain why as we go.
- Ladyfingers (about 24 pieces) — These are the classic tiramisu base. I use the crisp, store-bought kind. If you can’t find ladyfingers, you could try sponge cake cut into strips, but ladyfingers soak up the espresso better.
- Mascarpone cheese
- Cream cheese (4 oz / 115g, softened) — Adds a slight tang and helps stabilize the filling. Use full-fat for best texture.
- Heavy cream (1 cup / 240ml) — Whipped and folded in for lightness. Cold cream whips best, so chill your bowl and beaters.
- Powdered sugar (3/4 cup / 90g) — Sweetens the filling without grit. I prefer powdered over granulated for smoothness.
- Espresso or strong brewed coffee (1 cup / 240ml, cooled) — The soak for the ladyfingers. Use strong coffee or espresso for that bold tiramisu flavor. Instant espresso powder dissolved in water works well too.
- Vanilla extract (1 teaspoon) — Boosts the overall flavor of the creamy filling.
- Cocoa powder
- Optional: Coffee liqueur (2 tablespoons) — Adds a nice boozy depth, but totally optional. I add it when I want to impress guests.
If you want to experiment, try mixing in a little cinnamon or nutmeg for a warm twist. I also keep a stash of mascarpone and cream cheese from recipes like my easy homemade cinnamon rolls with cream cheese frosting, so it’s easy to pull this off anytime.
Equipment Needed
You don’t need anything fancy for these no-bake tiramisu cheesecake cups. Here’s what I use:
- Mixing bowls — At least two: one for whipping cream and one for mixing the mascarpone and cream cheese.
- Electric mixer or hand whisk — An electric mixer makes whipping the cream way easier, but a whisk works if you’re patient.
- Measuring cups and spoons — Basic stuff, but important for getting the right sweetness and consistency.
- Spatula — For folding the whipped cream gently into the cheese mixture.
- Small cups or ramekins — I like using 6-ounce glass cups for serving. They’re perfect for layering and look pretty on the table.
- Sifter or fine mesh strainer — For dusting cocoa powder evenly over the top.
If you don’t have individual cups, a small trifle bowl or glass baking dish works fine for a layered dessert. Just adjust the portions accordingly.
How to Make It: Step-by-Step

Alright, here’s the plan. I’ll walk you through exactly how I make these no-bake tiramisu cheesecake cups with all the little tricks and tips I’ve picked up.
- Prepare the espresso soak (5 minutes)
Brew 1 cup of strong espresso or coffee and let it cool completely. If you want, stir in 2 tablespoons of coffee liqueur for extra flavor. Pour the coffee mixture into a shallow bowl wide enough to dip the ladyfingers. - Mix the creamy filling (10 minutes)
In a large bowl, beat the mascarpone cheese and softened cream cheese until smooth and creamy. Add the powdered sugar and vanilla extract, then mix until combined. In a separate chilled bowl, whip the heavy cream until stiff peaks form. Gently fold the whipped cream into the cheese mixture until it’s light and fluffy. This is the magic that makes the filling so dreamy. - Assemble the cups (10 minutes)
Quickly dip each ladyfinger into the espresso soak—just a second or two on each side. Don’t soak too long or they’ll get soggy. Break the ladyfingers in half if needed to fit your cups. Place a layer of dipped ladyfingers at the bottom of each cup. - Add the filling layers (5 minutes)
Spoon or pipe a generous layer of the creamy filling over the ladyfingers, smoothing it out gently. Repeat with another layer of dipped ladyfingers, then top with another layer of filling. Leave the top layer smooth for dusting. - Chill and dust (minimum 4 hours, preferably overnight)
Cover the cups with plastic wrap and refrigerate for at least 4 hours to let the flavors meld and the filling set. Just before serving, dust the tops generously with unsweetened cocoa powder using a sifter or fine mesh strainer.
The whole process takes about 30 minutes hands-on, but the chilling is where the magic happens. I’ve found that letting these sit overnight makes the flavors even better.
Expert Tips & Tricks
After making these dozens of times, here’s what I’ve learned that’ll save you headaches and get you perfect cups every time.
- Don’t over-soak the ladyfingers — They should be just moistened, not soggy. A quick dip keeps the structure intact and prevents a mushy dessert.
- Use full-fat mascarpone and cream cheese — It makes a huge difference in creaminess and flavor. Low-fat versions just aren’t the same.
- Chill your mixing bowl and beaters before whipping cream — This helps the cream whip up faster and hold its shape better.
- Fold, don’t stir when combining whipped cream with the cheese mixture to keep it airy.
- Make ahead is your friend — These actually taste better the next day once the flavors have mingled. Perfect for prepping before a party.
- For a boozy twist, add coffee liqueur or rum to the espresso soak or the filling. Just a splash goes a long way.
- Don’t skip the cocoa dusting — It adds classic tiramisu bitterness that balances the sweetness.
Variations & Substitutions
Once you’re comfortable with the basic recipe, here are some fun ways to mix it up:
- Chocolate lovers: Add a layer of chocolate ganache or sprinkle mini chocolate chips between layers.
- Berry twist: Toss fresh raspberries or strawberries in between layers for a fruity surprise.
- Nutty crunch: Sprinkle toasted hazelnuts or almonds on top before serving.
- Non-alcoholic: Simply omit the liqueur and add a splash of vanilla or almond extract for extra flavor.
- Vegan adaptation: Use dairy-free cream cheese and coconut cream whipped to stiff peaks. Use vegan ladyfingers or sponge cake alternatives.
These cups are pretty forgiving, so feel free to get creative. I sometimes swap in different coffees or add a pinch of cinnamon for warmth.
Serving & Storage
I love serving these no-bake tiramisu cheesecake cups straight from the fridge in their individual glasses. They look elegant and keep the portion sizes perfect.
For a casual touch, pair them with crunchy grilled street corn with cotija cheese or a simple green salad to balance out the richness.
Storage: Keep the cups covered in the fridge for up to 3 days. The filling will firm up but remain creamy. When you’re ready to eat, just dust with fresh cocoa powder again if needed.
Reheating: No reheating needed—these are best served chilled. If you want a softer texture, let them sit at room temperature for 10-15 minutes before serving.
Make-ahead tip: Assemble the night before and enjoy stress-free entertaining the next day.
Nutrition Information
I’m not a nutritionist, but here’s a rough breakdown per serving (based on 6 servings):
| Nutrient | Amount |
|---|---|
| Calories | 410 |
| Protein | 7g |
| Carbohydrates | 32g |
| Fat | 28g |
| Saturated Fat | 17g |
| Sugar | 22g |
| Cholesterol | 85mg |
| Sodium | 150mg |
This dessert is rich and indulgent thanks to the mascarpone, cream cheese, and heavy cream. It’s definitely a treat, but it’s made with real ingredients and no artificial additives. I usually enjoy a small portion with a strong coffee to balance the sweetness—especially when I’m making my favorite cold brew iced coffee with vanilla sweet cream.
Final Thoughts
So that’s my easy, creamy, and utterly delicious no-bake tiramisu cheesecake cups. I know I’ve probably talked your ear off by now (I get excited about this recipe!), but I truly believe it’s one of the best easy desserts out there. It’s saved me countless times when I needed something that felt special without the stress.
Plus, it’s flexible enough to fit your mood—boozy or sober, classic or fruity, simple or fancy. Most importantly, it’s a dessert that brings smiles and little happy sighs all around the table.
If you make these, please drop a comment and tell me how they turned out! I’m always curious to hear your twists or troubleshoot if something didn’t go as planned. Happy cooking, and may your kitchen smell like freshly brewed espresso and cocoa powder very soon.
Frequently Asked Questions
Q: Can I substitute cream cheese for all the mascarpone?
A: You can, but the texture will be a bit tangier and less rich. Mascarpone adds a silky, authentic tiramisu creaminess that cream cheese alone can’t quite match. If mascarpone isn’t available, try mixing cream cheese with a little heavy cream to lighten it up.
Q: How long can I store these tiramisu cheesecake cups?
A: They keep well in the fridge for up to 3 days. The flavors actually improve after a day as they meld together. Just cover tightly to prevent drying out.
Q: Can I make these without coffee or espresso?
A: Sure! For a kid-friendly or coffee-free version, substitute the espresso soak with chocolate milk or even orange juice for a different flavor profile. Just keep in mind it won’t taste like classic tiramisu.
Q: Why did my filling turn out runny?
A: Runny filling usually means the heavy cream wasn’t whipped enough or was overfolded into the cheese mixture. Make sure your cream forms stiff peaks and fold gently to keep the air in. Also, using room temperature mascarpone and cream cheese helps the mixture come together better.
Q: Can I double this recipe for a larger group?
A: Absolutely! Just double all the ingredients and use larger serving containers or more cups. The assembly and chilling times stay the same. I often double recipes like this for parties, along with dishes like my homemade beef meatloaf for a complete meal.
Q: Is there a way to make this dessert lighter?
A: You can try using half the amount of heavy cream or substitute with half-and-half, but it won’t be as rich or stable. Adding fresh fruit layers like berries can also add freshness and lighten the overall feel.
Q: Can I freeze tiramisu cheesecake cups?
A: I don’t recommend freezing because the creamy layers can separate and get watery after thawing. It’s best enjoyed fresh or refrigerated for a few days.
Pin This Recipe!


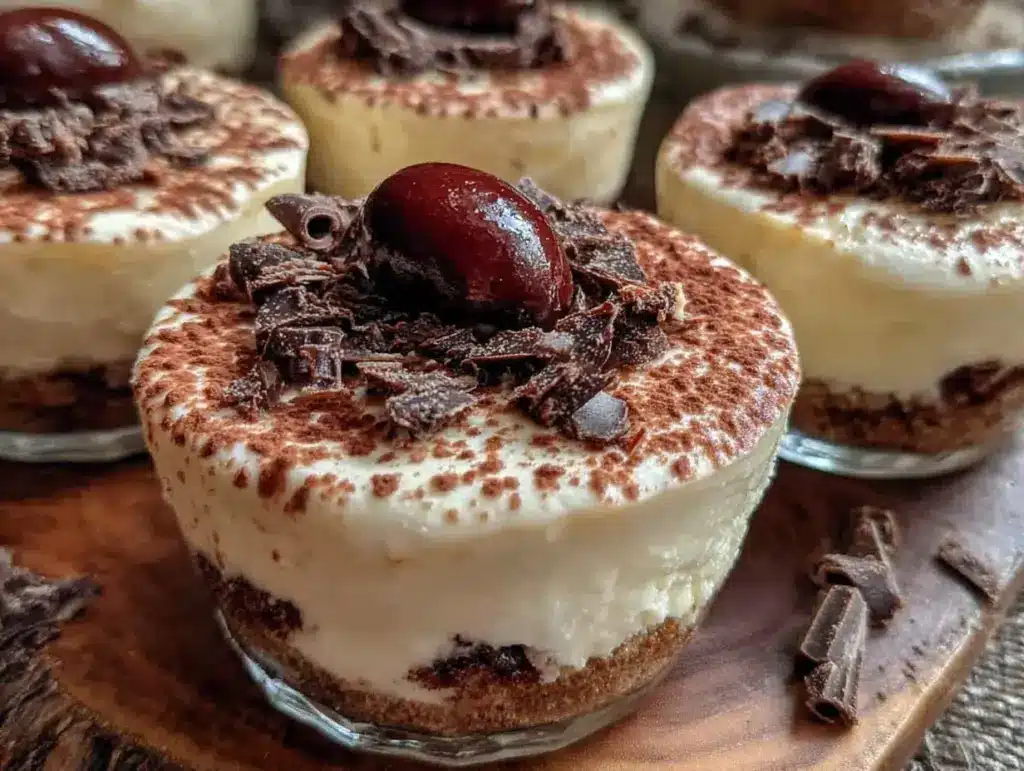
No-Bake Tiramisu Cheesecake Cups
- Total Time: 4 hours 20 minutes
- Yield: 6 servings 1x
Description
A creamy, rich, and easy no-bake dessert combining classic tiramisu flavors with a cheesecake texture, served in individual cups for effortless elegance.
Ingredients
- About 24 ladyfingers
- 8 oz (225g) mascarpone cheese
- 4 oz (115g) cream cheese, softened
- 1 cup (240ml) heavy cream, chilled
- 3/4 cup (90g) powdered sugar
- 1 cup (240ml) espresso or strong brewed coffee, cooled
- 1 teaspoon vanilla extract
- Unsweetened cocoa powder, for dusting
- Optional: 2 tablespoons coffee liqueur
Instructions
- Prepare the espresso soak by brewing 1 cup of strong espresso or coffee and let it cool completely. Stir in 2 tablespoons of coffee liqueur if using. Pour into a shallow bowl for dipping ladyfingers.
- In a large bowl, beat mascarpone cheese and softened cream cheese until smooth. Add powdered sugar and vanilla extract, mixing until combined.
- In a separate chilled bowl, whip heavy cream until stiff peaks form. Gently fold whipped cream into the cheese mixture until light and fluffy.
- Quickly dip each ladyfinger into the espresso soak for 1-2 seconds, avoiding sogginess. Break in half if needed to fit cups. Place a layer of dipped ladyfingers at the bottom of each cup.
- Spoon or pipe a generous layer of the creamy filling over the ladyfingers. Repeat with another layer of dipped ladyfingers and top with another layer of filling, smoothing the top.
- Cover cups with plastic wrap and refrigerate for at least 4 hours or preferably overnight to let flavors meld and filling set.
- Just before serving, dust the tops generously with unsweetened cocoa powder using a sifter or fine mesh strainer.
Notes
Do not over-soak ladyfingers to avoid sogginess. Use full-fat mascarpone and cream cheese for best creaminess. Chill mixing bowl and beaters before whipping cream. Fold whipped cream gently into cheese mixture to keep it airy. Assemble the night before for best flavor. Optional coffee liqueur adds boozy depth. Dust cocoa powder just before serving.
- Prep Time: 20 minutes
- Cook Time: 0 minutes
- Category: Dessert
- Cuisine: Italian
Nutrition
- Serving Size: 1 cup (approximately
- Calories: 410
- Sugar: 22
- Sodium: 150
- Fat: 28
- Saturated Fat: 17
- Carbohydrates: 32
- Protein: 7
Keywords: no-bake tiramisu, cheesecake cups, easy dessert, creamy dessert, tiramisu recipe, no oven dessert, individual servings, coffee dessert