Two years ago, I found myself scrambling just hours before a Memorial Day barbecue, armed with little more than a box of Oreos and a vague idea to make something festive. I was tired of the usual pies and cupcakes crowding the dessert table, and honestly, I didn’t want to turn on the oven in the May heat. That’s when this no-bake patriotic Oreo cheesecake came together almost by accident.
I mixed crushed Oreos with cream cheese and layered them with vibrant red and blue berries, creating a dessert that looked like a miniature American flag and tasted like pure indulgence. It was a hit—not just because it was easy, but because it felt fun and fitting for the holiday. Since then, this no-bake patriotic Oreo cheesecake has become my go-to Memorial Day dessert. I’ve made it at family cookouts, friend gatherings, and even for a casual Fourth of July picnic. It’s always a crowd-pleaser, and the best part? No oven required, so you stay cool while everyone else’s kitchens heat up.
Here’s the thing about this cheesecake: it’s ridiculously easy, doesn’t require fancy ingredients, and you can prep it ahead of time so you’re not stuck in the kitchen when guests arrive. I’ve tested this recipe more than a dozen times, tweaking the berry layers and Oreo crust until it’s just right—creamy, crunchy, and bursting with patriotic charm.
Why You’ll Love This No-Bake Patriotic Oreo Cheesecake Recipe
This no-bake patriotic Oreo cheesecake has seriously changed the way I think about holiday desserts. Instead of stressing over baking times and complicated decorations, I just whip this up and relax.
- Super Simple Prep — If you can crush cookies, mix cream cheese, and arrange berries, you’re all set. I once made this while juggling a toddler and a ringing phone (don’t ask), and it still turned out perfect.
- No Oven Needed — Memorial Day often means warm weather and outdoor fun. This recipe lets you skip the oven heat, keeping your kitchen cool and your stress low.
- Visually Impressive — The red, white, and blue layers make a statement without any fancy piping or frosting skills. Guests always ask how you made it look so festive.
- Make-Ahead Friendly — Prepare it a day in advance and let it chill. The flavors meld beautifully, and you free up your holiday to focus on grilling or relaxing.
- Kid-Approved — My kids love the Oreo crust and the creamy filling. The berries add a fresh touch that even picky eaters don’t mind.
- Versatile for Other Occasions — While perfect for Memorial Day, this cheesecake also shines at Fourth of July parties, summer birthdays, or anytime you want a patriotic touch.
Honestly, this dessert has saved many of my holiday gatherings from becoming chaotic. It’s quick, delicious, and a guaranteed conversation starter. If you’re looking for a dessert that’s as fun to make as it is to eat, this no-bake patriotic Oreo cheesecake is it.
Ingredients You’ll Need
Here’s the best part about this no-bake patriotic Oreo cheesecake: most of the ingredients are pantry basics or easy to find, and the rest are fresh, simple add-ins that bring the colors and flavors to life. I’m picky about the Oreos and cream cheese brands here, and I’ll tell you why.
- Oreos (24 cookies / about 14 ounces) — You’ll crush these for the crust, so regular Oreos work best. Double Stuff is tempting, but the filling can make the crust too soft. I always keep a pack of Nabisco original Oreos in my pantry.
- Unsalted Butter (5 tablespoons / 70g, melted) — This binds the crust perfectly. Unsalted gives you control over salt levels, so the crust doesn’t taste overly salty.
- Cream Cheese (16 ounces / 450g, softened) — Full-fat cream cheese is a must. It makes the filling rich and creamy. I always let it sit out for 30 minutes before mixing to avoid lumps.
- Powdered Sugar (3/4 cup / 90g) — Smooth sweetness that blends easily. I sift mine to avoid clumps.
- Vanilla Extract (1 teaspoon) — Adds warm depth to the filling. Use pure vanilla if you can—it makes a difference.
- Heavy Whipping Cream (1 cup / 240ml) — For that light, fluffy texture. Cold cream whips best, so chill your bowl and beaters beforehand if you can.
- Fresh Strawberries (1 1/2 cups / about 225g, sliced) — The red layer. Choose ripe, sweet berries for the best flavor.
- Fresh Blueberries (1 1/2 cups / about 225g) — The blue layer. Fresh or frozen works, but fresh is prettier and less watery.
- Optional: Fresh Mint Leaves — For garnish and a pop of green, if you want to get fancy.
Pro tip: If you want to keep things super simple, you can skip the mint. But if you want to pair this cheesecake with a refreshing drink, you might love my cold brew iced coffee with vanilla sweet cream—it’s a perfect match for creamy desserts.
Equipment Needed
You don’t need fancy gadgets for this no-bake patriotic Oreo cheesecake. Here’s what I use every time:
- 9-inch Springform Pan — Makes it easy to remove the cheesecake without ruining the edges. If you don’t have one, a regular pie dish works but the sides won’t be as clean.
- Mixing Bowls — At least two: one for the crust, one for the filling. I use glass or stainless steel.
- Electric Mixer — A hand mixer works fine, but a stand mixer saves your wrists when whipping cream.
- Food Processor or Plastic Bag + Rolling Pin — To crush the Oreos. I’ve done it both ways; food processors are faster, but the rolling pin method works perfectly if you’re in a pinch.
- Rubber Spatula — For scraping down the bowl and folding in the whipped cream gently.
- Measuring Cups and Spoons — Standard stuff, but accurate measurements help the texture.
Quick note: I once tried making this in a regular cake pan and had a heck of a time unmolding it. The springform pan is worth the investment if you plan to make cheesecakes often.
How to Make No-Bake Patriotic Oreo Cheesecake: Step-by-Step

Alright, let’s get into the fun part. Making this no-bake patriotic Oreo cheesecake is straightforward, but there are a few little tricks that make it foolproof. I’m walking you through everything I do, including how to get the berry layers looking just right.
Step 1: Make the Oreo Crust (10 minutes)
Start by crushing your Oreos. I pulse them in my food processor until finely ground, but you can put them in a sealed plastic bag and crush with a rolling pin if needed. Pour the crumbs into a bowl and add the melted butter. Stir until the mixture feels like wet sand.
Press the crust mixture firmly and evenly into the bottom of your 9-inch springform pan. I use the bottom of a glass to pack it down tight. Pop it in the fridge for at least 15 minutes to set while you make the filling.
Step 2: Whip the Cream Cheese Filling (10 minutes)
In a large bowl, beat the softened cream cheese until smooth and creamy—no lumps! Add the powdered sugar and vanilla extract, then mix again until fully combined.
In a separate chilled bowl, whip the heavy cream until stiff peaks form. This means when you lift the beaters, the cream holds its shape without drooping.
Gently fold the whipped cream into the cream cheese mixture with a spatula. The folding technique is important here: you want to keep it light and fluffy, not deflate the whipped cream. Take your time.
Step 3: Assemble the Layers (10-15 minutes)
Pour about half of the cream cheese filling over the chilled Oreo crust and spread it evenly.
Arrange your sliced strawberries neatly to cover the white filling completely—this creates the red layer of your patriotic flag.
Add the remaining cream cheese filling over the strawberries, smoothing it out carefully so the berries don’t get disturbed.
Top with fresh blueberries, spreading them evenly for the blue layer. You want nice, full coverage here to get that striking red, white, and blue look.
Step 4: Chill and Set (4+ hours)
Cover the cheesecake loosely with plastic wrap and refrigerate for at least four hours, preferably overnight. This lets everything set perfectly and the flavors meld together.
Before serving, run a knife along the edges of the springform pan to loosen, then gently release the sides.
Optional: Garnish with fresh mint leaves for a touch of green contrast and a fresh aroma.
Step 5: Serve and Enjoy
Slice with a sharp knife dipped in hot water for cleaner cuts. The crust should be firm and crunchy, the filling creamy and smooth, and the berries fresh and vibrant.
Serve chilled and watch the compliments roll in!
Expert Tips & Tricks for the Perfect No-Bake Oreo Cheesecake
After making this cheesecake dozens of times, here’s what I’ve learned:
- Don’t skip chilling the crust: If you don’t let the Oreo crust firm up before adding the filling, it’ll crumble when you slice.
- Use full-fat cream cheese and cream: Low-fat versions won’t set properly and can make the cheesecake watery.
- Be gentle folding in whipped cream: Overmixing deflates the air and you lose that fluffy texture.
- Choose ripe berries: They don’t just look pretty—they add sweetness and balance the richness.
- Make ahead: This cheesecake actually tastes better the next day when the flavors have had time to marry.
- For cleaner slices: Warm your knife under hot water and wipe it dry before slicing each piece.
- Try layering variations: For a twist, I sometimes add a layer of crushed Oreos on top before the blueberries for extra crunch.
If you want to turn this into a full Memorial Day feast, pairing it with my grilled street corn with cotija cheese or deviled eggs with crispy bacon will make your celebration complete.
Variations & Substitutions
Once you’ve nailed the classic no-bake patriotic Oreo cheesecake, here’s how to mix things up:
- Berry swap — Use raspberries instead of strawberries for a slightly tart red layer.
- Chocolate twist — Add mini chocolate chips into the cream cheese filling for an extra surprise bite.
- Gluten-free option — Use gluten-free chocolate sandwich cookies for the crust.
- Vegan adaptation — Try dairy-free cream cheese and coconut cream, and use dairy-free sandwich cookies. It’s not exactly the same, but surprisingly good.
- Mini cheesecakes — Make individual servings in mason jars or silicone molds for easy portioning and portability.
I’ve also played with adding a drizzle of salted caramel on top for a decadent finish, but that’s a whole other level of indulgence.
Serving & Storage
Serving: This cheesecake shines straight from the fridge. I like to set it out 10 minutes before serving so it’s not too cold, which helps the flavors pop. Pair it with fresh coffee or a refreshing iced drink (like my strawberry lemonade slushie) for the ultimate summer vibe.
Storage: Keep leftovers in an airtight container or cover the springform pan tightly with plastic wrap. It will last 3-4 days in the fridge, but honestly, it never lasts that long in my house.
Reheating: Cheesecake is best served cold, so I don’t recommend reheating. If it’s too firm, just let it sit at room temperature for 10-15 minutes before slicing.
Freezing: You can freeze this cheesecake, but the texture of the cream cheese filling might change slightly. Wrap tightly in plastic wrap and foil, freeze for up to 1 month, and thaw overnight in the fridge.
Nutrition Information
I’m not a nutritionist, but here’s a rough idea per serving (based on 12 slices):
| Nutrient | Amount |
|---|---|
| Calories | 320 |
| Protein | 5g |
| Carbohydrates | 32g |
| Fiber | 1g |
| Sugar | 22g |
| Fat | 18g |
| Saturated Fat | 10g |
| Cholesterol | 55mg |
| Sodium | 210mg |
| Calcium | 90mg |
This dessert is definitely a treat, with richness from cream cheese and heavy cream balanced by fresh fruit. For a lighter option, try reducing the sugar or swapping some heavy cream for Greek yogurt (though it will alter texture).
Final Thoughts
So that’s my no-bake patriotic Oreo cheesecake—easy, festive, and downright delicious. I’ve probably talked your ear off, but when a recipe becomes a holiday staple like this one, there’s a lot to share. It’s saved me on hectic Memorial Days, kept me out of a hot kitchen, and brought smiles to every gathering.
Make it yours! Experiment with berry combinations, add a little extra Oreo crunch, or keep it classic. This cheesecake is all about celebrating with good food and good company.
If you try it, drop a comment below and tell me how it went. I love hearing your stories, and if you hit any snags, I’m here to help you troubleshoot. Happy Memorial Day, and may your dessert table be as joyful as your celebrations!
Frequently Asked Questions
Q: Can I make this no-bake cheesecake ahead of time?
A: Absolutely! In fact, it tastes better after chilling overnight. Just cover it tightly and keep it refrigerated until ready to serve. It’s perfect for prepping the day before your Memorial Day cookout.
Q: Can I use frozen berries for the layers?
A: You can, but frozen berries may release extra liquid and make the layers less firm. If you must use frozen, thaw and drain them thoroughly on paper towels first.
Q: What if I don’t have a springform pan?
A: A regular pie dish or cake pan will work, but the sides won’t come off cleanly. You might have to serve it like a pie, scooping it out with a spatula.
Q: Can I substitute the Oreos with another cookie?
A: Sure! Chocolate wafer cookies or even graham crackers can be used, but the classic Oreo crust really gives this cheesecake its distinctive flavor.
Q: How do I avoid the filling being too soft?
A: Make sure your cream cheese is fully softened and whip your heavy cream to stiff peaks. Also, folding gently keeps the texture light but firm. Chilling for at least 4 hours is crucial.
Q: Can I double this recipe for a bigger crowd?
A: Yes! Just double the ingredients and use a larger pan or two pans. The chilling time stays the same. I’ve done this for family reunions and it works great.
Q: How do I keep the crust from getting soggy?
A: Pressing the crust firmly and chilling it before adding the filling helps. Also, avoid letting the cheesecake sit out too long at room temperature before serving.
Pin This Recipe!


No-Bake Patriotic Oreo Cheesecake
- Total Time: 4 hours 20 minutes
- Yield: 12 servings 1x
Description
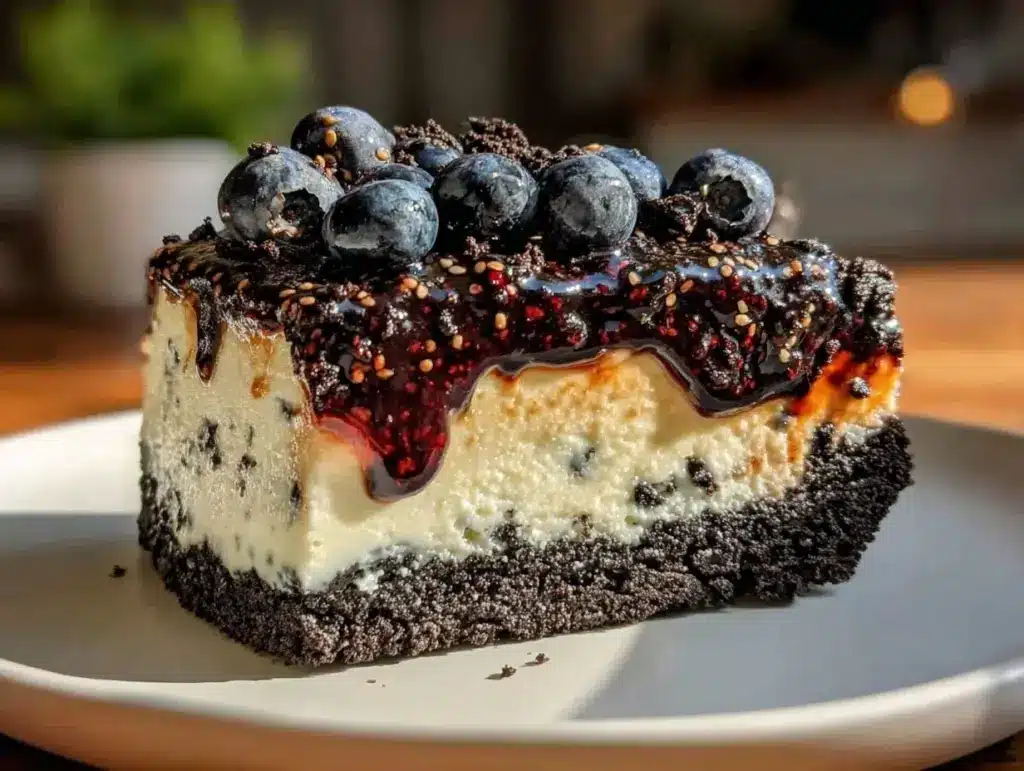
An easy, no-bake cheesecake featuring a crunchy Oreo crust and creamy filling layered with fresh strawberries and blueberries for a festive Memorial Day dessert.
Ingredients
- 24 Oreos (about 14 ounces)
- 5 tablespoons unsalted butter, melted (70g)
- 16 ounces full-fat cream cheese, softened (450g)
- 3/4 cup powdered sugar (90g)
- 1 teaspoon vanilla extract
- 1 cup heavy whipping cream (240ml)
- 1 1/2 cups fresh strawberries, sliced (about 225g)
- 1 1/2 cups fresh blueberries (about 225g)
- Optional: fresh mint leaves for garnish
Instructions
- Crush Oreos finely using a food processor or place in a sealed plastic bag and crush with a rolling pin.
- Mix crushed Oreos with melted butter until mixture feels like wet sand.
- Press the crust mixture firmly and evenly into the bottom of a 9-inch springform pan. Chill in the refrigerator for at least 15 minutes.
- In a large bowl, beat softened cream cheese until smooth and creamy.
- Add powdered sugar and vanilla extract to the cream cheese and mix until fully combined.
- In a separate chilled bowl, whip heavy cream until stiff peaks form.
- Gently fold whipped cream into the cream cheese mixture, keeping it light and fluffy.
- Pour half of the cream cheese filling over the chilled Oreo crust and spread evenly.
- Arrange sliced strawberries evenly over the filling to create the red layer.
- Add the remaining cream cheese filling over the strawberries, smoothing carefully.
- Top with fresh blueberries evenly to create the blue layer.
- Cover loosely with plastic wrap and refrigerate for at least 4 hours or overnight to set.
- Before serving, run a knife along the edges of the springform pan to loosen and gently remove the sides.
- Optional: Garnish with fresh mint leaves.
- Slice with a sharp knife dipped in hot water for clean cuts and serve chilled.
Notes
Use full-fat cream cheese and heavy cream for best texture. Chill crust before adding filling to prevent crumbling. Fold whipped cream gently to keep filling light and fluffy. For cleaner slices, dip knife in hot water before cutting. Can be made a day ahead and tastes better after chilling overnight.
- Prep Time: 20 minutes
- Cook Time: 0 minutes
- Category: Dessert
- Cuisine: American
Nutrition
- Serving Size: 1 slice (1/12th of c
- Calories: 320
- Sugar: 22
- Sodium: 210
- Fat: 18
- Saturated Fat: 10
- Carbohydrates: 32
- Fiber: 1
- Protein: 5
Keywords: no-bake cheesecake, Oreo cheesecake, Memorial Day dessert, patriotic dessert, easy cheesecake, berry cheesecake