It was 6:30 PM on a Tuesday, and I was staring into the abyss of my pantry. You know the look. It’s that specific mix of hunger, exhaustion, and mild panic that hits right when the kids realize dinner isn’t ready and you’re too tired to actually cook it. My husband was asking if we could order pizza (again), and I was mentally calculating how many clean plates I’d have to wash if I just threw some cereal on the table.
Then I saw it. A half-eaten bag of oats, a jar of peanut butter that had hardened into a brick, and a bag of chocolate chips that had survived a summer heatwave in the garage. I had nothing else. No chicken, no pasta, no vegetables that weren’t turning to mush in the crisper drawer.
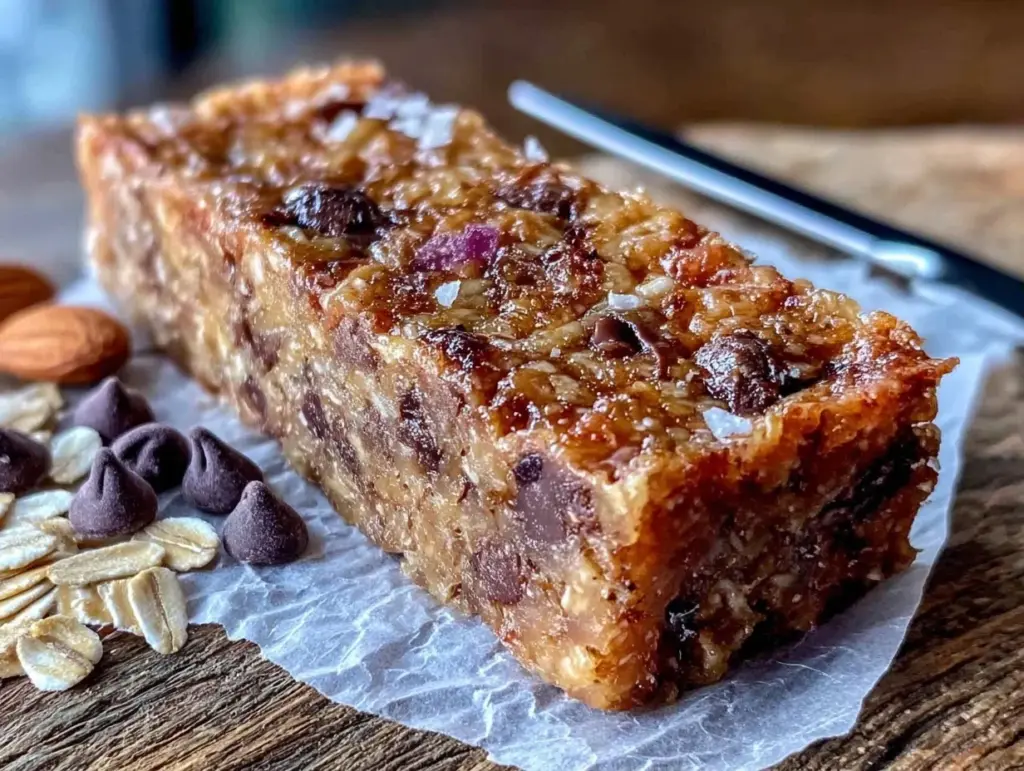
So I did what any desperate parent does. I made these Easy No-Bake Chocolate Chip Granola Bars. I didn’t plan it. I didn’t look up a recipe. I just melted everything together, pressed it into a pan, and hoped for the best. Two hours later, when they firmed up in the fridge, I cut a square and took a bite. It was chewy, salty, sweet, and somehow… perfect.
That accidental Tuesday dinner turned into a weekly ritual. We call them “emergency bars” now, though they’re far from an emergency. They’ve become the backbone of our snack rotation. My daughter packs them in her lunchbox (they survive the backpack crush better than anything else). My husband eats them straight from the fridge at 10 PM. I eat them while standing at the kitchen counter because I need sugar and silence.
The best part? They take zero baking skills. No oven, no timer, no messy dishes except for one pot and one pan. I’ve made this recipe at least forty times in the last year, tweaking the ratios until I got it exactly right. It’s my go-to when I want something homemade but don’t have the energy to turn on the stove for forty minutes. And honestly? They taste way better than the store-bought kind, which are usually just sugar and regret.
Why You’ll Love This Recipe
I’m not exaggerating when I say these bars have saved my sanity more times than I can count. There are a few reasons they’ve stuck around in my rotation, but let’s be real: it’s mostly because they’re ridiculously easy and actually taste good.
Zero Oven Required — Seriously. If you have a stovetop and a fridge, you can make this. I’ve made these in July when my kitchen was 85 degrees and I refused to turn on the oven. You don’t need a pastry bag or a candy thermometer. Just melt, mix, press, chill.
Ready in 15 Minutes (Plus Chill Time) — The active time is basically nothing. You’re just stirring stuff together. The rest happens while you’re doing something else. I usually start these while the kids are doing homework or watching a show. By the time they’re done, the bars are set. It’s the perfect low-effort, high-reward snack.
Pantry Staples Only — You probably have 90% of this already. Oats? Check. Peanut butter? Check. Chocolate chips? Check. Honey or syrup? Check. This isn’t a recipe where you need to run to the store for three obscure ingredients you’ll use once. It’s built for real life.
Customizable Chaos — I love that this recipe is a blank canvas. Hate chocolate chips? Use dried cranberries. Want more protein? Add seeds. Your kids are picky? Hide some chopped nuts in there. I’ve made these with everything from crushed pretzels to coconut flakes. It’s forgiving and flexible.
Meal Prep Friendly — I make a double batch every Sunday. They keep in the fridge for two weeks, or I freeze half of them for later. Having a container of these ready to grab means I’m not resorting to chips or crackers when the 3 PM slump hits. It’s a game-changer for busy weeknights.
This is my answer to “what’s a healthy snack?” that doesn’t involve cutting an apple into ten tiny pieces. It’s satisfying, it’s sweet, and it’s genuinely good for you (mostly oats and peanut butter, right?).
Ingredients You’ll Need
Here’s the thing about no-bake bars: the quality of your ingredients matters more than you think. Since there’s no baking to mask flavors, you taste everything. I’m particular about three things here, and I’ll tell you exactly why.
For the Base
Rolled Oats (3 cups / 270g) — Use old-fashioned rolled oats. I know quick oats exist, but they turn this into a mushy paste. You need the chew. If you can’t find rolled oats, you can pulse quick oats in a blender for a few seconds to break them up, but don’t overdo it. I use Quaker brand because it’s consistent, but any plain rolled oats work.
Peanut Butter (1 cup / 250g) — This is the glue. Use creamy peanut butter. Natural peanut butter (the kind where the oil separates) can work, but you have to mix it really well so it’s smooth, or your bars might be crumbly. I don’t recommend almond butter as a 1:1 swap here because it’s thinner and harder to bind, though it does taste amazing if you want to try it.
Honey (½ cup / 150ml) — Honey gives that nice, sticky chewiness. Maple syrup works too, but the bars will be softer. I use regular honey because it holds up better in the fridge. If you’re dairy-free, just make sure your honey is vegan-friendly (some filters use bone char, though that’s rare).
Butter (½ cup / 115g, unsalted) — This adds richness and helps everything bind. Don’t skip it. If you need it dairy-free, use a high-quality plant-based butter that melts well. Margarine works in a pinch, but real butter tastes better.
For the Flavor

Vanilla Extract (1 teaspoon) — Pure vanilla, please. I’ve tried the imitation stuff, and it tastes chemical. It’s a small amount, but it makes a huge difference in the flavor profile.
Salt (½ teaspoon) — Essential. The salt cuts through the sweetness of the honey and chocolate. Don’t skip it, even if you’re watching sodium. A little goes a long way.
Chocolate Chips (1 cup / 170g) — Semi-sweet or milk chocolate. I prefer semi-sweet because it’s not too sugary, but use whatever your family likes. I’ve used dark chocolate chips too, and they’re delicious but a bit more bitter. Pro tip: Chop up a chocolate bar instead of using chips if you want bigger, melty chunks.
Optional Add-ins — I love adding ½ cup of mini M&Ms for a pop of color, or ½ cup of crushed pretzels for a salty crunch. Dried cranberries or chopped nuts (walnuts or pecans) also work great. I keep a bag of walnuts in the pantry specifically for this recipe.
Equipment Needed
You don’t need fancy gadgets for this. Here’s what I actually use in my kitchen:
Large Saucepan — I use a 3-quart saucepan. It needs to be big enough to hold all the melted ingredients without spilling over when you add the oats. A non-stick pan is nice because cleanup is easier, but any heavy-bottomed pan works.
8×8 Inch Baking Pan — This is the standard size. You can use a 9×9 if you want thinner bars, but they’ll be harder to lift out. Line it with parchment paper! Seriously. Parchment paper is your best friend here. It makes lifting the bars out and cutting them so much easier.
Wooden Spoon or Silicone Spatula — For stirring. You need something sturdy to mix the thick peanut butter and oat mixture. A spoon works fine.
Measuring Cups and Spoons — Standard stuff. I measure my oats by spooning them into the cup, not scooping, to avoid packing them down. It’s a small detail, but it helps with consistency.
Sharp Knife — For cutting the bars. Use a chef’s knife or a serrated bread knife. If your bars are sticky, dip the knife in hot water and wipe it dry between cuts. It makes for clean slices.
How to Make It: Step-by-Step
Alright, let’s make these! It’s seriously this simple. I’m walking you through exactly how I do it, including the little tricks I’ve picked up over the years.
Step 1: Prep Your Pan
Line your 8×8 inch baking pan with parchment paper. Leave a little overhang on the sides like a sling—this is crucial for lifting the bars out later. I usually spray the parchment with a little cooking spray so the butter doesn’t stick to it. Set aside.
Step 2: Melt the Wet Ingredients
In your large saucepan, combine the butter, honey, and peanut butter. Turn the heat to medium-low. This is key. If the heat is too high, the honey can burn or the peanut butter can seize up. Stir constantly. It takes about 3-4 minutes. The mixture will start to bubble gently. Keep stirring until everything is smooth and combined. It should look glossy and uniform. Don’t rush this step.
Step 3: Remove from Heat and Add Vanilla
Once the mixture is smooth and melted, take the pan off the heat immediately. Stir in the vanilla extract and salt. If you add vanilla while it’s still on the heat, it can evaporate and lose flavor. Off heat is best. Mix it in quickly.
Step 4: Fold in the Oats and Chocolate
Add the rolled oats and chocolate chips to the wet mixture. This is where you need to work fast. The mixture will start to cool and thicken. Use your wooden spoon or spatula to fold everything together. You want every oat to be coated. It might look like a mess at first, but keep folding. It’ll come together. If it’s too stiff to stir, you can put it back on low heat for 30 seconds, but usually, the residual heat is enough.
Step 5: Press into the Pan
Transfer the mixture to your prepared pan. Here’s the trick: wet your hands with a little water or oil. Use your fingers to press the mixture down firmly. Don’t be gentle. You want it packed tight. If it’s loose, the bars will crumble. Press every corner and edge. You can also use the bottom of a measuring cup to smooth it out evenly.
Step 6: Chill
Place the pan in the fridge. You need at least 2 hours for them to set completely. If you’re impatient (like me), you can put them in the freezer for 45 minutes, but the fridge is more even. Do not skip this step. If you try to cut them warm, they’ll be a sticky mess.
Step 7: Cut and Serve
Once set, lift the bars out using the parchment sling. Place them on a cutting board. Use a sharp knife to cut into squares or rectangles. I like to cut them into 12 bars. Store them in an airtight container in the fridge.
Expert Tips & Tricks
Here’s everything I’ve learned from making these dozens of times. These tips will save you from my mistakes.
Pack It Tight
The #1 reason no-bake bars fail is that they’re too loose. When you press them into the pan, press hard. Imagine you’re trying to crush a bug. The denser you pack it, the better they hold together. I’ve made loose batches that fell apart in lunchboxes. Never again.
Don’t Overheat the Honey
Honey burns easily. Keep the heat on medium-low. If you see dark bubbles or smell a burnt scent, you’ve gone too far. It’s better to take it slow. If the mixture looks separated, it’s usually just because it cooled too fast. Keep stirring.
Use Mini Chocolate Chips
Regular chocolate chips can be too big and uneven. Mini chips distribute better and make every bite chocolatey. If you only have regular chips, chop them up a bit. I always keep a bag of mini chips in the pantry for this.
Wet Your Knife
Cutting sticky bars can be frustrating. Dip your knife in hot water and wipe it dry before each cut. The heat helps the knife glide through the chocolate and oats without dragging. It makes for clean, pretty edges.
Storage is Key
These bars are best stored in the fridge. They’ll get hard in the freezer, which I like, but they’re easier to eat cold from the fridge. If you leave them on the counter in summer, they’ll melt into a puddle. Keep them cool.
Variations & Substitutions
Once you’ve nailed the basic version, here’s how you can mix it up. I’ve tried all of these, and they’re all winners.
Almond Butter Version
Swap the peanut butter for almond butter. It tastes more sophisticated and less sweet. Note: Almond butter is thinner, so you might need to add an extra ¼ cup of oats to get the right consistency.
Trail Mix Bars
Add ½ cup of raisins, ½ cup of dried cranberries, and ½ cup of chopped walnuts. This is my favorite for hiking snacks. It’s packed with energy and doesn’t need refrigeration if you’re eating it within a day or two.
White Chocolate Macadamia
Use white chocolate chips and macadamia nuts instead of dark chocolate and peanuts. It’s sweeter and richer. Great for special occasions or when you want something more indulgent.
Gluten-Free
Just use certified gluten-free oats. The rest of the ingredients are naturally gluten-free. I’ve used Bob’s Red Mill GF oats and they work perfectly. Be careful with your chocolate chips—some brands have wheat starch. Check the label.
Vegan
Use maple syrup instead of honey, plant-based butter, and vegan chocolate chips. It works great. I use Enjoy Life chocolate chips because they’re dairy-free and nut-free.
Pretzel Crunch
Add ½ cup of crushed pretzels to the oat mixture. The salty crunch pairs amazingly with the sweet chocolate. It’s like a salty-sweet candy bar.
Protein Boost
Add 2 scoops of vanilla protein powder. Note: This will make the mixture drier, so you might need to add an extra tablespoon of honey or peanut butter to bind it. It’s great for post-workout snacks.
Serving & Storage
How to Serve:
I usually serve these straight out of the fridge. They’re firm and satisfying. I like to pair them with a glass of cold milk or a cup of coffee. They’re also great for lunchboxes—just wrap them in wax paper or put them in a small container. They don’t crumble if packed tight.
Side Dishes:
These are a snack or breakfast on their own, but they go well with:
– Greek yogurt with berries
– A piece of fruit (apple slices or banana)
– A glass of milk or smoothie
– Sometimes I eat one with a slice of peach butter toast for a sweet breakfast.
Storage Instructions:
Refrigerator: Store in an airtight container for up to 2 weeks. Layer them with parchment paper if you stack them so they don’t stick together.
Freezer: These freeze beautifully. Wrap individual bars in plastic wrap and put them in a freezer bag. They’ll last for 3 months. Thaw in the fridge for 30 minutes before eating.
Counter: Only if your house is cool. They’ll melt in the heat. I don’t recommend leaving them out for more than a day.
Reheating:
You don’t need to reheat these. They’re best cold. If they’re too hard from the freezer, let them sit at room temperature for 10 minutes.
Nutrition Information
I’m not a nutritionist, but here’s the breakdown if you’re tracking. Keep in mind that this is a snack, not a meal, so portion control is key.
Per Bar (makes 12 bars):
– Calories: 220
– Protein: 6g
– Carbs: 28g
– Fiber: 3g
– Sugar: 16g
– Fat: 11g
– Saturated Fat: 5g
– Sodium: 120mg
What’s Good:
– Good source of fiber from oats
– Protein from peanut butter
– No baked goods, so less processed
– Customizable to add more nutrients (nuts, seeds)
What to Know:
– High in sugar from honey and chocolate
– Contains peanuts (allergy warning)
– Calorie-dense due to nuts and oils
– Moderate sodium
My Take:
Look, this is a sweet treat. It’s not a salad. But it’s better than a candy bar, and it has real ingredients. When I want to make it healthier, I reduce the chocolate chips and add more nuts. But usually? I just enjoy one bar as a snack and move on.
Final Thoughts
So that’s my go-to Easy No-Bake Chocolate Chip Granola Bars! I’ve probably talked your ear off at this point, but when you make a recipe this often, you have a lot to say about it. These bars have saved me on lazy nights, packed lunches, and emergency snack situations. They’re reliable, delicious, and ridiculously easy.
This has been my answer to “what’s a healthy snack?” for years. It’s satisfying, it’s sweet, and it’s genuinely good for you. My kids are happy, my husband’s happy, and I’m happy because I’m not stressed about cooking.
Make it yours! Try different add-ins, swap in your favorite nuts, adjust the sweetness. The best recipes are the ones you adapt to your family’s tastes. If you make these, drop a comment and let me know what you think! I love hearing how recipes turn out in your kitchen.
Happy cooking! And I hope your kitchen smells half as good as mine does right now.
Frequently Asked Questions
Q: Can I use quick oats instead of rolled oats?
A: You can, but the texture will be different. Quick oats are smaller and more processed, so your bars will be softer and less chewy. If you must use them, pulse them in a blender for a few seconds to break them up a bit, but rolled oats are definitely better for structure.
Q: Why are my bars crumbly?
A: This usually happens for two reasons. Either you didn’t press them down tightly enough into the pan, or the mixture cooled too much before you pressed it. Make sure to pack it firmly, and if it’s too stiff to mix, put it back on low heat for a minute to soften it up.
Q: Can I freeze these bars?
A: Yes! They freeze really well. Wrap each bar individually in plastic wrap or wax paper, then put them in a freezer bag. They’ll last for up to 3 months. Thaw them in the fridge for 30 minutes before eating. I freeze a batch every time I make them so I have snacks ready to go.
Q: Can I substitute honey with maple syrup?
A: You can, but the bars will be softer and stickier. Maple syrup has more water content than honey, so it doesn’t bind as well. If you use maple syrup, you might need to chill the bars longer or add a bit more oats. I prefer honey for the chewy texture.
Q: Can I make these nut-free?
A: Yes! Swap the peanut butter for sunflower seed butter (SunButter) or soy nut butter. Make sure your chocolate chips are also nut-free. I use Enjoy Life chips for this. They work perfectly and taste great.
Q: How long do these last in the fridge?
A: Up to 2 weeks in an airtight container. After that, they might start to dry out or get too hard. If you want them to last longer, freeze them. I’ve had them last 3 weeks, but they’re best within the first two.
Q: Can I add protein powder?
A: Yes, but it changes the texture. Protein powder absorbs moisture, so the mixture will be drier. Start with 2 scoops and see how it mixes. You might need to add an extra tablespoon of honey or peanut butter to get it to bind. It’s a great way to boost protein, but the bars will be denser.
Q: Can I use dark chocolate chips?
A: Absolutely. I love using semi-sweet or dark chocolate chips. They’re less sweet and pair nicely with the salty peanut butter. If you use dark chocolate, you might want to reduce the honey slightly, but it’s not necessary. It’s all personal preference.
Pin This Recipe!


Easy No-Bake Chocolate Chip Granola Bars
- Total Time: 2 hours 15 minutes
- Yield: 12 servings 1x
Description
These easy no-bake granola bars are the perfect healthy snack made with pantry staples like oats, peanut butter, and chocolate chips. They require zero baking skills, are ready in minutes, and can be customized with various add-ins.
Ingredients
- 3 cups rolled oats
- 1 cup creamy peanut butter
- 1/2 cup honey
- 1/2 cup unsalted butter
- 1 teaspoon vanilla extract
- 1/2 teaspoon salt
- 1 cup chocolate chips (semi-sweet or milk)
Instructions
- Line an 8×8 inch baking pan with parchment paper, leaving an overhang on the sides for easy removal.
- In a large saucepan over medium-low heat, combine the butter, honey, and peanut butter. Stir constantly for 3-4 minutes until the mixture is smooth, glossy, and combined.
- Remove the pan from the heat and immediately stir in the vanilla extract and salt.
- Add the rolled oats and chocolate chips to the wet mixture. Fold everything together quickly until every oat is coated. If the mixture becomes too stiff, return to low heat for 30 seconds.
- Transfer the mixture to the prepared pan. Wet your hands with water or oil and press the mixture firmly and tightly into the pan to ensure the bars hold together.
- Refrigerate for at least 2 hours (or freeze for 45 minutes) until the bars are completely set.
- Lift the bars out of the pan using the parchment paper sling. Use a sharp knife dipped in hot water and wiped dry to cut into 12 bars.
- Store in an airtight container in the refrigerator.
Notes
For best results, press the mixture tightly into the pan to prevent crumbling. Use mini chocolate chips for better distribution. If using almond butter, add an extra 1/4 cup of oats as it is thinner. For gluten-free, use certified gluten-free oats. For vegan, substitute honey with maple syrup and butter with plant-based butter.
- Prep Time: 15 minutes
- Cook Time: 0 minutes
- Category: Snack
- Cuisine: American
Nutrition
- Serving Size: 1 bar
- Calories: 220
- Sugar: 16
- Sodium: 120
- Fat: 11
- Saturated Fat: 5
- Carbohydrates: 28
- Fiber: 3
- Protein: 6
Keywords: no-bake, granola bars, healthy snack, peanut butter, chocolate chip, oat bars, meal prep, easy recipe