One rainy Saturday afternoon, I found myself craving something that felt like a warm hug but with a little kick—something sticky, crispy, and bursting with flavor. I’d been scrolling through cookbooks and food blogs, but nothing quite hit the spot until I remembered a street food stall I loved during a trip to Bangkok years ago. That’s when I decided to recreate that magic at home: this Thai sweet chili chicken with a crispy, sticky sauce that clings to every bite. I’ve made this recipe more times than I can count since then, tweaking it until the sauce was perfectly balanced between sweet, spicy, and tangy, and the chicken was crispy without being greasy.
What makes this Thai sweet chili chicken recipe so special? It’s the contrast between the crunchy fried chicken and the luscious sticky sauce that makes your taste buds dance. Plus, it’s quick enough for weeknights but impressive enough for weekend dinners. If you’ve ever been intimidated by getting that perfect crispy texture or worried the sauce might be too sweet, I’ve got you covered. After testing this recipe over a dozen times, I’m confident it’s the easiest way to get restaurant-level Thai sweet chili chicken right in your own kitchen.
And hey, if you love dishes that combine crispy textures with big flavors, you might also enjoy the garlic parmesan chicken crockpot recipe I shared recently—it’s comfort food at its best, and just as straightforward.
Why You’ll Love This Thai Sweet Chili Chicken Recipe
This recipe has completely transformed my dinner routine when I want something flavorful but fuss-free. Here’s why I keep making it:
- Crispy, Not Greasy — Thanks to a light coating and the right frying technique, the chicken comes out perfectly crispy every time without feeling heavy or oily.
- Sticky, Flavor-Packed Sauce — The sauce balances sweet chili heat with a hint of tangy lime, and it sticks to the chicken beautifully for maximum flavor in every bite.
- Quick and Easy — From prep to plate in about 30 minutes. I’ve pulled this off on busy weeknights when time is tight but I want something satisfying.
- Family and Guest Friendly — My kids adore it, and it’s always a hit when I bring it to potlucks or dinner parties. The sauce is just spicy enough to add excitement without overwhelming sensitive palates.
- Pantry Staples — Most of the ingredients are easy to keep on hand, and substitutions work well if you don’t have everything.
- Versatile — Works great on its own, over rice, or tossed into noodle bowls. I often pair it with simple steamed veggies or a crisp salad.
This Thai sweet chili chicken has become my go-to when I want a quick dinner that feels special. It’s the perfect mix of crispy texture and sticky sauce that hooks you from the first bite. If you want to try something equally flavorful but different, you might also enjoy the savory Korean beef noodles I posted—it’s another quick meal bursting with umami.
Ingredients You’ll Need
Here’s the best part: you probably have most of these ingredients already in your kitchen. I’m picky about a few key components, so I’ll share why they matter and how to swap if needed.
- Boneless, skinless chicken thighs (1.5 pounds / 700g) — Thighs stay juicy and tender under the crispy coating better than breasts. You can use breasts if you prefer, but watch cooking time.
- All-purpose flour (¾ cup / 90g) — The base for the coating. You can mix in some cornstarch (¼ cup) for extra crispiness.
- Eggs (2 large) — Helps the flour stick to the chicken and create that golden crust.
- Garlic powder (1 teaspoon) — Adds subtle depth to the coating. Fresh garlic tastes great in the sauce but this powder works best in the dredge.
- Salt and pepper — Essential for seasoning the chicken and balancing the sauce.
- Vegetable oil (for frying, about 2 cups / 475ml) — Use a neutral oil with a high smoke point. I use canola or peanut oil.
- Sweet chili sauce (½ cup / 120ml) — The star of the sauce. Go for a good-quality store-bought brand or homemade if you have time.
- Rice vinegar (2 tablespoons / 30ml) — Adds zing and balances the sweetness.
- Soy sauce (1 tablespoon / 15ml) — Boosts umami and saltiness.
- Honey (2 tablespoons / 30ml) — Sweetens the sauce naturally and helps it thicken.
- Fresh lime juice (1 tablespoon / 15ml) — Brightens the sauce and adds that signature Thai tang.
- Red pepper flakes (½ teaspoon, optional) — For extra heat if you want to kick it up a notch.
- Green onions (2 stalks, sliced) — For garnish and a fresh bite at the end.
- Sesame seeds (1 tablespoon) — Optional but adds a nice nutty crunch on top.
Quick note: If you don’t have rice vinegar, you can use apple cider vinegar or white wine vinegar. Just don’t use balsamic—it’s too heavy for this flavor. And if you want to make this gluten-free, swap the flour for a gluten-free blend and use tamari instead of soy sauce.
Equipment Needed
You don’t need fancy gear for this recipe—just some basics you probably already have.
- Large skillet or frying pan — A 10-12 inch pan works best for frying chicken in batches. I use a heavy-bottomed non-stick skillet to avoid sticking, but stainless steel is fine too.
- Mixing bowls — One for the flour mixture, one for the beaten eggs, and one for the sauce.
- Tongs or slotted spoon — For turning and removing the chicken from hot oil safely.
- Paper towels — To drain the fried chicken and keep it crispy.
- Measuring cups and spoons — Standard kitchen tools.
- Small whisk or fork — To mix the sauce ingredients smoothly.
If you don’t have a deep-frying thermometer, just keep the oil at medium heat so it’s hot but not smoking—you want about 350°F (175°C) to get the perfect crisp without burning. I’ve done this many times without a thermometer just by adjusting the heat and testing with a small piece of coating.
How to Make It: Step-by-Step

Alright, let’s get cooking! I’m walking you through exactly how I make this Thai sweet chili chicken with crispy, sticky sauce, including all the little tricks that made it foolproof.
Step 1: Prep the Chicken (5 minutes)
Trim any excess fat from the chicken thighs and pat them dry with paper towels. Dry chicken crisps up better. Cut each thigh into bite-sized pieces, about 1½ inches. Season lightly with salt and pepper. Set aside.
Step 2: Make the Coating (3 minutes)
In a large bowl, combine the flour, garlic powder, and a pinch of salt and pepper. In another bowl, beat the two eggs until smooth. This simple setup makes breading quick and even.
Step 3: Bread the Chicken (5 minutes)
Dip each chicken piece first into the eggs, letting the excess drip off, then dredge in the flour mixture. Press lightly so the coating sticks well. Place coated pieces on a plate ready for frying.
Step 4: Fry the Chicken (10-12 minutes)
Heat about 1½ inches of oil in your skillet over medium heat until shimmering (around 350°F / 175°C). Carefully add chicken pieces in batches—don’t overcrowd the pan or the temperature will drop. Fry for 3-4 minutes per side until golden brown and cooked through. Use tongs to turn gently.
Once cooked, transfer chicken to a plate lined with paper towels to drain. Repeat with remaining chicken. Keep the chicken warm in a low oven while you make the sauce.
Step 5: Make the Sticky Sauce (5 minutes)
In a small bowl, whisk together sweet chili sauce, rice vinegar, soy sauce, honey, lime juice, and red pepper flakes (if using). Pour the sauce into a clean skillet over medium-low heat. Let it simmer gently for 3-4 minutes, stirring often, until it thickens slightly and becomes glossy.
Step 6: Toss Chicken in Sauce (2 minutes)
Add the fried chicken pieces to the skillet with the sauce. Toss gently but thoroughly, making sure every piece is coated in that beautiful sticky glaze.
Step 7: Garnish and Serve
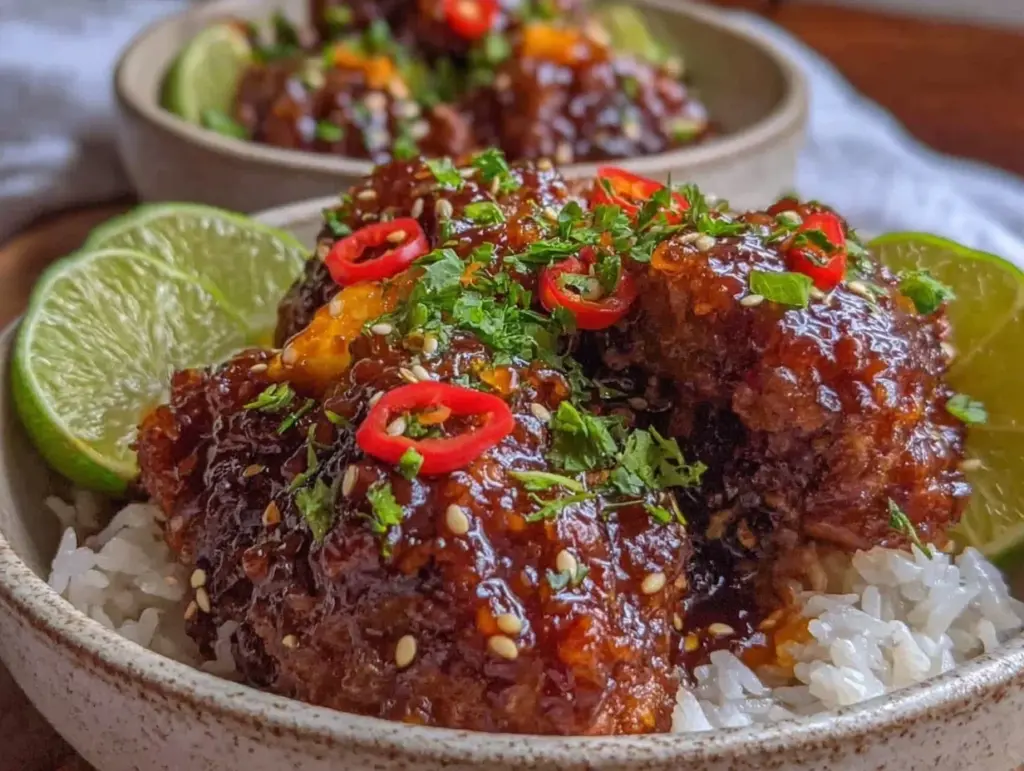
Transfer the saucy chicken to a serving platter. Sprinkle sliced green onions and sesame seeds on top. Serve immediately with steamed jasmine rice or sticky rice, and maybe some crisp veggies or a simple salad on the side.
Expert Tips & Tricks
- Don’t skip drying the chicken: Moisture is the enemy of crispiness. Always pat your chicken dry before breading.
- Use chicken thighs: They stay juicy under that hot oil. Chicken breasts tend to dry out faster.
- Control your oil temperature: Too hot and the coating burns; too cool and the chicken gets greasy. Test with a small piece first.
- Make the sauce last minute: It thickens and sticks better when fresh and warm.
- Save time by prepping sauce ingredients ahead: Mix them in a bowl while the chicken fries.
- Keep cooked chicken warm in the oven (about 200°F / 90°C) until all batches are done.
- Try tossing the chicken with the sauce off the heat if you want a thinner glaze.
Quick tip: If the sauce gets too thick, stir in a teaspoon of water or lime juice to loosen it up without losing flavor.
Variations & Substitutions
Once you’ve nailed this recipe, here are some ways to mix it up:
- Spicy Upgrade: Add more red pepper flakes or swap sweet chili sauce for a spicy Thai chili sauce to turn up the heat.
- Veggie Boost: Stir-fry bell peppers, snap peas, or broccoli and toss with the chicken for a colorful stir-fry.
- Gluten-Free: Use a gluten-free flour blend and tamari instead of soy sauce.
- Air Fryer Version: Air fry the breaded chicken at 400°F (200°C) for 15-18 minutes, flipping halfway, then toss with sauce.
- Protein Swap: Try this sauce with crispy tofu or shrimp for a different twist.
- Lime and Basil: Add fresh Thai basil and extra lime zest for a herbaceous lift.
This recipe is flexible, so feel free to experiment with your favorite flavors and ingredients. For a comforting one-pot dinner with a totally different vibe, you might like the savory chicken sausage and broccoli orzo I posted—it’s hearty and easy.
Serving & Storage
How to Serve: I usually plate this Thai sweet chili chicken over steamed jasmine rice or fluffy sticky rice, with a side of crunchy cucumber salad or sautéed greens. It’s also fantastic wrapped in lettuce leaves for a lighter bite.
Storage: Store leftovers in an airtight container in the fridge for up to 3 days. The chicken will lose some crispiness but still tastes great.
Reheating: Reheat gently in a skillet over low heat, adding a splash of water or extra sweet chili sauce to revive the glaze. Avoid microwaving if possible, as it can make the coating soggy.
Freezing: I don’t recommend freezing this dish because the crispy texture and sauce don’t hold up well after thawing.
Nutrition Information
I’m not a nutritionist, but here’s an estimate per serving based on 4 servings:
| Calories | 480 |
|---|---|
| Protein | 35g |
| Carbohydrates | 28g |
| Fat | 22g |
| Saturated Fat | 4.5g |
| Sodium | 850mg |
| Sugar | 14g |
The protein comes mainly from the chicken, and the sugars are mostly from the sweet chili sauce and honey. You can reduce sodium by using low-sodium soy sauce and controlling added salt. Adding veggies on the side easily boosts fiber and nutrients.
For a lighter version, try using less honey and serving with a big green salad or steamed vegetables to balance the richness.
Final Thoughts
So that’s my recipe for Thai sweet chili chicken with crispy, sticky sauce! I’ve probably talked your ear off, but after making this dish so many times, I have a lot to say about what makes it work. This recipe is my answer to craving big flavors without complicated cooking or long prep. It’s quick, satisfying, and hits that perfect balance of crispy and saucy every time.
Make it your own—add more garlic, extra heat, or toss in your favorite veggies. The best meals come from putting your own spin on recipes. If you decide to try this, drop a comment and let me know how it goes or if you ran into any hiccups. I’m here to help!
Happy cooking! And may your kitchen smell as amazing as mine does right now.
Frequently Asked Questions
Q: Can I use chicken breasts instead of thighs?
A: You can! Just be careful not to overcook them—they tend to dry out faster. Cut breasts into similar-sized pieces and reduce frying time by a minute or two. Thighs just stay juicier and crisp up better.
Q: How do I get the chicken extra crispy?
A: Adding some cornstarch to the flour (about ¼ cup cornstarch to ¾ cup flour) amps up the crispiness. Also, make sure your oil is hot enough before frying and don’t overcrowd the pan.
Q: Can I make the sauce ahead of time?
A: Yes! You can mix the sauce ingredients and store in the fridge for up to 2 days. Reheat gently before tossing with the cooked chicken. Just don’t toss the chicken in the sauce until ready to serve, or it will get soggy.
Q: Is sweet chili sauce very spicy?
A: Most store-bought sweet chili sauces are mildly spicy and sweet. If you want more heat, add red pepper flakes or swap for a spicier chili sauce. If you’re sensitive to spice, you can leave out the flakes completely.
Q: Can I bake the chicken instead of frying?
A: You can bake the breaded chicken at 425°F (220°C) for about 20-25 minutes, flipping halfway. It won’t be as crispy as frying but still tasty and lighter.
Q: What should I serve with Thai sweet chili chicken?
A: Steamed jasmine rice or sticky rice are classics. I also love it with a simple cucumber salad or sautéed greens. For something heartier, pair it with noodles or try it alongside the crockpot chicken tortellini for a comforting meal combo.
Q: Can I freeze leftovers?
A: I don’t recommend freezing because the crispy coating loses its texture and the sauce separates when thawed. It’s best fresh or refrigerated for a few days.
Pin This Recipe!


Thai Sweet Chili Chicken Recipe Easy Crispy Sticky Sauce Perfect for Dinner
- Total Time: 28 minutes
- Yield: 4 servings 1x
Description
This Thai sweet chili chicken recipe features crispy fried chicken thighs coated in a sticky, flavorful sauce that balances sweet, spicy, and tangy notes. Quick and easy to prepare, it’s perfect for weeknight dinners or entertaining guests.
Ingredients
- 1.5 pounds boneless, skinless chicken thighs
- 3/4 cup all-purpose flour
- 1/4 cup cornstarch (optional for extra crispiness)
- 2 large eggs
- 1 teaspoon garlic powder
- Salt and pepper to taste
- About 2 cups vegetable oil (canola or peanut oil recommended) for frying
- 1/2 cup sweet chili sauce
- 2 tablespoons rice vinegar
- 1 tablespoon soy sauce
- 2 tablespoons honey
- 1 tablespoon fresh lime juice
- 1/2 teaspoon red pepper flakes (optional)
- 2 stalks green onions, sliced (for garnish)
- 1 tablespoon sesame seeds (optional, for garnish)
Instructions
- Trim excess fat from chicken thighs and pat dry. Cut into 1½-inch bite-sized pieces. Season lightly with salt and pepper.
- In a large bowl, combine flour, garlic powder, salt, and pepper. In another bowl, beat the eggs until smooth.
- Dip each chicken piece into the beaten eggs, letting excess drip off, then dredge in the flour mixture, pressing lightly to coat. Place coated pieces on a plate.
- Heat about 1½ inches of oil in a large skillet over medium heat (around 350°F). Fry chicken in batches without overcrowding, cooking 3-4 minutes per side until golden and cooked through. Drain on paper towels and keep warm in a low oven.
- In a small bowl, whisk together sweet chili sauce, rice vinegar, soy sauce, honey, lime juice, and red pepper flakes if using.
- Pour sauce into a clean skillet over medium-low heat and simmer for 3-4 minutes until slightly thickened and glossy.
- Add fried chicken to the skillet and toss gently to coat all pieces with the sticky sauce.
- Transfer to a serving platter and garnish with sliced green onions and sesame seeds. Serve immediately with steamed jasmine or sticky rice and optional sides.
Notes
[‘Pat chicken dry before breading to ensure crispiness.’, ‘Use chicken thighs for juicier, crispier results; breasts can be used but watch cooking time.’, ‘Maintain oil temperature around 350°F to avoid greasy or burnt coating.’, ‘Make sauce last minute and toss chicken while sauce is warm for best glaze.’, ‘If sauce thickens too much, stir in a teaspoon of water or lime juice to loosen.’, ‘For gluten-free, substitute flour with gluten-free blend and soy sauce with tamari.’, ‘Air fryer option: cook breaded chicken at 400°F for 15-18 minutes, flipping halfway.’]
- Prep Time: 13 minutes
- Cook Time: 15 minutes
- Category: Main Course
- Cuisine: Thai
Nutrition
- Serving Size: 1 serving (approxima
- Calories: 480
- Sugar: 14
- Sodium: 850
- Fat: 22
- Saturated Fat: 4.5
- Carbohydrates: 28
- Protein: 35
Keywords: Thai sweet chili chicken, crispy chicken, sticky sauce, easy dinner, fried chicken, Thai recipe, weeknight meal