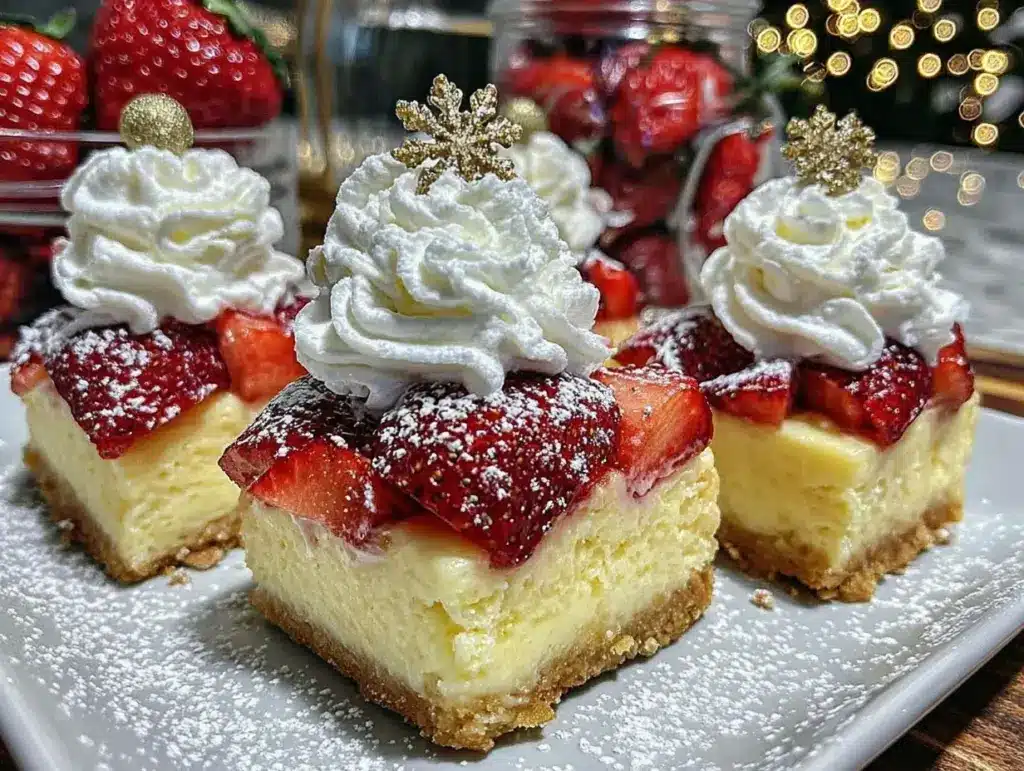
Imagine this: the holidays are in full swing, the house smells like sugar and vanilla, and you’re holding a tray of adorable Santa Hat Cheesecake Crispy Squares. These little treats are the perfect combination of creamy cheesecake goodness, crispy rice cereal crunch, and festive holiday charm. Plus, they’re so easy to make, you’ll feel like a kitchen wizard without breaking a sweat.
I found myself dreaming about these while staring at a bag of marshmallows and a box of rice cereal on my counter one snowy afternoon. When I added rich cheesecake filling and topped them off with cute little strawberry Santa hats, it was love at first bite. I’ve made them three times already this season, and they disappear faster than I can slice them up!
If you’re looking for the ultimate holiday dessert that’s easy, delicious, and Instagram-worthy, this recipe is calling your name. Let’s get started!
Why You’ll Love This Recipe
Okay, let’s talk about why these Santa Hat Cheesecake Crispy Squares are about to become your holiday MVP. I’m obsessed, and here’s why:
- A combo of textures. Creamy, crunchy, and fluffy—all in one bite. It’s like a holiday party for your taste buds.
- Festive and fun. Who can resist those sweet little strawberry Santa hats? They’re ridiculously cute and make everyone smile.
- No baking required. Yup, you read that right. This is a no-bake recipe, perfect for when your oven is already monopolized by cookies and casseroles.
- Quick and easy. You’ll be done in under 30 minutes (not counting chill time). Perfect for last-minute holiday gatherings or stress-free gift giving.
- <stronga a="" cheesecake="" classic. Traditional crispy rice treats are great, but the addition of cheesecake filling takes them to another level.
These little squares are the kind of treat that your guests will rave about—and you’ll get to bask in the compliments without spending hours in the kitchen. Win-win!
What Ingredients You’ll Need
Here’s what I love about this recipe: the ingredients are simple, and you might already have most of them in your pantry. Plus, I’ve included notes to help you customize or substitute if needed.
For the Crispy Base:
- Rice cereal (6 cups) — I use classic Rice Krispies, but any crispy rice cereal will work.
- Marshmallows (10 oz bag) — Mini marshmallows melt faster, but if you only have the big ones, chop them up first.
- Butter (4 tbsp / 57g) — Unsalted is best, but salted works if that’s what you have. Just skip the pinch of salt.
- Vanilla extract (1 tsp) — Trust me, it makes a difference. I’m partial to Nielsen-Massey, but use whatever you’ve got.
For the Cheesecake Layer:

- Cream cheese (8 oz / 225g, softened) — Full-fat Philadelphia cream cheese is my ride-or-die, but any good brand works.
- Powdered sugar (¾ cup / 90g) — Sift it if you want the filling extra smooth.
- Heavy cream (¼ cup / 60ml) — Whip it up for a fluffy texture, or use half-and-half if that’s what you have.
- Lemon juice (1 tsp) — Optional, but it adds a nice tang to balance the sweetness.
For the Santa Hats:
- Fresh strawberries (about 12 large) — Choose ones that are vibrant red and cone-shaped for the perfect Santa hat look.
- Whipped cream (1 cup) — Homemade or store-bought, you do you.
Quick tip: Use room temperature cream cheese for the cheesecake layer—it blends much better and prevents lumps.
Equipment Needed
You don’t need any fancy gadgets for this recipe, but there are a few essentials that make things go smoothly.
- 9×9-inch square pan — Line it with parchment paper for easy removal. Trust me, you’ll thank yourself later.
- Mixing bowls — Two medium-sized ones should do the trick.
- Spatula — For spreading the layers evenly. I love my silicone spatulas—they’re lifesavers.
- Electric hand mixer or stand mixer — For whipping up that creamy cheesecake layer. You can do it by hand, but it’s a workout.
Optional but helpful: a piping bag with a star tip for the whipped cream. It makes the Santa hats look extra polished.
How to Make It: Step-by-Step
Alright, let’s get these adorable squares made! Follow along, and I promise it’s easier than it looks.
- Make the crispy base (10 minutes). In a large pot, melt the butter over medium heat. Add the marshmallows and stir until completely melted and smooth—this takes about 3-5 minutes. Remove from heat and stir in the vanilla extract. Quickly fold in the rice cereal until fully coated. Press the mixture into your lined 9×9 pan, using a spatula or greased hands to flatten it evenly.
- Prepare the cheesecake layer (5 minutes). In a mixing bowl, beat the softened cream cheese until smooth. Add the powdered sugar and lemon juice, and mix until combined. Slowly add the heavy cream while beating, until the mixture is light and fluffy.
- Assemble the squares (5 minutes). Spread the cheesecake filling evenly over the crispy base using a spatula. Chill in the fridge for at least 1 hour to set.
- Create the Santa hats (10 minutes). Cut the tops off the strawberries to create flat bottoms. Place strawberries point-side up on top of the cheesecake layer. Pipe a small dollop of whipped cream on the tip of each strawberry to complete the hat. If you don’t have a piping bag, just use a zip-top bag with the corner snipped off.
- Slice and serve. Once chilled, lift the squares out of the pan using the parchment paper. Slice into 12 pieces, each with its own Santa hat. Serve immediately or store for later.
My Best Tips & Techniques
Here’s everything I’ve learned from making these festive treats over and over again:
- Don’t skip the parchment paper. It makes removing and slicing the squares so much easier.
- Use the freshest strawberries. They’re the star of the show, so pick the reddest, ripest ones you can find. If they’re too soft, they won’t hold their shape.
- Spread the cheesecake layer carefully. It’s soft, so go slow and use a spatula to get it even. A chilled base will help.
- Chill thoroughly before slicing. The cheesecake layer needs time to firm up. Plan ahead and give it at least an hour in the fridge.
- Get creative with toppings. Sprinkle a little edible glitter or crushed candy canes over the whipped cream for extra sparkle!
Ways to Mix It Up
Once you’ve tried the original, here are some fun variations:
- Chocolate Lover’s Version: Add ½ cup mini chocolate chips to the crispy base and drizzle melted chocolate over the cheesecake layer before adding the Santa hats.
- Peppermint Twist: Mix crushed candy canes into the cheesecake layer for a minty holiday flavor.
- Vegan-Friendly: Use vegan marshmallows, plant-based butter, and coconut cream instead of heavy cream.
- Kid-Friendly Fun: Let the kids decorate the Santa hats with sprinkles or edible glitter for extra holiday cheer.
Serving Ideas & Storage
These squares are perfect for holiday parties, gifts, or just snacking while watching Christmas movies. Here’s how to make the most of them:
How to Serve:
- Arrange on a festive platter and watch them disappear.
- Serve with mugs of hot cocoa or coffee for the ultimate holiday pairing.
- If you’re gifting, wrap them individually in cellophane bags tied with ribbon—adorable and practical!
Storage Tips:
- In the fridge: Store in an airtight container for up to 5 days. The strawberries stay fresh longer if you don’t wash them until you’re ready to use.
- In the freezer: Freeze without the strawberries for up to a month. Thaw in the fridge overnight and add the Santa hats before serving.
Nutritional Info & Health Benefits
Let’s be real—these aren’t health food. But they’re worth every bite during the holidays!
| Nutritional Info (per square): | |
|---|---|
| Calories: | ~250 |
| Protein: | 3g |
| Carbs: | 35g |
| Fat: | 10g |
| Sugar: | 22g |
It’s all about balance—enjoy one or two squares, and savor the holiday magic!
Final Thoughts
So there you have it—Santa Hat Cheesecake Crispy Squares, the cutest holiday treat you’ll make this season. Whether you whip them up for a party or just for yourself (no judgment), they’re guaranteed to spread some joy.
I’d love to hear how yours turn out! Drop a comment below with your thoughts or tag me on Instagram @yourhandle—I can’t wait to see your festive creations.
Happy holidays and happy baking! May your kitchen be filled with the smell of marshmallows and the spirit of Santa hats.
FAQs
Q: Can I use a different fruit for the Santa hats?
A: Absolutely! Raspberries work well, and they’re already bite-sized. You can also try halved cherries for a fun twist.
Q: My crispy base is sticking to the pan—help!
A: Make sure you line the pan with parchment paper. If you forgot, try running a butter knife along the edges to loosen it before lifting out the squares.
Q: Can I make these ahead of time?
A: Yes! You can make the crispy base and cheesecake layer a day ahead and store them in the fridge. Add the strawberries and whipped cream just before serving.
Q: What if I don’t have a piping bag for the whipped cream?
A: No problem! Use a zip-top bag with the corner snipped off—it works just as well.
Q: Can I double the recipe?
A: Definitely! Use a larger pan (like 9×13 inches) and double all the ingredients. The chilling time may take a little longer, but otherwise, it’s the same process.
Pin This Recipe!


Santa Hat Cheesecake Crispy Squares
- Total Time: 1 hour 25 minutes
- Yield: 12 servings 1x
Description
A festive and easy no-bake holiday dessert combining creamy cheesecake, crispy rice cereal, and adorable strawberry Santa hats.
Ingredients
- 6 cups rice cereal
- 10 oz mini marshmallows
- 4 tbsp unsalted butter
- 1 tsp vanilla extract
- 8 oz cream cheese, softened
- 3/4 cup powdered sugar
- 1/4 cup heavy cream
- 1 tsp lemon juice (optional)
- 12 large fresh strawberries
- 1 cup whipped cream
Instructions
- Make the crispy base: Melt butter in a large pot over medium heat. Add marshmallows and stir until melted and smooth. Remove from heat and stir in vanilla extract. Fold in rice cereal until fully coated. Press mixture into a lined 9×9-inch pan and flatten evenly.
- Prepare the cheesecake layer: Beat softened cream cheese until smooth. Add powdered sugar and lemon juice, mixing until combined. Slowly add heavy cream while beating until light and fluffy.
- Assemble the squares: Spread cheesecake filling evenly over the crispy base. Chill in the fridge for at least 1 hour to set.
- Create the Santa hats: Cut tops off strawberries to create flat bottoms. Place strawberries point-side up on the cheesecake layer. Pipe whipped cream onto the tip of each strawberry to complete the hat.
- Slice and serve: Lift squares out of the pan using parchment paper. Slice into 12 pieces, each with a Santa hat. Serve immediately or store for later.
Notes
[‘Use parchment paper to make removing and slicing the squares easier.’, ‘Choose the freshest strawberries for the best presentation.’, ‘Chill thoroughly before slicing to ensure the cheesecake layer sets properly.’, ‘Get creative with toppings like edible glitter or crushed candy canes.’]
- Prep Time: 15 minutes
- Cook Time: 10 minutes
- Category: Dessert
- Cuisine: American
Nutrition
- Serving Size: 1 square
- Calories: 250
- Sugar: 22
- Fat: 10
- Carbohydrates: 35
- Protein: 3
Keywords: Santa Hat Cheesecake Crispy Squares, holiday dessert, no-bake recipe, festive treats, Christmas dessert