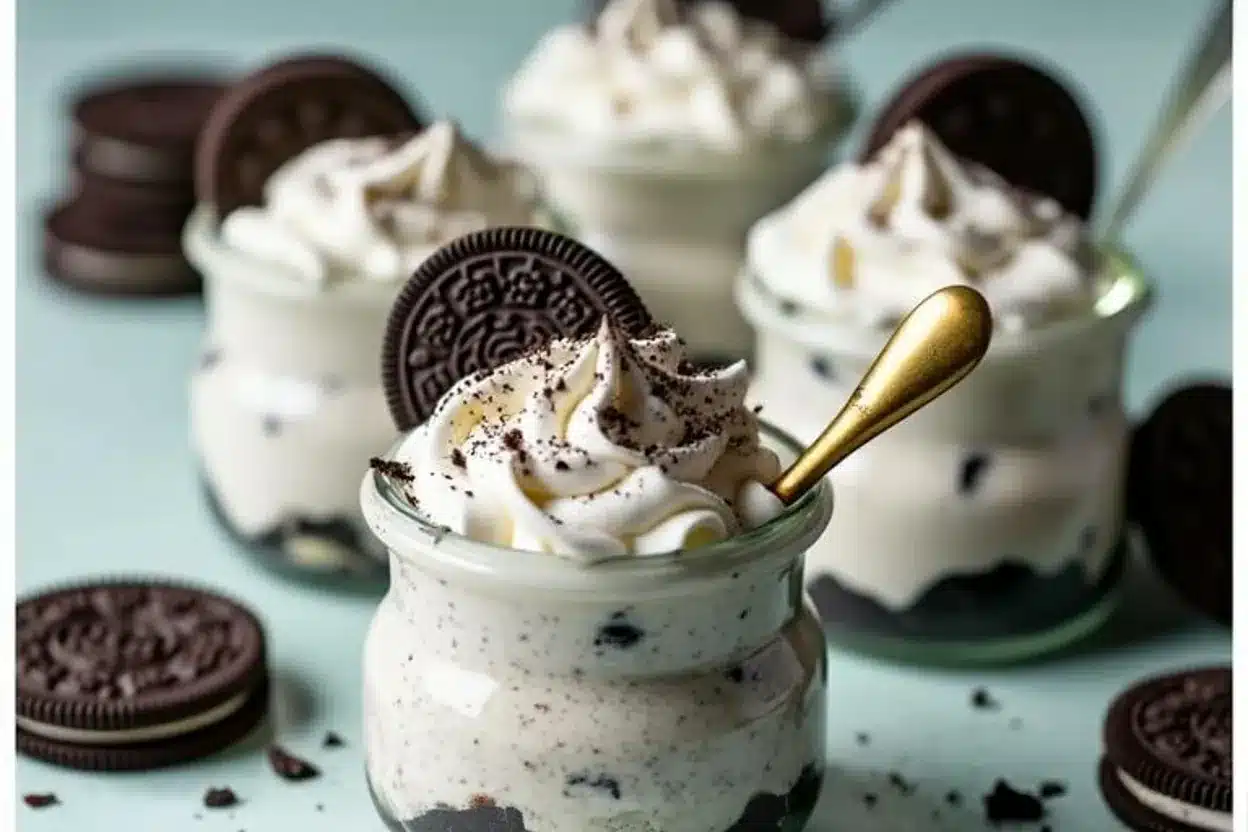
Are you looking for a sweet way to celebrate your anniversary? Look no further than these Oreo No-Bake Cheesecake Cups. They are not just delicious but also incredibly easy to whip up! Picture this: creamy cheesecake layered over crushed Oreo cookies, all topped with whipped cream and more Oreo crumbles. It’s a dessert that looks as good as it tastes, making it perfect for special occasions like anniversaries. Plus, you don’t even need to turn on your oven!
What I love about these cheesecake cups is how they bring a bit of nostalgia. Growing up, I always enjoyed Oreos with a glass of milk, and now, combining them into a rich cheesecake feels like a sweet trip down memory lane. The texture is creamy, the flavor is rich, and the chocolatey crunch adds a delightful contrast. So, let’s get started on making this perfect treat for your special day!
Why You Will Love this Recipe
The Oreo No-Bake Cheesecake Cups have a rich history, being a modern twist on traditional cheesecake recipes. Cheesecake itself can be traced back to ancient Greece, but it has evolved into so many variations today. This no-bake version makes it accessible for everyone, especially if you’re pressed for time or don’t want to deal with the hassle of baking.
I remember the first time I made this dessert for my partner. It was a spontaneous decision, and I didn’t expect it to become a staple for our celebrations. The joy on their face as they dug into the creamy layers was priceless! This recipe has become our little anniversary tradition, and it’s so easy that we can even make it together. Plus, it’s perfect for warm weather, allowing us to skip the oven and still enjoy a sweet treat.
Each bite is a celebration of flavors. The combination of cream cheese and whipped cream creates a light yet decadent filling, while the Oreo crust adds a crunchy texture. This dessert is not only delicious but also visually appealing, making it a fantastic centerpiece for any anniversary dinner.
Ingredient Discussion
Let’s go through the key ingredients you’ll need for these delightful cheesecake cups:
- Oreo Cookies: The star of the show! Look for classic Oreos for that perfect chocolatey flavor. If you want to switch things up, consider using Golden Oreos for a lighter twist.
- Cream Cheese: Use full-fat cream cheese for the creamiest texture. Soften it at room temperature before mixing to avoid lumps.
- Powdered Sugar: This gives the cheesecake its sweetness. You can adjust the amount based on your preference for sweetness.
- Whipped Cream: Freshly whipped cream is ideal, but you can use store-bought if you’re short on time. It adds lightness to the filling.
- Vanilla Extract: A splash of vanilla enhances the flavors beautifully. Always choose pure vanilla extract for the best taste.
As for substitutions, if you’re looking for a dairy-free option, consider using a dairy-free cream cheese alternative and whipped coconut cream for the topping. Also, if you want to add a bit of flavor, you could mix in some fruit puree or melted chocolate into the cheesecake mixture.
When selecting ingredients, always check for the freshest options. For the best Oreos, look for packages with the latest expiration date. For cream cheese, avoid any that appear overly soft or have an off smell. Store the leftover cheesecake cups in the fridge for up to 5 days, but they’re so delicious, I doubt they’ll last that long!
Equipment Needed
Here’s what you’ll need to make these cheesecake cups:
- Mixing bowls
- Hand mixer or stand mixer
- Measuring cups and spoons
- Spatula
- Serving cups or jars (clear ones work great for presentation!)
If you don’t have a hand mixer, you can easily use a whisk, but it’ll take a bit more elbow grease! And if you want to save on costs, any glass or plastic cups will work perfectly for serving.
Preparation Method
- Crush the Oreos: Start by placing the Oreos in a food processor and pulse until they turn into fine crumbs. If you don’t have a food processor, you can put them in a zip-top bag and crush them with a rolling pin.
- Make the Crust: In a mixing bowl, combine the crushed Oreos with melted butter. Mix until the crumbs are evenly coated. Spoon about 2 tablespoons of the mixture into the bottom of each serving cup and press down firmly.
- Prepare the Cheesecake Filling: In another bowl, beat the softened cream cheese with a hand mixer until smooth. Gradually add the powdered sugar and vanilla extract, mixing until well combined. Gently fold in the whipped cream until the mixture is light and fluffy.
- Layer the Cheesecake: Spoon the cheesecake filling over the Oreo crust in each cup, filling them about three-quarters full. You can use a piping bag for a more polished look or just a spoon—whatever works for you!
- Chill and Serve: Cover the cups with plastic wrap and refrigerate for at least 2 hours or until set. Just before serving, top with a dollop of whipped cream and sprinkle some crushed Oreos on top for that extra crunch!
As you prepare, keep an eye on the consistency of your filling. If it’s too thick, you can add a bit more whipped cream to lighten it up. And trust me, the waiting is the hardest part, but letting them chill is key for the perfect texture!
Cooking Tips & Techniques
Here are some handy tips to ensure your Oreo No-Bake Cheesecake Cups turn out perfectly:
- Room Temperature Ingredients: Always start with room temperature cream cheese. It blends more smoothly and avoids lumps.
- Whipping Cream: If you’re whipping your own cream, make sure your bowl and beaters are cold for better volume.
- Don’t Overmix: When folding in the whipped cream, do it gently to keep the mixture light and airy.
- Flavor Variety: Try adding a swirl of raspberry or strawberry puree in the cheesecake for a fruity twist!
- Storing Leftovers: If you have leftovers, store them in an airtight container in the fridge. They actually taste better the next day as the flavors meld!
Remember, every great cook has had their share of mishaps. My first attempt resulted in a lumpy filling because I was too eager to mix! Just take your time, and you’ll be fine.
Variations & Adaptations
One of the best things about this recipe is how easy it is to adapt. Here are a few variations to consider:
- Chocolate Lover’s Dream: Add melted chocolate to the cream cheese filling for a richer flavor.
- Fruit-Filled Cups: Layer in fresh strawberries or raspberries between the crust and filling for a refreshing twist.
- Different Cookies: Swap out Oreos for other cookies like Nutter Butters or chocolate chip cookies for a unique flavor.
Feel free to experiment! Each variation brings something special to the table, and you’ll discover new favorites along the way.
Serving & Storage Suggestions
These cheesecake cups are best served chilled, so keep them in the refrigerator until you’re ready to share. For a beautiful presentation, consider garnishing with whole Oreos or a sprinkle of chocolate shavings. They pair wonderfully with a glass of cold milk or even a rich cup of coffee.
When it comes to storage, keep any leftovers covered in the fridge for up to 5 days. If you want to prepare them a day or two in advance, that works great too! Just remember, the flavors will develop and deepen the longer they sit, making them even more delightful.
Nutritional Information & Benefits
Each serving of these Oreo No-Bake Cheesecake Cups is a delightful mix of creamy and crunchy. They provide a comforting treat with a balance of sweetness and richness.
- Calories: Approximately 250 per cup
- Fat: 16g
- Sugar: 18g
- Protein: 4g
While these are certainly a treat, they do have some benefits! Cream cheese provides calcium, and the whipped cream adds a bit of protein. Just be mindful of portions if you’re watching your sugar intake. And hey, there’s nothing wrong with indulging every now and then!
Conclusion
In summary, these Oreo No-Bake Cheesecake Cups are a fantastic way to celebrate your anniversary or any special occasion. They are easy to make, delicious, and can be customized to fit your taste. I love how this dessert brings joy with every bite, and I encourage you to make it your own. Don’t hesitate to experiment with flavors and toppings!
After you try this recipe, I’d love to hear how it turns out for you! Feel free to comment below with your own variations or any tips you discovered along the way. Enjoy your anniversary treat, and remember to savor every moment!
FAQs
1. Can I make these cheesecake cups in advance?
Absolutely! They can be made a day or two in advance and stored in the refrigerator until you’re ready to serve.
2. How long do these cheesecake cups last in the fridge?
They will stay fresh in the fridge for up to 5 days, provided they’re stored in an airtight container.
3. Can I use a different type of cookie for the crust?
Yes! Feel free to use other cookies like chocolate chip or Nutter Butter cookies for a different flavor.
4. Is it possible to make these gluten-free?
Yes! Just use gluten-free Oreo cookies and make sure all other ingredients are gluten-free as well.
5. Can I freeze these cheesecake cups?
While they can be frozen, the texture may change slightly upon thawing. It’s best to enjoy them fresh for the best flavor and consistency.
Print
Oreo No-Bake Cheesecake Cups
- Total Time: 2 hours 15 minutes
- Yield: 4 servings
Description
These Oreo No-Bake Cheesecake Cups are a delicious and easy dessert, perfect for celebrating special occasions like anniversaries. With creamy cheesecake layered over crushed Oreo cookies, they are a delightful treat that requires no baking.
Ingredients
- Oreo Cookies
- Cream Cheese
- Powdered Sugar
- Whipped Cream
- Vanilla Extract
- Melted Butter
Instructions
- Crush the Oreos in a food processor until they turn into fine crumbs.
- Combine the crushed Oreos with melted butter and mix until evenly coated. Spoon about 2 tablespoons into each serving cup and press down firmly.
- Beat the softened cream cheese until smooth, then gradually add powdered sugar and vanilla extract, mixing until well combined. Gently fold in the whipped cream until light and fluffy.
- Spoon the cheesecake filling over the Oreo crust in each cup, filling them about three-quarters full.
- Cover the cups with plastic wrap and refrigerate for at least 2 hours or until set. Top with whipped cream and crushed Oreos before serving.
Notes
For a dairy-free option, use dairy-free cream cheese and whipped coconut cream. Store leftovers in the fridge for up to 5 days.
- Prep Time: 15 minutes
- Cook Time: 0 minutes
- Category: Dessert
- Cuisine: American
Nutrition
- Serving Size: 1 cup
- Calories: 250
- Sugar: 18
- Fat: 16
- Carbohydrates: 30
- Protein: 4
Keywords: Oreo, No-Bake, Cheesecake, Dessert, Anniversary


")