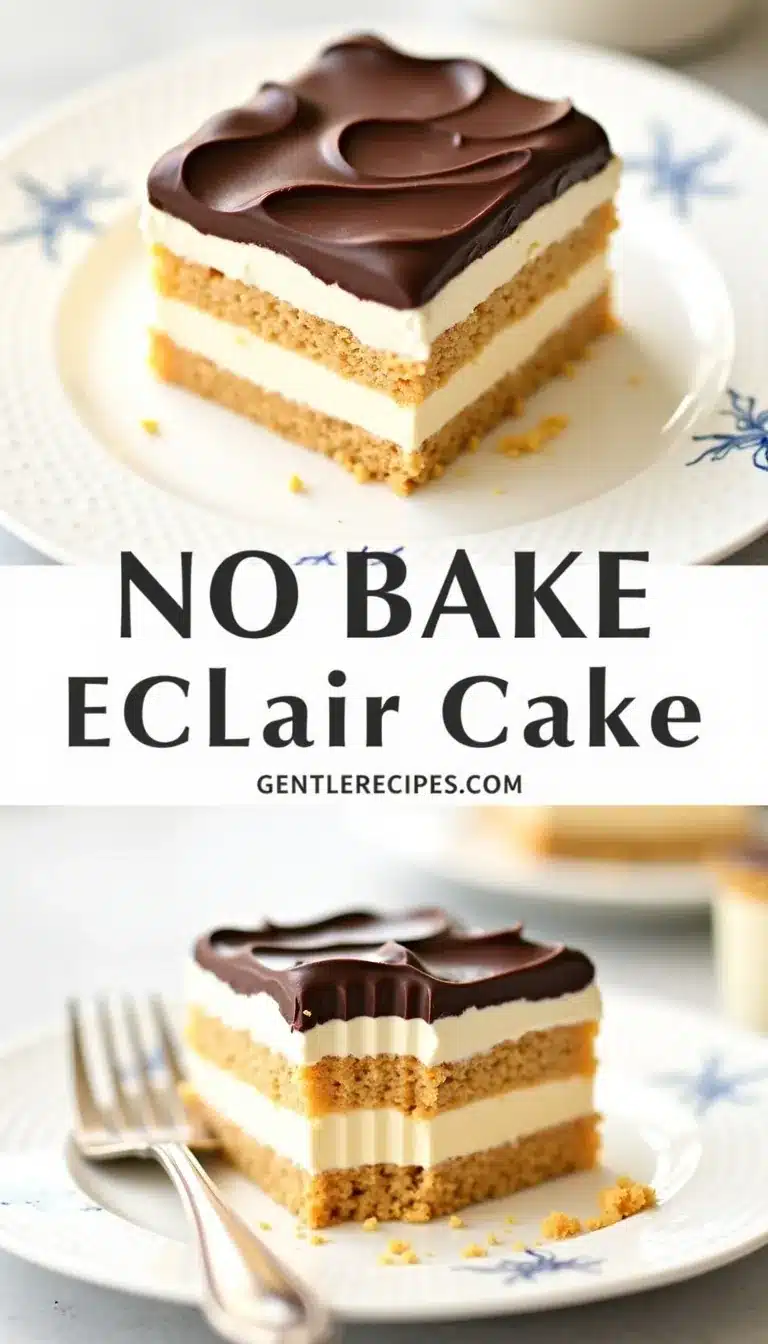
If you’re searching for a show-stopping dessert that’s easy, fuss-free, and absolutely crowd-pleasing, this no-bake eclair cake recipe is about to become your new go-to. Imagine silky vanilla pudding, fluffy whipped topping, buttery graham crackers, and a glossy chocolate icing—all coming together in cool, creamy layers. Honestly, this is the kind of dessert that disappears in minutes at any party! No oven, no stress, just pure deliciousness. My favorite thing? The no-bake eclair cake delivers all the nostalgic flavors of a classic éclair but in a simple, slice-and-serve format. You’re going to love how easy it is to whip up, and how impressive it looks on a dessert table.
Let’s face it: sometimes you just don’t want to turn on the oven, especially when you’re prepping for a big gathering or it’s way too hot outside. That’s why I keep this recipe in my back pocket for summer barbecues, potlucks, and even holiday gatherings. There’s something so satisfying about a dessert that feels fancy but comes together with barely any effort. Did you know that the original French éclair dates back to the 19th century? It was a patisserie staple long before anyone dreamed up this clever shortcut. I first tasted no-bake eclair cake at a neighbor’s Fourth of July picnic, and I swear, I went back for thirds. There’s just something magical about the way the graham crackers soften and meld with the creamy filling. Trust me, you’ll want to make this again and again.
Why You Will Love This No-Bake Eclair Cake
No-bake eclair cake is rooted in the classic French éclair, with its crisp pastry shell, vanilla custard, and chocolate glaze. But somewhere along the line, clever home cooks (probably in the Midwest, where casserole-style desserts reign supreme) figured out how to capture all those flavors—without a single pastry bag or oven mitt. This cake is a fantastic example of American ingenuity, bringing together pantry staples you can find almost anywhere.
For me, this recipe is pure nostalgia. Growing up, it always made a splash at family reunions and back-to-school potlucks. I remember sneaking slices from the fridge late at night, even when my mom said “no more!” It’s the kind of dessert that makes you feel like a kid again, with those soft, creamy layers and rich chocolate top. Over the years, I’ve tweaked the recipe to suit different seasons—adding fresh berries in summer, or a splash of coffee for a grown-up twist in winter.
What makes this no-bake eclair cake extra special is its adaptability. It’s a lifesaver for last-minute parties, especially when you need something that feeds a crowd but doesn’t require complicated steps. The recipe shines during hot weather (no oven, yay!), but honestly, it’s just as welcome at Thanksgiving or New Year’s Eve. Fun fact: the layered “icebox cake” concept has been around since the early 20th century, when refrigerators (aka “iceboxes”) became household staples. People loved making chilled desserts that got better with time, and this eclair cake is a delicious part of that tradition.
Ingredient Discussion
One of the best things about this no-bake eclair cake recipe is that it uses simple, easy-to-find ingredients—but they all play a key role. Let’s break them down, one by one, and talk about how to choose the best, plus ideas for substitutions if you need them.
- Graham Crackers: These are the backbone of the cake, acting as the “pastry” layers. I always use plain honey graham crackers for the classic flavor, but cinnamon or even chocolate grahams are fun for a twist. If you’re gluten-free, swap in GF graham-style crackers (they work great). For the freshest taste, check for crackers that aren’t broken, and store them in a sealed bag so they stay crisp until you use them.
- Vanilla Instant Pudding Mix: This shortcut creates a smooth, custardy filling without any stovetop cooking. I prefer Jell-O brand for the flavor, but store brands often work just as well. If you want to avoid artificial flavors, look for organic or natural pudding mixes. For a richer taste, French vanilla pudding is amazing! If vanilla isn’t your jam, try chocolate or banana pudding.
- Milk: Whole milk makes the filling extra creamy, but 2% or even non-dairy milk (like almond or oat) will work if that’s what you’ve got. Just avoid skim milk, which can make the filling too thin. Always use cold milk straight from the fridge for best results.
- Frozen Whipped Topping (like Cool Whip): This is the “secret ingredient” for a light, fluffy filling. Thaw it in the fridge (not on the counter) so it blends smoothly. If you prefer homemade whipped cream, that’s totally fine—just whip 2 cups (480 ml) of heavy cream with 2 tablespoons (25 g) sugar until stiff peaks form.
- Chocolate Frosting: Store-bought chocolate frosting melts into a glossy glaze that’s super easy. I like Duncan Hines or Betty Crocker, but homemade ganache is amazing if you’re feeling fancy. (Just melt 1 cup (170 g) chocolate chips with 1/2 cup (120 ml) heavy cream.) You can also use a simple cocoa-powder glaze if you want a lighter topping.
Some folks like to add a splash of vanilla extract or a pinch of salt to the pudding for extra depth. Fresh berries between the layers are great in summer, and a sprinkle of espresso powder in the chocolate topping makes it pretty irresistible. All the main ingredients can be found at any big grocery store, and most are easy to keep stocked in your pantry. For parties, I recommend doubling the recipe—it holds up well, and leftovers are rare!
Equipment Needed
- 9×13-inch (23×33 cm) Baking Dish: The classic size for this party dessert. Glass or metal both work, but I like glass so you can see the layers.
- Mixing Bowls: One large for the pudding mixture, and a smaller one for whipping cream (if making your own).
- Whisk or Electric Mixer: A whisk is fine for the pudding, but a hand mixer makes things even easier, especially if you’re in a hurry. I’ve used both, and honestly, either gets the job done!
- Spatula: For folding in the whipped topping and spreading the layers evenly.
- Offset Spatula or Butter Knife: This is super handy for smoothing out the chocolate frosting on top.
- Plastic Wrap or Foil: For covering the cake while it chills in the fridge.
If you don’t have a 9×13 dish, use two 8×8-inch (20×20 cm) pans or even a round trifle bowl for a different look. For budget-friendly tools, dollar store spatulas and bowls work just as well. Just make sure everything is clean and dry before you start—water can mess with the pudding’s texture. And pro tip: rinse your whisk in hot water right after using so cleanup is a breeze!
Preparation Method
-
Prepare the Filling:
In a large mixing bowl, whisk together 2 packages (3.4 oz/96 g each) vanilla instant pudding mix and 3 cups (710 ml) cold milk. Whisk for 2 minutes until thick and smooth. If you notice any lumps, keep whisking—they’ll work out. The pudding should look glossy and hold soft peaks. -
Fold in Whipped Topping:
Gently fold in 8 oz (225 g) thawed whipped topping using a spatula. Go slow to keep the filling fluffy—overmixing can deflate the mixture. The texture should be light and creamy, almost like mousse. -
Layer the Graham Crackers:
Arrange a single layer of graham crackers (about 1 sleeve) to cover the bottom of a 9×13-inch (23×33 cm) baking dish. Break crackers as needed to fit the corners. Don’t worry about perfect edges; the filling will hide any gaps. -
Add the First Layer of Filling:
Spoon half the pudding mixture over the graham crackers. Smooth evenly with a spatula, making sure to reach all the edges. This helps the layers meld together. -
Second Layer of Graham Crackers:
Add another layer of graham crackers over the filling. Try to offset the cracks so the cake slices hold together better. -
Repeat Filling and Crackers:
Spread the remaining pudding mixture over the second layer of crackers. Top with a final layer of graham crackers. Give everything a gentle press with your hands (just a light touch!) to settle the layers. -
Frost the Cake:
Scoop 1 can (16 oz/450 g) chocolate frosting into a microwave-safe bowl. Heat for 20-30 seconds until just pourable but not hot. Stir well, then pour over the top layer of graham crackers. Use an offset spatula or butter knife to spread the frosting evenly. Work quickly—it sets fast! -
Chill:
Cover the cake tightly with plastic wrap or foil. Refrigerate for at least 6 hours, or overnight if possible. The longer it chills, the softer the graham crackers become (that’s what makes it taste like real eclairs!). -
Serve:
Slice into squares and serve cold. For neat slices, wipe your knife between cuts and use a sharp, thin blade. If the cake feels too firm, let it sit at room temperature for 10 minutes before slicing.
Prep notes: Don’t rush the chilling step—this is what gives you that perfect, cake-like texture. If your frosting is too stiff, add a teaspoon of milk before microwaving. And if you accidentally tear the graham crackers, just patch them together. Nobody will know once it’s all layered up!
Cooking Tips & Techniques
This no-bake eclair cake is super forgiving, but a few pro tips can really make it shine. First, always use cold milk for the pudding—warm milk won’t set as nicely. I learned this the hard way once, when my filling turned out runny (let’s just say, it was more like pudding soup). If you’re making homemade whipped cream, don’t overbeat it or it’ll turn grainy. Stop as soon as you see stiff peaks.
When layering the graham crackers, try to offset the seams in each layer. This helps the finished cake hold together better when sliced. If you end up with some broken crackers, just tuck them underneath—you know, “out of sight, out of mind.” And when spreading the chocolate frosting, working quickly while it’s still warm helps you get that smooth, glossy finish. If it starts to set, dip your spatula in hot water for easier spreading.
One mistake I made early on was not chilling the cake long enough. If you cut into it too soon, the layers won’t have time to meld, and you’ll get crunchy crackers instead of the soft, pastry-like texture you want. Trust me, it’s worth the wait! Also, don’t skip covering the cake tightly; it keeps things moist and prevents fridge odors from sneaking in. Finally, if you’re serving at a party, slice the cake just before guests arrive for the cleanest presentation.
Variations & Adaptations
The beauty of no-bake eclair cake is how easy it is to customize. Here are a few ideas to make it fit any occasion or diet:
- Gluten-Free: Use gluten-free graham crackers and check that your pudding mix is GF. It tastes just as dreamy!
- Chocolate Lover’s Version: Swap the vanilla pudding for chocolate pudding, or even layer chocolate and vanilla for a “black and white” effect. Top with mini chocolate chips or grated chocolate for extra flair.
- Berry Eclair Cake: Add a layer of sliced strawberries or raspberries between the pudding layers, especially in summer. The freshness is unbeatable.
- Dairy-Free: Substitute almond or oat milk for regular milk, and use dairy-free whipped topping and frosting. It still tastes amazing—promise!
- Personal Favorite: Sometimes I add a splash of espresso to the chocolate frosting and a pinch of sea salt on top. It’s like a tiramisu-eclair hybrid and always gets rave reviews.
If you want to make smaller, individual servings, layer the ingredients in mason jars or cups. Great for portion control and picnics! And if you need a nut-free version, double-check all labels, as some graham crackers and toppings may contain traces of nuts.
Serving & Storage Suggestions
No-bake eclair cake is best served cold, straight from the fridge. I usually slice it into generous squares and arrange them on a pretty platter—those layers always look so inviting. For extra pizzazz, sprinkle with chocolate shavings, fresh berries, or even a dusting of powdered sugar right before serving.
This cake pairs beautifully with hot coffee, iced tea, or even a glass of cold milk. If you’re serving for a special occasion, consider adding a bowl of fresh berries or a scoop of vanilla ice cream on the side.
Leftovers (if you have any!) should be covered and refrigerated. The cake keeps well for up to 4 days. For longer storage, wrap slices tightly and freeze for up to 2 months. To thaw, just place in the fridge overnight. When reheating individual slices,

No-Bake Eclair Cake
- Total Time: 6 hours 15 minutes (includes chilling time)
- Yield: 12 servings 1x
Description
This no-bake eclair cake is a crowd-pleasing, fuss-free dessert featuring layers of graham crackers, creamy vanilla pudding, fluffy whipped topping, and a glossy chocolate frosting. It’s the perfect make-ahead treat for parties, potlucks, or any occasion when you want a nostalgic, slice-and-serve dessert without turning on the oven.
Ingredients
- 2 packages (3.4 oz each) vanilla instant pudding mix
- 3 cups cold whole milk
- 8 oz frozen whipped topping (thawed)
- 1 box honey graham crackers (about 3 sleeves, enough for 3 layers)
- 1 can (16 oz) chocolate frosting
Instructions
- In a large mixing bowl, whisk together the vanilla instant pudding mix and cold milk for 2 minutes until thick and smooth.
- Gently fold in the thawed whipped topping with a spatula until the mixture is light and creamy.
- Arrange a single layer of graham crackers to cover the bottom of a 9×13-inch baking dish, breaking crackers as needed to fit.
- Spoon half of the pudding mixture over the graham crackers and smooth evenly.
- Add a second layer of graham crackers over the filling, offsetting the seams.
- Spread the remaining pudding mixture over the second layer of crackers.
- Top with a final layer of graham crackers and gently press to settle the layers.
- Scoop the chocolate frosting into a microwave-safe bowl and heat for 20-30 seconds until just pourable. Stir well.
- Pour the frosting over the top layer of graham crackers and spread evenly with an offset spatula or butter knife.
- Cover the cake tightly with plastic wrap or foil and refrigerate for at least 6 hours, or overnight.
- Slice into squares and serve cold. For neat slices, wipe your knife between cuts.
Notes
For best results, chill the cake overnight to allow the graham crackers to fully soften. Use cold milk for the pudding to ensure it sets properly. If the frosting is too thick, add a teaspoon of milk before microwaving. Variations include using chocolate or banana pudding, adding fresh berries, or making it gluten-free or dairy-free with appropriate substitutions.
- Prep Time: 15 minutes
- Cook Time: 0 minutes
- Category: Dessert
- Cuisine: American
Nutrition
- Serving Size: 1 square (about 1/12 of cake)
- Calories: 320
- Sugar: 29
- Sodium: 390
- Fat: 13
- Saturated Fat: 6
- Carbohydrates: 48
- Fiber: 1
- Protein: 3
Keywords: no-bake, eclair cake, party dessert, easy dessert, potluck, icebox cake, chocolate, vanilla pudding, graham crackers