Imagine a dessert that mixes cheesecake’s richness with banana pudding’s classic taste, all without baking. You can find a no bake banana pudding cheesecake recipe on Facebook. Or, try one with condensed milk for a creamy twist. For a taste of Philadelphia, look for a no bake banana pudding cheesecake philadelphia style.
This no-bake banana pudding cheesecake is great for hot weather or when you need a quick, tasty dessert. It takes just 30 minutes to prepare and 4 hours to chill. Ready in 4 hours and 30 minutes, it serves 8-10 people. It’s perfect for parties or gatherings.
Main Headings
The Perfect Blend of Two Classic Desserts
Combining banana pudding and cheesecake is truly a match made in heaven. The creamy cheesecake and sweet banana pudding flavors come together to create an irresistible dessert. To prepare a no-bake banana pudding cheesecake, simply mix cream cheese, sugar, eggs, and ripe bananas. Alternatively, you can opt for instant banana pudding mix to simplify the recipe even further.
For a straightforward banana pudding cheesecake, start with a vanilla wafer crust as your base. Next, fill it with a mixture of cream cheese, sugar, eggs, and mashed bananas. To enhance the creamy texture, add instant banana pudding mix and cold milk. Finally, top the cheesecake with whipped cream and garnish with vanilla wafers for a stunning presentation that’s sure to impress.
Here’s a brief overview of the ingredients and their quantities:
- 16 oz of softened cream cheese
- 1 cup of granulated sugar
- 2 large eggs
- 2 ripe bananas, mashed
- 1 package of instant banana pudding mix (3.4 oz)
- 2 cups of cold milk
With these ingredients, you can make a delicious banana pudding cheesecake. It’s perfect for any occasion. Whether you’re making bars or bites, this recipe will be a hit.

| Ingredient | Quantity |
|---|---|
| Cream Cheese | 16 oz |
| Granulated Sugar | 1 cup |
| Eggs | 2 large |
| Ripe Bananas | 2 |
| Instant Banana Pudding Mix | 1 package (3.4 oz) |
| Cold Milk | 2 cups |
Essential Ingredients for No-Bake Banana Pudding Cheesecake
To make a delicious no-bake banana pudding cheesecake, you’ll need a few key ingredients that come together harmoniously. For the cheesecake base, you’ll combine cream cheese, powdered sugar, and whipped topping. Meanwhile, the banana pudding layer requires instant banana cream pudding mix, Greek yogurt, and freshly sliced bananas. Finally, the crust is prepared with a mix of crushed vanilla wafers, brown sugar, and unsalted butter, creating the perfect foundation for this layered dessert.
When preparing this treat, using high-quality ingredients is absolutely essential. For instance, soft cream cheese is crucial for achieving a smooth and creamy texture in the cheesecake layer. Similarly, crushed vanilla wafers not only provide a sturdy base but also add a flavorful crunch that perfectly complements the creamy layers. By carefully selecting these ingredients and paying attention to detail, you’ll create a show-stopping cheesecake that’s sure to impress everyone at the table.
Core Cheesecake Components
- 24 ounces of cream cheese (softened)
- 1/2 cup of powdered sugar
- 16 ounces of whipped topping (divided in half)
Banana Pudding Elements
- 1 box of instant banana cream pudding mix (3.4-ounce)
- 1/4 cup of Greek yogurt
- 2 sliced bananas
Crust Ingredients
- 3 1/2 cups of vanilla wafers
- 2 tablespoons of brown sugar
- 1/2 cup of unsalted butter (melted)

With these essential ingredients, you can make a no-bake banana pudding cheesecake. It will be delicious and look great. The vanilla wafer crust, creamy cheesecake, and sweet banana pudding will make it a favorite.
Kitchen Tools and Equipment Needed for No-Bake Banana Pudding Cheesecake
To make a no-bake banana pudding cheesecake, you’ll need some kitchen tools. The question does no-bake cheesecake taste better can be answered by trying this recipe. You’ll need a springform pan, mixing bowls, and measuring cups.
In this recipe, we mix cream cheese, heavy whipping cream, and vanilla extract. This creates a unique flavor.
The necessary equipment includes:
- Mixing bowls
- Measuring cups
- Springform pan
- Electric mixer
- Whisk
Having the right equipment is key to a great dessert. With these tools, your no-bake banana pudding cheesecake will be creamy and delicious.
Creating the Perfect Vanilla Wafer Crust for No-Bake Banana Pudding Cheesecake
To make the perfect vanilla wafer crust, you need just the right ingredients. Specifically, you’ll need 2 cups of Nilla wafers, 2 tablespoons of brown sugar, and 8 tablespoons of melted vegan butter. That said, if your no-bake cheesecake doesn’t set properly, it could be due to an underprepared crust.
On another note, many people often wonder, Can you eat Philadelphia no-bake cheesecake filling before it’s set? While it’s technically safe to do so, it’s always best to wait for the filling to fully set. After all, this ensures the best possible texture and flavor, making the dessert truly worth the wait.
To prepare the crust, first start by crushing the Nilla wafers in a food processor until they form fine crumbs. Then, mix the crumbs with the brown sugar and melted vegan butter until everything is evenly combined. Finally, press this mixture into the pan, as it will form the essential foundation of your no-bake cheesecake, ensuring both flavor and structure.
Crushing and Mixing Methods
- Use a food processor to crush the Nilla wafers into fine crumbs.
- Mix the crumbs with the brown sugar and melted butter until well combined.
Press and Setting Techniques
Press the crust mixture into the bottom of a springform pan. Make sure it’s evenly spread. Then, refrigerate it for at least 30 minutes. This helps the crust stay right, not too dense or hard.

| Ingredient | Quantity |
|---|---|
| Nilla wafers | 2 cups |
| Brown sugar | 2 tablespoons |
| Melted vegan butter | 8 tablespoons |
By following these steps and using the right ingredients, you’ll create a perfect vanilla wafer crust for your no-bake banana pudding cheesecake.
Mastering the Creamy Cheesecake Filling in No-Bake Banana Pudding Cheesecake
To make a creamy cheesecake filling, it’s important to use top-notch ingredients and follow the right mixing methods. Specifically, you’ll need 2 cups of cold milk, 1 package of instant vanilla pudding mix, 1 can of sweetened condensed milk, and 1 teaspoon of vanilla extract. Additionally, for a no-bake banana pudding cheesecake with cool whip, incorporating whipped cream enhances both the texture and flavor.
When preparing the filling, ensuring a smooth mixture is essential to avoid lumps and achieve a creamy texture. For this step, you can use a mixer or mix the ingredients by hand; however, be careful not to overmix. Ideally, the filling should be perfectly smooth and creamy, making it easy to pour into the crust and ensuring a delightful final result.

- Use room temperature ingredients to ensure they mix well.
- Avoid overmixing, as this can lead to a dense filling.
- Incorporate whipped cream or cool whip to enhance the texture and flavor.
By following these tips and using the right ingredients, you can make a delicious and creamy cheesecake filling. Always choose high-quality ingredients and the right mixing techniques for the best results.
| Ingredient | Quantity |
|---|---|
| Cold milk | 2 cups |
| Instant vanilla pudding mix | 1 package (5 ounces) |
| Sweetened condensed milk | 1 can (14 ounces) |
| Vanilla extract | 1 teaspoon |
For the best results, ensure all your ingredients are at room temperature before starting. If you enjoy making individual portions, check out our banana pudding cups or perfect single-serve desserts.
Layering Your Banana Pudding Elements for a Perfect No-Bake Banana Pudding Cheesecake
Layering is key when making no-bake banana pudding cheesecake bars or bites. Start by slicing bananas into thin rounds. Make sure they’re all the same size for a nice look.
Begin with a layer of cheesecake mixture, then bananas, and finish with whipped cream. Keep repeating until you’ve used everything, ending with whipped cream on top.
Proper Banana Slicing Techniques
Getting the bananas right is important for a great look. Use a sharp knife or a mandoline for thin, even slices.
Creating Even Layers
Even layers make your dessert look amazing. Spread each layer carefully with an offset spatula to avoid bumps.
Preventing Banana Browning
To stop bananas from turning brown, add a bit of lemon juice before layering.
By following these steps, you’ll make a beautiful and tasty banana pudding cheesecake. It’s perfect for any event. The secret to success is in the layering.
| Layer | Ingredients |
|---|---|
| 1 | Cheesecake mixture |
| 2 | Sliced bananas |
| 3 | Whipped cream |
Setting and Chilling Guidelines for No-Bake Banana Pudding Cheesecake
Patience is key when setting and chilling your banana pudding cheesecake with condensed milk. You want it to set right for the perfect texture. Follow the chilling time, which is usually several hours or overnight.
A no-bake banana pudding cheesecake philadelphia style needs careful chilling. Place it in the fridge for at least 6 hours or overnight. This lets the flavors mix well and the texture set.
Here are some tips for setting and chilling your banana pudding cheesecake:
- Make sure to cover the cheesecake with plastic wrap or aluminum foil to prevent it from drying out.
- Keep the cheesecake away from direct sunlight and heat sources.
- Let the cheesecake chill for the recommended amount of time to ensure it sets properly.
| Chilling Time | Texture |
|---|---|
| 6 hours | Set, but still slightly soft |
| Overnight | Firm and creamy |
By following these guidelines and using high-quality ingredients like condensed milk, you’ll create a delicious banana pudding cheesecake. It will impress everyone.
Delicious Variations of No-Bake Banana Pudding Cheesecake to Try
No-bake banana pudding cheesecake offers endless possibilities. You can find many recipes online, like one from Facebook that adds a twist to the classic. For an easy recipe, try using a pre-made crust or simplifying the filling.
Here are some tasty variations to try:
- Mini cheesecake bites: Perfect for parties or gatherings, these bite-sized treats are easy to make and fun to eat.
- Cheesecake bars: A great alternative to traditional cheesecake, these bars are easy to serve and can be cut into bite-sized pieces.
- Different crust options: Try using a different type of cookie or nut to create a unique crust flavor.
Trying different variations can help you find your favorite banana pudding cheesecake. With a little creativity, you can make a dessert that’s both delicious and looks great.
| Variation | Description |
|---|---|
| Mini Cheesecake Bites | Perfect for parties or gatherings |
| Cheesecake Bars | Easy to serve and cut into bite-sized pieces |
| Different Crust Options | Try using a different type of cookie or nut for a unique flavor |
Storage and Make-Ahead Tips
Storing your no-bake banana pudding cheesecake right is key to keeping it fresh and tasty. People often ask can you eat philadelphia no-bake cheesecake filling? Yes, you can, but it’s important to store it correctly. Keep it in an airtight container in the fridge for up to 3 days.
Ever wondered why won’t my no-bake cheesecake set? It could be because of how you stored or handled it. To fix this, keep the cheesecake in the fridge at a steady temperature below 40°F (4°C). Freezing it for up to 2 months works too, just wrap it well in plastic or foil.
Here are some tips for making and storing your no-bake banana pudding cheesecake:
- Make the cheesecake filling and pudding ahead of time. Store them in separate containers in the fridge.
- Assemble the cheesecake just before serving, or keep it in the fridge for up to 24 hours before serving.
- Think about making individual servings. It makes storing and serving easier.
By using these tips, you can enjoy your no-bake banana pudding cheesecake at its best. Always check the cheesecake for spoilage before serving. If it smells bad, looks off, or has mold, throw it away.
| Storage Method | Storage Time | Temperature |
|---|---|---|
| Airtight container in refrigerator | Up to 3 days | Below 40°F (4°C) |
| Freezer | Up to 2 months | 0°F (-18°C) or below |
Serving Suggestions and Garnishing Ideas
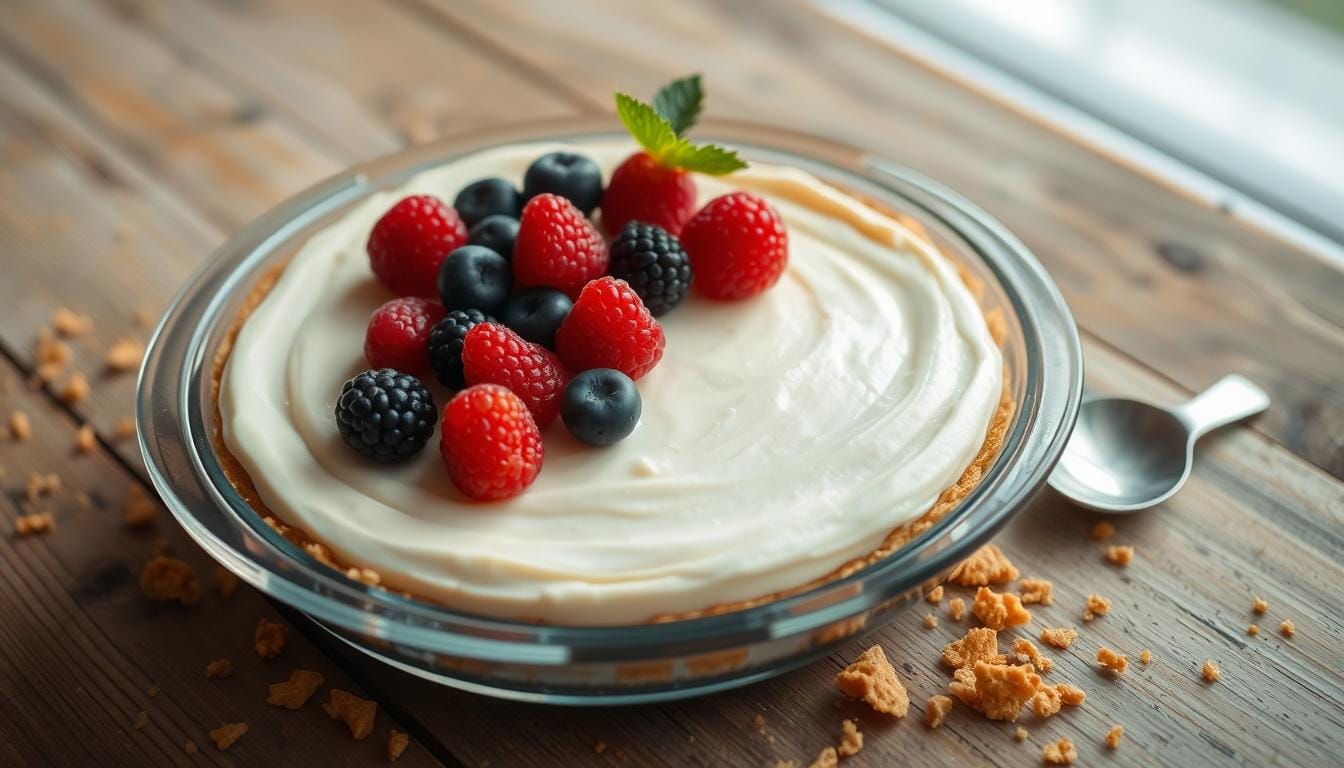
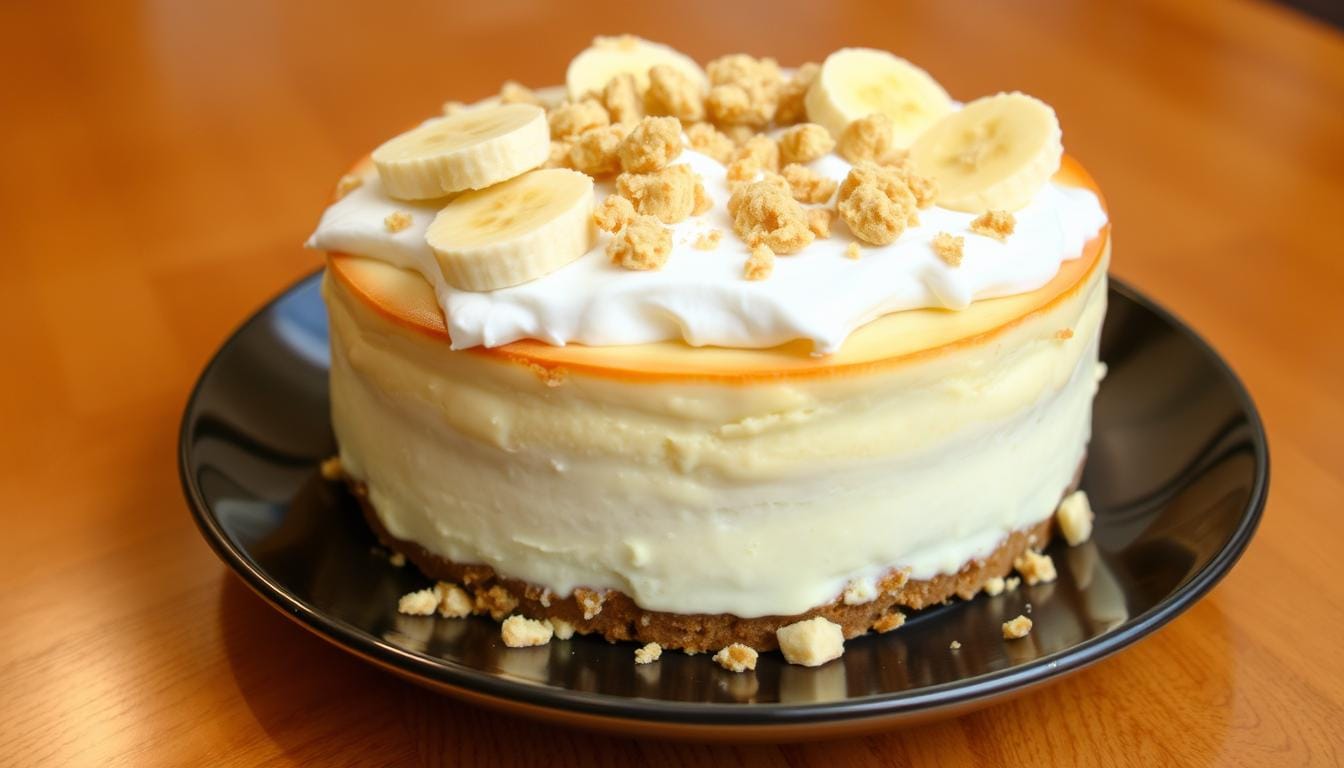
When serving your no-bake banana pudding cheesecake, presentation matters a lot. You want to impress everyone with your dessert. Adding fresh fruit like sliced bananas or berries can brighten up your cheesecake and add flavor.
Whipped cream or chopped nuts can also enhance your cheesecake’s texture. If you’re feeling adventurous, try making homemade whipped cream. This can turn your banana pudding cheesecake into a stunning dessert that will wow your guests.
Presentation Tips
To make your no-bake banana pudding cheesecake look great, follow these tips:
- Place your cheesecake on a cake stand or pedestal to make it stand out.
- Decorate with fresh greenery like mint or basil for a fresh look.
- Drizzle caramel or chocolate sauce for a rich, indulgent flavor.
Complementary Toppings
There are many toppings that can complement your no-bake banana pudding cheesecake. Consider these options:
- Chopped nuts like walnuts or pecans for a crunchy texture.
- Caramel sauce for a sweet, sticky taste.
- Chocolate shavings or chips for a rich, decadent flavor.
Conclusion: Enjoying Your No-Bake Banana Pudding Cheesecake
Congratulations on making a delicious no-bake banana pudding cheesecake! This dessert masterfully combines creamy banana goodness with rich cheesecake. Whether you choose to bake it or opt for the quick no-bake method, either way, you’re guaranteed a delightful treat.
Once you finally cut into your no-bake banana pudding cheesecake with cool whip, you’ll immediately enjoy the smooth texture and fresh banana taste. Furthermore, the creamy filling, crunchy crust, and sweet banana pudding flavors all work together seamlessly to create a harmonious balance. To take it up a notch, serve it cold and top it with whipped cream, a sprinkle of cinnamon, or a drizzle of caramel for an unforgettable dessert.
In fact, the secret to crafting a truly great no-bake banana pudding cheesecake recipe lies in using high-quality ingredients and paying close attention to detail. Additionally, by employing the right techniques and exercising a little patience, you’ll create a dessert that everyone will adore. Ultimately, enjoy every bite, and who knows—it might just become your new favorite dessert.
FAQ
What is the difference between banana cream pudding and banana pudding?
Banana cream pudding and banana pudding are similar but different. Banana cream pudding is a custard dessert with milk, sugar, egg yolks, and bananas. Banana pudding, by contrast, is layered with vanilla pudding, banana slices, and sometimes vanilla wafers.
Can you eat the Philadelphia no-bake cheesecake filling?
Yes, you can eat the Philadelphia no-bake cheesecake filling by itself. It’s made from cream cheese, sugar, and stabilizers. This makes it safe to eat without baking it into a full cheesecake.
Why won’t my no-bake cheesecake set?
There are a few reasons why a no-bake cheesecake might not set right. It could be because it didn’t chill long enough or had too much liquid. Not letting it set in the fridge long enough can also cause it to stay soft.
Does no-bake cheesecake taste better?
Whether no-bake cheesecake tastes better than baked is up to you. No-bake cheesecakes are lighter and creamier. Baked ones are richer and denser. Both are delicious, so it’s really about what you like better.
What is the best way to store no-bake banana pudding cheesecake?
To keep no-bake banana pudding cheesecake fresh, store it in an airtight container in the fridge. This keeps the bananas from turning brown. It’s best to eat it within 3-5 days for the best taste and texture.

")