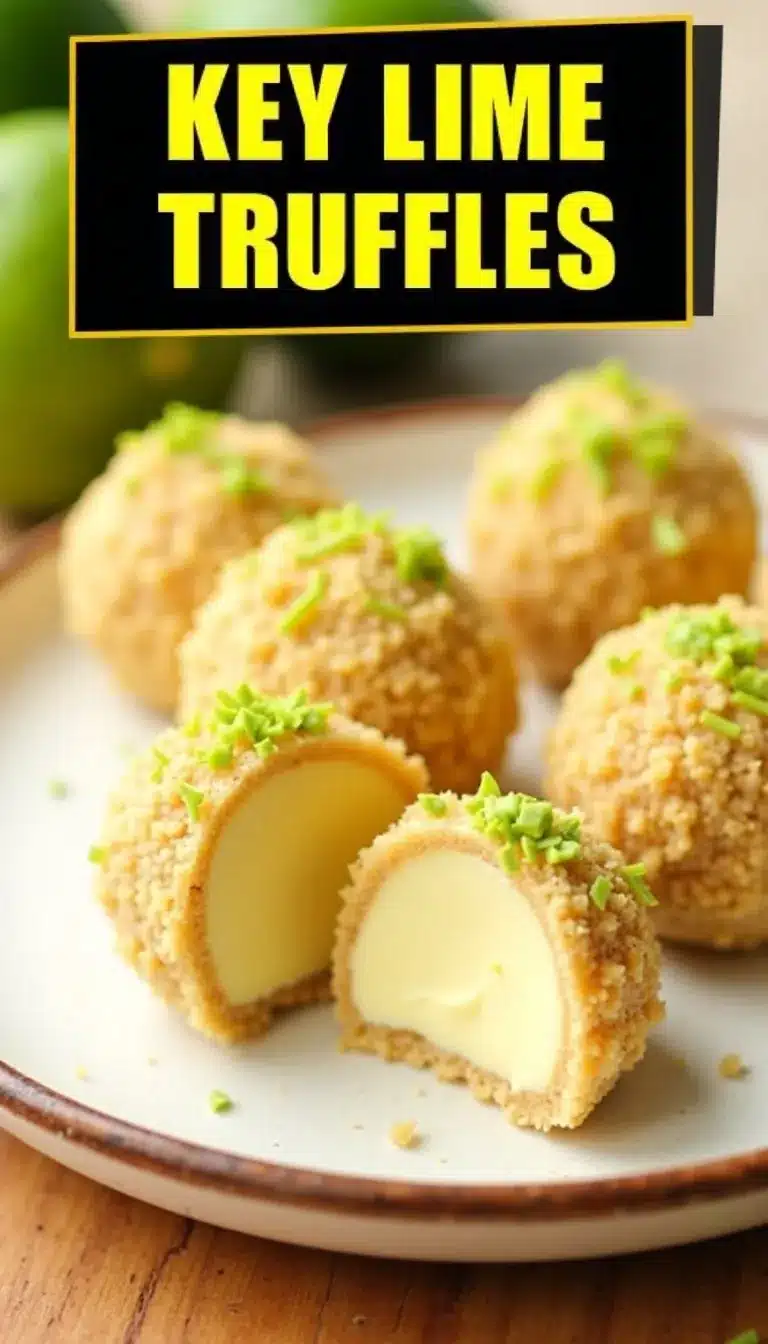
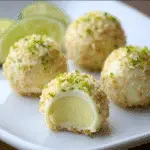
Have you ever taken a bite of something so zesty, creamy, and perfectly sweet that it instantly transports you to a tropical paradise? That’s exactly how I’d describe this Key Lime Truffles recipe. If you love desserts that strike that magical balance between tart and sweet, these easy homemade summer truffles are about to become your new obsession. Honestly, just thinking about that first burst of key lime flavor makes my mouth water! I first stumbled upon the idea for key lime truffles while searching for a no-bake treat to impress my friends at a poolside gathering. Let me tell you, they were a hit—and now, it’s my go-to summer dessert idea. There’s something about the punchy citrus and creamy white chocolate combination that screams summer vacation. Plus, these truffles are as pretty as a Pinterest board—little lime-green gems that look gorgeous on any dessert tray. Whether you want to wow your family or just treat yourself, this recipe is worth making. It’s easy, quick, and you don’t even need to turn on the oven (thank goodness, right?).
Did you know the key lime has been a beloved Florida staple since the 1800s? It’s the secret behind the famous Key lime pie, but in this recipe, we’re turning that classic flavor into bite-sized delights that are perfect for sharing… or keeping all to yourself!
Why You Will Love This Key Lime Truffles Recipe
Key lime truffles have their roots in the sunny, laid-back culture of the Florida Keys, where key limes grow wild and flavor everything from pies to cocktails. Growing up, I’d always see baskets of tiny, fragrant key limes at our local farmer’s market each summer. I remember watching my grandma zesting them to make her legendary pie, and the aroma would fill the whole kitchen. These truffles capture that same fresh, tangy spirit but in a modern, poppable form.
Over the years, I’ve played around with the original idea—sometimes adding coconut for a tropical spin, or a dash of graham cracker for a nod to the classic pie crust. The recipe has changed a bit with each summer, as I try new twists or swap in different coatings. The one thing that never changes is the way they disappear from the dessert table in minutes! These days, key lime truffles are my signature summer treat. They’re perfect for picnics, potlucks, or just as a cool sweet bite after a long day in the sun. The flavors feel especially right during those hot months when you want something refreshing and not too heavy.
The bright green color and citrusy zing make them a standout at any party. Plus, you can make them ahead, and they’re so easy to customize. Whether it’s a sunny backyard BBQ or a fancy brunch, these key lime truffles always fit right in. Honestly, they’re a little taste of Florida sunshine no matter where you live.
Ingredient Discussion
Let’s talk about what goes into these irresistible key lime truffles and how each ingredient makes a difference. Knowing the “why” behind each part helps ensure your truffles turn out perfect every time. Here’s what you’ll need:
- White Chocolate (12 oz / 340 g): This is the creamy base for the truffles. I prefer using high-quality white chocolate bars (like Ghirardelli or Lindt) instead of chips, since they melt more smoothly. If you’re dairy-free, look for vegan white chocolate options—just double-check it melts well. Store unused chocolate in a cool, dry spot, tightly wrapped.
- Cream Cheese (8 oz / 225 g, softened): The tangy cream cheese balances the sweetness and adds that irresistible creamy texture. Go for full-fat blocks, not whipped or spreadable versions. If you need a substitute, vegan cream cheese works in a pinch, but avoid fat-free kinds—they get too soft. Keep it refrigerated until you’re ready to mix.
- Key Lime Juice (1/4 cup / 60 ml): Fresh-squeezed is best, and if you can get your hands on real key limes, you’re in for a treat! They’re smaller, tarter, and more aromatic than standard limes. Bottled key lime juice works if fresh isn’t available—just check for pure juice without added sugar. Regular lime juice can substitute if needed, but the flavor is a bit different. Store juice in the fridge and use within a week.
- Key Lime Zest (1 tbsp / about 2 limes): Zest brings bright, fresh flavor and a pop of color. Always zest before juicing! Use a microplane for best results. If key limes aren’t available, use Persian lime zest (it’s milder, but still tasty). Zest can be frozen for later use—just seal tightly.
- Powdered Sugar (1 cup / 120 g): This sweetens the mixture and helps bind it. Sift the sugar first to avoid lumps. If you’re avoiding refined sugar, try a powdered monk fruit sweetener instead (just note it may change the texture slightly). Store in a sealed container to keep it from clumping.
- Graham Cracker Crumbs (1/2 cup / 60 g, optional): For a pie-inspired twist, roll the finished truffles in graham cracker crumbs. Gluten-free graham crackers work well, too. Crush them yourself for best texture—store leftovers in an airtight jar.
- White Chocolate or Candy Melts for Coating (8 oz / 225 g): This gives the truffles a beautiful, crisp shell. Candy melts are easy for dipping, but I like the taste of real white chocolate. Add a tiny bit of coconut oil (about 1 tsp) if needed to thin the coating. Store coated truffles in the fridge for best texture.
- Green Gel Food Coloring (optional): For a more vibrant, summery look. I use just a dab—too much and it tastes artificial. If you’d rather keep things natural, skip it or add a sprinkle of matcha powder for color.
Sometimes I’ll add a pinch of sea salt or shredded coconut for extra flair. The key is to use the freshest ingredients you can find, especially for the limes. The difference in flavor is totally worth the effort. And don’t be afraid to get creative—these truffles are super forgiving if you need to swap something out.
Equipment Needed
You don’t need a fancy kitchen to whip up a batch of key lime truffles, I promise. Here’s what you’ll want handy:
- Mixing Bowls: At least two—one for the filling, one for melting chocolate. Glass or stainless steel works best.
- Hand Mixer or Stand Mixer: Makes blending the cream cheese and sugar a breeze. A sturdy wooden spoon and some elbow grease work in a pinch, but it’s more effort.
- Microplane or Fine Grater: For zesting those tiny key limes. I’ve tried box graters and they’re just not as effective—microplanes are worth it and last forever if you rinse right after use.
- Small Cookie Scoop or Spoon: For portioning out even truffles. A melon baller or two teaspoons will do if you don’t have a scoop.
- Baking Sheet: For chilling the truffle balls before coating. Line it with parchment paper for easy cleanup.
- Double Boiler or Microwave-Safe Bowl: For melting the chocolate coating. If you don’t own a double boiler, just use a heatproof bowl over a saucepan with simmering water. I’ve even used the microwave in 20-second bursts (just stir frequently to avoid burning).
- Forks or Dipping Tools: For dipping the truffles in chocolate. Toothpicks work, but I prefer forks for more control.
Honestly, most of these are probably already in your kitchen. If you’re on a budget, dollar store bowls and tools can work just fine—truffles don’t judge!
How to Make Key Lime Truffles
- Soften the Cream Cheese: Leave 8 oz (225 g) of cream cheese at room temperature for about 30 minutes. It should feel soft and spreadable. (If you’re impatient like me, zap it in the microwave for 10 seconds, but don’t let it melt!)
Time: 30 minutes (passive) - Make the Truffle Base: In a medium mixing bowl, beat softened cream cheese until smooth. Add 1 cup (120 g) sifted powdered sugar and mix until fully combined. The mixture should be fluffy but thick.
Time: 2-3 minutes - Add Lime Flavors: Mix in 1/4 cup (60 ml) key lime juice and 1 tbsp zest. Beat until smooth. If you want a brighter color, add a drop or two of green gel food coloring now.
Time: 1 minuteNote: The mixture may look loose—don’t panic! It will firm up after chilling.
- Melt the White Chocolate: In a microwave-safe bowl, heat 12 oz (340 g) chopped white chocolate in 20-second bursts, stirring after each. Or, use a double boiler over low heat. When smooth, let cool for 2-3 minutes so it doesn’t melt the cream cheese mixture.
Time: 3-5 minutesTip: If it seizes or gets grainy, stir in a teaspoon of coconut oil.
- Combine: Fold the melted white chocolate into the cream cheese-lime mixture. Stir gently until fully blended.
Time: 1-2 minutesWarning: Don’t overmix or the chocolate may seize.
- Chill: Cover the bowl tightly and refrigerate for 1-2 hours, until the mixture is firm enough to scoop. (If you’re in a hurry, place in the freezer for 30 minutes.)
Time: 1-2 hours (passive) - Shape the Truffles: Using a small cookie scoop or spoon, portion out 1-inch (2.5-cm) balls. Roll quickly between your palms (it’s messy, but fun!). Place on a parchment-lined baking sheet.
Time: 10-15 minutesTip: If the mixture gets too sticky, chill your hands or dust them with powdered sugar.
- Freeze for Dipping: Freeze the shaped balls for 20 minutes to make coating easier.
Time: 20 minutes (passive) - Melt Coating Chocolate: Melt 8 oz (225 g) white chocolate or candy melts (plus 1 tsp coconut oil if needed) in a bowl.
Time: 3-5 minutesWarning: Do not overheat!
- Dip the Truffles: Using a fork, dip each chilled ball into the melted chocolate, tap gently to remove excess, and return to the baking sheet. While wet, sprinkle with graham cracker crumbs, extra lime zest, or coconut if desired.
Time: 10-15 minutes - Chill to Set: Refrigerate truffles until the coating is firm—about 20 minutes.
Time: 20 minutes (passive) - Serve: Arrange on a pretty platter, and watch them disappear!
Time: Immediate
That’s it! If your truffles turn out too soft, try adding a bit more melted white chocolate, or chill longer between steps. Don’t worry if they’re not perfectly round—the homemade look is part of their charm.
Cooking Tips & Techniques
Making truffles is a bit of an art, but a few pro tricks can make life easier. First, use the freshest limes you can find—old limes just don’t have the same punch. For the creamiest texture, always use full-fat cream cheese and good chocolate. I once tried using white chocolate chips, and they never melted quite right—lesson learned!
If your mixture is too soft to roll, don’t panic—just chill it longer. Sometimes, humidity or a warm kitchen can make things tricky. When dipping, work quickly and in small batches, keeping the rest of the truffles in the fridge or freezer until you’re ready. This keeps them firm and easy to handle.
One time, I forgot to let my melted chocolate cool a bit before adding it to the cream cheese, and it totally separated—so always let it come down to just warm (not hot). If your chocolate starts to seize up while dipping, add a tiny splash of coconut oil or shortening and stir gently—it usually brings it back.
Don’t worry about making every truffle identical—imperfections are part of the fun! And if you’re multitasking, set up a little truffle assembly line: shape all the balls first, freeze, then dip. It makes the process more efficient and less stressful. Consistency comes with practice, but honestly, even the “ugly” ones taste amazing.
Variations & Adaptations
There are so many fun ways to tweak this key lime truffles recipe to fit
Key Lime Truffles
- Total Time: 2 hours 30 minutes
- Yield: 24 truffles 1x
Description
These easy, no-bake Key Lime Truffles are creamy, zesty, and perfectly sweet—like a bite-sized taste of Florida sunshine. With a tangy cream cheese and white chocolate base, they’re the ultimate summer dessert for parties or snacking.
Ingredients
- 12 oz white chocolate (preferably bars, not chips)
- 8 oz cream cheese, softened
- 1 cup powdered sugar, sifted
- 1/4 cup key lime juice (fresh or bottled)
- 1 tbsp key lime zest (about 2 limes)
- 1/2 cup graham cracker crumbs (optional, for coating)
- 8 oz white chocolate or candy melts for coating
- 1 tsp coconut oil (optional, for thinning coating)
- Green gel food coloring (optional, for color)
- Extra lime zest, graham cracker crumbs, or shredded coconut for garnish (optional)
Instructions
- Soften the cream cheese by leaving it at room temperature for about 30 minutes or microwaving for 10 seconds (do not melt).
- In a medium mixing bowl, beat the softened cream cheese until smooth. Add sifted powdered sugar and mix until fluffy and thick.
- Mix in key lime juice and zest. Add a drop or two of green gel food coloring if desired. The mixture may look loose; it will firm up after chilling.
- Melt 12 oz white chocolate in a microwave-safe bowl in 20-second bursts, stirring after each, or use a double boiler. Let cool for 2-3 minutes.
- Fold the melted white chocolate into the cream cheese-lime mixture until fully blended. Do not overmix.
- Cover the bowl and refrigerate for 1-2 hours, or freeze for 30 minutes, until the mixture is firm enough to scoop.
- Using a small cookie scoop or spoon, portion out 1-inch balls. Roll between your palms and place on a parchment-lined baking sheet.
- Freeze the shaped balls for 20 minutes to make coating easier.
- Melt 8 oz white chocolate or candy melts (plus 1 tsp coconut oil if needed) in a bowl.
- Using a fork, dip each chilled ball into the melted chocolate, tap gently to remove excess, and return to the baking sheet. While wet, sprinkle with graham cracker crumbs, extra lime zest, or coconut if desired.
- Refrigerate truffles until the coating is firm, about 20 minutes.
- Serve and enjoy!
Notes
For best results, use fresh key limes and high-quality white chocolate. If the mixture is too soft to roll, chill longer. Work in small batches when dipping to keep truffles firm. Add a pinch of sea salt or shredded coconut for extra flavor. Truffles can be made ahead and stored in the fridge for up to 1 week.
- Prep Time: 30 minutes
- Cook Time: 0 minutes
- Category: Dessert
- Cuisine: American
Nutrition
- Serving Size: 1 truffle
- Calories: 120
- Sugar: 13
- Sodium: 35
- Fat: 6
- Saturated Fat: 4
- Carbohydrates: 15
- Protein: 1
Keywords: key lime truffles, summer dessert, no-bake, white chocolate, key lime, easy truffles, party dessert, Florida dessert, homemade truffles