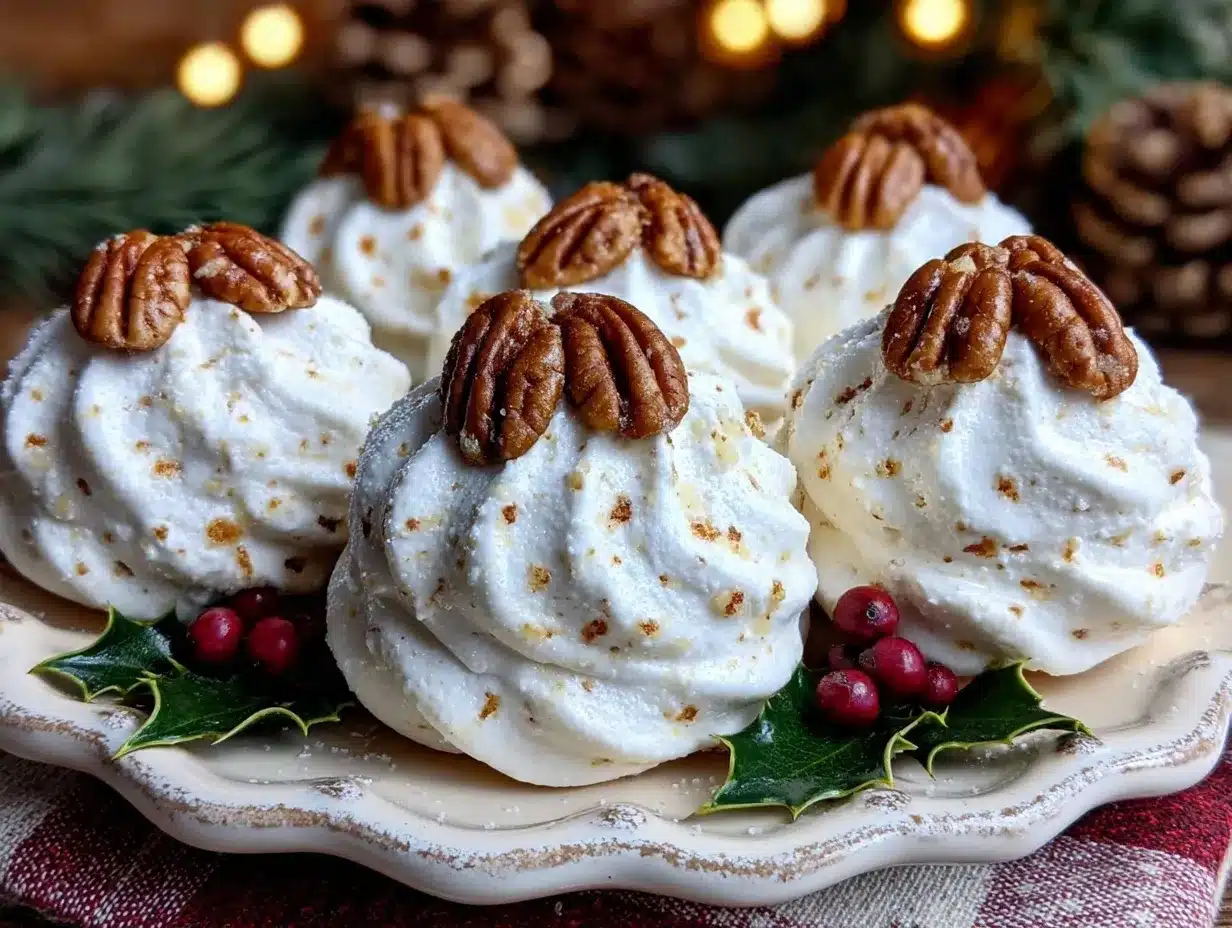
I can still hear the sound of my grandma’s wooden spoon scraping the sides of her mixing bowl as she whipped up her famous divinity candy every Christmas. The kitchen smelled like sugar and vanilla, and the counters were dusted in powdered sugar—like a little winter wonderland. Her divinity wasn’t just candy; it was magic, soft clouds of sweetness that melted in your mouth and made every holiday feel extra special.
Fast forward to today, and this vintage divinity candy recipe has become my go-to for creating those same cozy holiday vibes. It’s one of those old-fashioned treats that feels like a hug from the past. Sure, it’s a little finicky, but trust me—once you taste it, you’ll understand why it’s worth the effort.
This irresistible vintage divinity candy is perfect for gifting, sharing at holiday parties, or keeping all to yourself (no judgment here). If you’ve never made divinity before, don’t worry—I’ve got tips and tricks to make sure you nail it on your first try.
Why You’ll Love This Recipe
Let me tell you—this recipe has everything you need to make your holiday season feel extra special. Here’s why I adore it:
- Classic Christmas nostalgia: This candy feels like stepping back in time to old-fashioned holiday traditions. It’s the kind of treat your grandma probably made.
- Light, fluffy texture: Divinity candy is like edible clouds—soft, airy, and melt-in-your-mouth sweet.
- Perfect for gifting: Pack these up in cute tins or boxes, and you’ve got an impressive homemade gift that feels thoughtful and personal.
- Customizable: Add nuts, dried fruit, or even a drizzle of chocolate to make it your own. (More ideas in the “Ways to Mix It Up” section!)
Whether you’re whipping up a batch for your holiday dessert table or sneaking a few bites while wrapping presents, this recipe is guaranteed to bring joy.
What Ingredients You’ll Need
Here’s the thing about divinity candy—it’s deceptively simple. You only need a handful of ingredients, but the magic is in how you work them together. Let’s break it down:
- Granulated sugar (2 cups / 400g): The backbone of this recipe. Use regular white sugar, and don’t try to swap it for alternatives like brown sugar—it won’t work.
- Light corn syrup (½ cup / 120ml): Essential for that glossy, smooth texture. I use Karo syrup, but any light corn syrup will do.
- Water (½ cup / 120ml): Helps dissolve the sugar and keeps everything flowing smoothly.
- Egg whites (2 large, room temperature): Whipped to stiff peaks, these give the candy its signature airy texture. Room temperature eggs whip up faster and hold their structure better.
- Vanilla extract (1 tsp): The classic flavoring. Use the good stuff—real vanilla extract makes a big difference.
- Optional: Chopped nuts (½ cup / 60g): Pecans or walnuts are traditional, but feel free to experiment with your favorites.
- Optional: Food coloring: A few drops if you want to add festive flair, like red or green for Christmas.
Quick note: Don’t skimp on the quality of your ingredients. Trust me, it’s worth it—especially for the vanilla extract.
Equipment Needed
You don’t need fancy gadgets to make this recipe, but there are a few tools that are non-negotiable:
- Heavy-bottom saucepan: For cooking the sugar syrup evenly. Thin pans can lead to scorching, so go for something sturdy.
- Candy thermometer: Absolutely essential. Divinity candy is all about precision—you’ll need to hit exactly 250°F (121°C).
- Stand mixer or hand mixer: Whipping egg whites to stiff peaks takes some muscle. A mixer makes it so much easier.
- Rubber spatula: Perfect for folding in nuts or scraping down the sides of the mixing bowl.
- Wax paper or parchment paper: For dropping the candy onto and letting it set without sticking.
Pro tip: A candy thermometer is your best friend here. If you don’t have one, it’s worth investing in—trust me, your holiday baking will thank you.
How to Make It: Step-by-Step
Ready to make some magic happen? Let’s walk through this step-by-step. Don’t worry, I’ve got tips to help you every step of the way.
- Prep your workspace (5 minutes): Lay out a sheet of wax or parchment paper on your counter. Get your mixer ready and have all your ingredients pre-measured—this moves fast once you get going!
- Cook the sugar syrup (10 minutes): In a heavy-bottom saucepan, combine the granulated sugar, corn syrup, and water. Stir gently over medium heat until the sugar dissolves, then stop stirring. Attach your candy thermometer and let the mixture boil until it reaches 250°F (121°C). Don’t let it go higher!
- Whip the egg whites (5 minutes): While the sugar syrup is boiling, beat your egg whites in a clean, dry mixing bowl. Use a stand mixer or hand mixer and whip on high speed until stiff peaks form. You’ll know you’ve hit the mark when the peaks stand straight up without collapsing.
- Combine the syrup and egg whites (5 minutes): Once the syrup reaches 250°F, slowly pour it into the whipped egg whites while the mixer is running on medium speed. Go slow—this step takes patience. The mixture will thicken and turn glossy. Add the vanilla extract and any food coloring, then keep beating until the mixture loses its sheen and holds its shape.
- Drop the candy (10 minutes): Working quickly, use two spoons to drop small mounds of the mixture onto the prepared wax paper. If you’re adding nuts, fold them in before scooping. You’ll need to move fast here—divinity sets up quickly!
- Cool and enjoy (1 hour): Let the candy sit at room temperature until completely set. Once firm, transfer to an airtight container for storage.
Quick tip: If your candy mixture starts to set before you’re done dropping it, you can try adding a few drops of hot water and mixing again to loosen it up.
My Best Tips & Techniques
Divinity candy can be a little tricky, but with these tips, you’ll be a pro in no time:
- Humidity is the enemy: Don’t even think about making divinity on a rainy or humid day—it won’t set properly. Dry, cool weather is your best friend here.
- Don’t rush the syrup: Be patient when cooking the sugar mixture. If you don’t hit the right temperature, the candy won’t set.
- Room temperature eggs: Cold egg whites won’t whip as well. Let them sit out for 30 minutes before starting.
- Work quickly: Once the mixture is ready, you need to drop the candy fast before it hardens. Have everything prepped and ready to go.
- Keep it clean: Grease or water can ruin the texture of divinity. Make sure your bowl, whisk, and spatula are completely dry before starting.
Real talk: I’ve had my fair share of flops with this recipe, but every time I’ve learned something new. Stick with it, and you’ll get the hang of it!
Ways to Mix It Up
Once you’ve mastered the classic recipe, feel free to experiment with these fun variations:
- Pecan Paradise: Fold in ½ cup toasted pecans before dropping the candy. The crunch adds a lovely texture.
- Cherry Bomb: Add chopped candied cherries for a pop of color and extra sweetness. They look so festive!
- Chocolate Swirl: Drizzle melted chocolate over the top of each candy mound for a decadent twist.
- Spiced Winter Divinity: Add ½ tsp cinnamon and a pinch of nutmeg to the sugar syrup for warm, cozy holiday vibes.
- Minty Fresh: Swap vanilla extract for peppermint extract and add green food coloring for a refreshing holiday treat.
Don’t be afraid to get creative—this candy is a blank canvas for your favorite flavors and mix-ins!
Serving Ideas & Storage
Divinity candy is as versatile as it is delicious. Here are some ideas for serving and storing it:
Serving Suggestions
- Holiday dessert trays: Add these to a platter with cookies, fudge, and other treats for a show-stopping display.
- Gift boxes: Pack them up in festive tins or jars and tie with ribbon for a thoughtful homemade gift.
- Snack time: Pair a piece with a cup of hot cocoa or tea for the ultimate cozy moment.
Storage Tips
- Room temperature: Store in an airtight container for up to 5 days. Keep them away from heat and humidity.
- Freezer: Divinity can be frozen! Wrap pieces individually in wax paper and store in a freezer-safe container for up to 1 month. Let them thaw at room temperature before serving.
Nutritional Info & Health Benefits
Let’s be real—this is candy, so it’s meant to be enjoyed in moderation. But here’s the rundown:
| Nutrient | Per Piece |
|---|---|
| Calories | 75 |
| Sugar | 18g |
| Protein | 1g |
| Fat | 0g |
While divinity is definitely a treat, it’s naturally gluten-free, so it’s great for people avoiding gluten during the holidays.
Real talk: It’s candy—it’s not supposed to be healthy. Enjoy it for what it is, and balance it out with a veggie-packed dinner later!
Final Thoughts
So that’s my irresistible vintage divinity candy recipe! I truly love sharing this sweet tradition with family and friends, and now you can, too.
It’s a little slice of Christmas magic, and every time I make it, I’m reminded of holidays spent in my grandma’s kitchen, surrounded by love, laughter, and way too much sugar.
If you make this recipe, I’d absolutely love to hear how it turns out! Leave a comment below or tag me on Instagram @yourhandle so I can see your creations.
Happy holidays, and enjoy every bite of this sweet, fluffy goodness!
FAQs
Q: Why is my divinity candy not setting?
A: This usually happens if the sugar syrup didn’t reach 250°F, or if you made it on a humid day. Double-check your candy thermometer and try again on a dry day!
Q: Can I make divinity without a candy thermometer?
A: Technically, yes, but it’s tricky. The syrup is ready when it forms a firm ball when dropped into cold water, but a thermometer is much more reliable.
Q: Can I use dark corn syrup instead of light?
A: I don’t recommend it—it will change the flavor and color of the candy. Stick with light corn syrup for the best results.
Q: What’s the best way to add nuts without ruining the texture?
A: Fold them in gently right before you start dropping the candy. Toasted pecans or walnuts work best, but don’t overdo it—too many nuts can make the candy dense.
Q: Can I make this ahead of time for a party?
A: Absolutely! Divinity stores well for up to 5 days at room temperature or a month in the freezer. Just keep it in an airtight container to maintain freshness.
Pin This Recipe!

Irresistible Vintage Divinity Candy Recipe for Christmas
- Total Time: 1 hour 20 minutes
- Yield: Approximately 24 pieces 1x
Description
This vintage divinity candy recipe is a soft, airy, melt-in-your-mouth treat perfect for gifting, holiday parties, or enjoying yourself.
Ingredients
- 2 cups granulated sugar (400g)
- 1/2 cup light corn syrup (120ml)
- 1/2 cup water (120ml)
- 2 large egg whites, room temperature
- 1 teaspoon vanilla extract
- 1/2 cup chopped nuts (optional, 60g)
- Food coloring (optional)
Instructions
- Prep your workspace: Lay out wax or parchment paper, pre-measure ingredients, and set up your mixer.
- Cook the sugar syrup: Combine sugar, corn syrup, and water in a heavy-bottom saucepan. Stir gently over medium heat until sugar dissolves, then stop stirring. Attach a candy thermometer and boil until the mixture reaches 250°F (121°C).
- Whip the egg whites: Beat egg whites in a clean, dry mixing bowl on high speed until stiff peaks form.
- Combine syrup and egg whites: Slowly pour the hot syrup into the whipped egg whites while mixing on medium speed. Add vanilla extract and food coloring, then continue beating until the mixture thickens and loses its sheen.
- Drop the candy: Use two spoons to drop small mounds of the mixture onto prepared wax paper. Fold in nuts before scooping if desired.
- Cool and enjoy: Let the candy set at room temperature for 1 hour until firm. Store in an airtight container.
Notes
[“Avoid making divinity on humid days as it won’t set properly.”, ‘Room temperature egg whites whip better and hold their structure.’, ‘Work quickly when dropping the candy as it sets fast.’, ‘Ensure all equipment is clean and dry to avoid ruining the texture.’]
- Prep Time: 5 minutes
- Cook Time: 15 minutes
- Category: Dessert
- Cuisine: American
Nutrition
- Serving Size: 1 piece
- Calories: 75
- Sugar: 18
- Carbohydrates: 18
- Protein: 1
Keywords: Divinity candy, Christmas candy, holiday dessert, vintage recipe, gluten-free candy


