I still remember the moment I first tasted this tiramisu cold brew coffee cheesecake—my kitchen smelled like a cozy Italian café, and the creamy layers practically melted on my tongue. There’s something about combining rich coffee flavor with smooth cheesecake that feels like a little slice of heaven. Honestly, I’ve made this no bake treat so many times now, it’s become my go-to dessert for when I want to impress without turning on the oven.
What makes this recipe stand out? It’s the perfect balance between the boldness of cold brew coffee and the lusciousness of homemade cheesecake, all wrapped up in that classic tiramisu vibe. If you love coffee, creamy desserts, or no-fuss recipes, this one’s going to be your new obsession.
Why You’ll Love This Recipe
Okay, real talk—this tiramisu cold brew coffee cheesecake has spoiled me for all other desserts. Here’s why I keep coming back to it and why you will too:
- Effortless No Bake Magic: You don’t need an oven or fancy equipment. I’ve whipped this up after a long day, with just a bowl, a whisk, and some patience while it chills.
- Bold Coffee Flavor Without Bitterness: Using cold brew coffee gives it that smooth, rich taste that’s not too acidic or bitter. It’s like drinking your favorite coffee but in a dessert.
- Decadent Yet Light Texture: The cheesecake layer is creamy and airy thanks to the whipped cream and cream cheese combo. It’s indulgent without feeling heavy.
- Impressively Homemade: Guests always ask if it’s store-bought because it looks so polished, but it’s all you, I promise.
This cheesecake isn’t just dessert—it’s the kind of treat that makes you pause, savor, and maybe even sneak a second slice when no one’s looking. It’s perfect for date nights, weekend gatherings, or just when you want to treat yourself to something special.
What Ingredients You’ll Need
Here’s the thing about this ingredient list: most of it is pantry staples, but a few key players really bring it home. I’ll tell you why each one matters (and share some swaps I’ve tried when I was in a pinch).
- Graham cracker crumbs (1 ½ cups / 150g) — This makes the crust, giving that buttery crunch that contrasts beautifully with the creamy filling. I always use Honey Maid because it’s consistently good, but any brand works.
- Unsalted butter (6 tablespoons / 85g, melted) — Binds the crust and adds richness. Margarine? Nah, butter is worth it here.
- Cream cheese (16 oz / 450g, softened) — The base of the cheesecake layer. Full-fat is the way to go for that silky texture.
- Heavy whipping cream (1 cup / 240ml) — Whipped to fluffy perfection, it lightens the cheesecake so it’s not dense or heavy.
- Cold brew coffee concentrate (½ cup / 120ml) — The star of the show. I buy the concentrate from my local coffee roaster, but you can make your own by steeping coarse coffee grounds overnight in cold water.
- Granulated sugar (¾ cup / 150g) — Sweetens the filling just right without overpowering the coffee flavor.
- Vanilla extract (1 teaspoon) — Adds warmth and depth. I swear by Nielsen-Massey—worth every penny.
- Espresso powder (1 teaspoon) — Optional, but I add it for an extra coffee punch. It dissolves easily and amps up the flavor.
- Ladyfinger cookies (about 24) — The classic tiramisu touch. They soak up the coffee and add texture without sogginess.
- Cocoa powder (for dusting) — The finishing touch that makes it look fancy and adds a slight bitterness to balance the sweetness.
Pro tip: If you don’t have cold brew, strong brewed coffee works, but let it cool completely. Also, if you’re in a pinch, store-bought ladyfingers are fine, but homemade ones take it next level.
Equipment Needed
You don’t need a fancy setup for this tiramisu cold brew coffee cheesecake. I made it in a tiny apartment kitchen with the basics, and it turned out amazing.
- 9-inch springform pan or deep pie dish — The springform pan makes slicing easier, but a regular pie dish works too.
- Mixing bowls — I use two: one for the crust and one for the filling.
- Electric mixer or hand whisk — I’m all about my stand mixer, but a hand mixer works just fine. Whipping the cream by hand is doable but an arm workout.
- Spatula — For folding the whipped cream into the cream cheese without deflating it.
- Measuring cups and spoons — Baking and no-bake desserts still need precision.
- Sifter or fine mesh strainer — To dust the cocoa powder evenly on top. Makes it look professional.
Quick note: If you don’t have a springform pan, just line your pie dish with plastic wrap for easy removal. I’ve done this more times than I can count.
How to Make It: Step-by-Step

- Prepare the crust (10 minutes)
In a medium bowl, mix the graham cracker crumbs and melted butter until it looks like wet sand. Press this mixture firmly into the bottom of your 9-inch springform pan (or pie dish). Pop it in the fridge to chill while you make the filling—this helps it set up. - Whip the cream (5 minutes)
In a large bowl, beat the heavy whipping cream with half the sugar (½ cup / 100g) on medium-high speed until stiff peaks form. Set aside. - Make the cream cheese filling (7 minutes)
In another bowl, beat the softened cream cheese, remaining sugar (¼ cup / 50g), vanilla extract, and espresso powder until smooth and creamy. Slowly pour in the cold brew coffee concentrate while mixing on low speed, making sure it’s fully incorporated without curdling. - Fold in the whipped cream (3 minutes)
Gently fold the whipped cream into the cream cheese mixture. Use a spatula and go slow—you want to keep it light and airy. - Assemble the layers (10 minutes)
Quickly dip ladyfingers one at a time into cold brew coffee (don’t soak them; a quick dunk is enough). Arrange a layer of dipped ladyfingers over the chilled crust. Spread half the cheesecake filling over the ladyfingers. Repeat with another layer of dipped ladyfingers and the remaining filling. - Chill and set (at least 4 hours, preferably overnight)
Cover the cheesecake with plastic wrap and refrigerate. This step is crucial for the flavors to meld and the texture to firm up. - Finish with cocoa (2 minutes)
Just before serving, sift a generous layer of cocoa powder over the top. It adds that iconic tiramisu look and a touch of bittersweetness.
Heads up: If your filling feels a bit loose before chilling, don’t worry—it firms up beautifully in the fridge.
My Best Tips & Techniques
After making this tiramisu cold brew coffee cheesecake more times than I can count, here are the nuggets I want you to have:
- Don’t over-soak the ladyfingers. I learned this the hard way. Too much coffee and they get mushy and fall apart. A quick dip is all they need.
- Softened cream cheese is key. Take it out of the fridge at least an hour before starting. Cold cream cheese leads to lumps, and no one wants that.
- Use cold brew concentrate. It’s smoother and less acidic than regular coffee, which means your cheesecake won’t taste bitter or chalky.
- Whip cream to stiff peaks. Anything less and your filling won’t hold its shape well. But don’t go past stiff peaks or it’ll get grainy.
- Chill overnight if you can. The flavors deepen and the texture becomes dreamy. I’ve tried it after just four hours, and it’s good, but overnight is magic.
- Brush the crust with melted butter. It seals the crumbs and keeps the crust from getting soggy. I used to skip this and regretted it.
Ways to Mix It Up
Once you nail the classic tiramisu cold brew coffee cheesecake, it’s fun to experiment. Here’s what I’ve tried, and trust me, all are winners:
- Mocha Twist: Add 2 tablespoons of cocoa powder to the crust and mix ¼ cup semi-sweet chocolate chips into the filling for a chocolate-coffee dream.
- Vanilla Bean Upgrade: Swap vanilla extract for 1 teaspoon of vanilla bean paste. The flecks look so pretty and the flavor is next level.
- Boozy Boost: Stir in 2 tablespoons of coffee liqueur (like Kahlúa) into the filling for adult-only indulgence. My friends love this one at parties.
- Berry Surprise: Add a layer of fresh raspberries or strawberries between the ladyfingers and filling. The tartness cuts through the richness beautifully.
- Gluten-Free Version: Use gluten-free ladyfingers or thinly sliced gluten-free pound cake. The texture changes a bit but it’s still fantastic.
- Dairy-Free Option: I haven’t tried this myself, but readers have swapped cream cheese for cashew cream and used coconut whipped cream—results vary, but worth a shot.
Serving Ideas & Storage
This tiramisu cold brew coffee cheesecake is best served chilled but not rock cold. I like slicing it about 10 minutes after taking it out of the fridge so the flavors can bloom.
Serving suggestions:
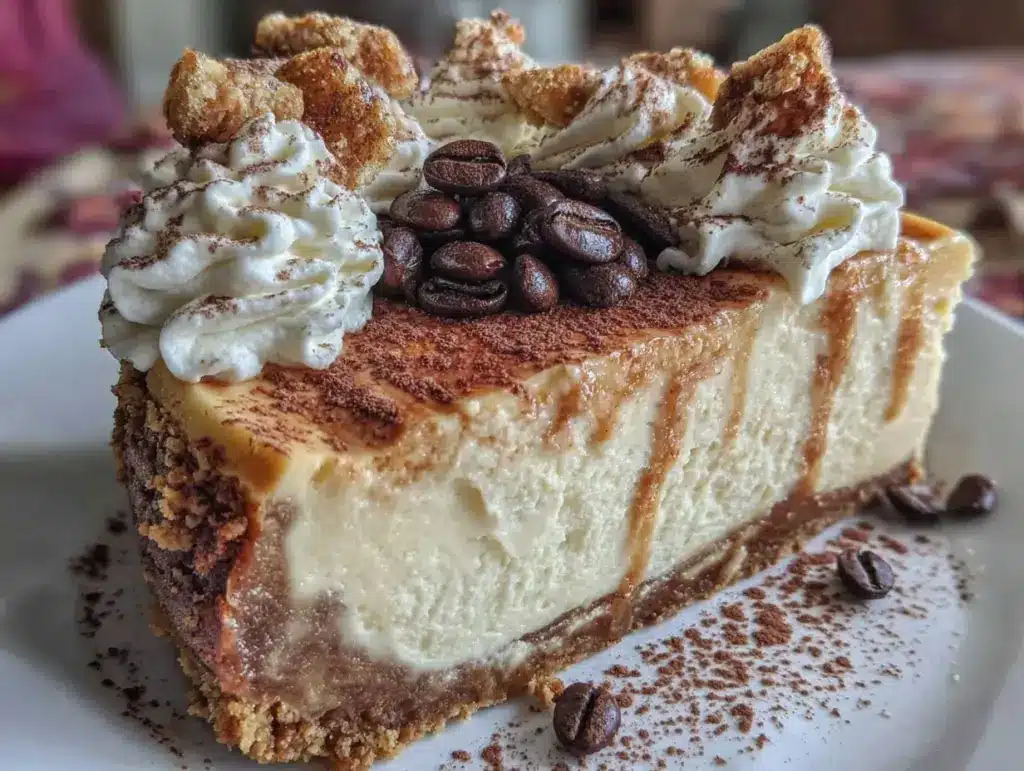
- Serve with a dusting of extra cocoa powder and a few coffee beans on top for a fancy touch.
- Pair with an espresso or your favorite cold brew coffee for the ultimate coffee-themed dessert experience.
- For brunch, serve alongside fresh berries and a dollop of whipped cream.
Storage tips:
- Keep it covered in the fridge for up to 4 days. It actually tastes better after a day or two.
- You can freeze it in portions wrapped tightly in plastic wrap and foil, up to 2 months. Thaw overnight in the fridge before serving.
- Leftovers make incredible parfait layers with granola and fresh fruit.
Nutritional Info & Health Benefits
Here’s the lowdown on what you’re eating (per slice, based on 12 servings):
| Calories | Protein | Carbs | Fat | Fiber |
|---|---|---|---|---|
| 320 | 6g | 28g | 21g | 1g |
Why I feel good about this dessert: The cream cheese and heavy cream pack a decent protein punch compared to other desserts. Plus, the cold brew coffee adds antioxidants without caffeine overload—especially since it’s concentrated but you’re only using half a cup for the whole recipe.
Real talk: It’s still a rich, indulgent treat with sugar and fat, so enjoy in moderation. But compared to a slice of frosted cake from the bakery? This feels like a smarter, more satisfying choice.
Final Thoughts
So there you have it—my irresistible tiramisu cold brew coffee cheesecake recipe that’s easy to make, no bake, and sure to wow anyone who tries it. Honestly, this dessert has become my secret weapon for celebrations and casual get-togethers alike.
What I love most is how customizable it is. Whether you want to keep it classic or jazz it up with a mocha twist or fresh berries, it always delivers. Plus, it’s surprisingly forgiving, so even if you’re not a pro baker, you’ll look like one.
If you make this, please let me know how it turns out! Drop a comment below or tag me on Instagram—I get genuinely excited seeing your versions. And if you have any questions or want more tips, just ask. I check comments daily and love helping out.
Happy no-bake cheesecake adventures! I hope your kitchen smells as amazing as mine does right now.
FAQs
Q: Can I use regular brewed coffee instead of cold brew concentrate?
A: Yep! Just make sure it’s strong and fully cooled before you add it to the filling. Cold brew is smoother and less acidic, but strong brewed coffee works in a pinch. I’d recommend using about half the amount and adjust to taste so it doesn’t get bitter.
Q: How do I know when the cheesecake is set enough to serve?
A: After chilling for at least 4 hours, the filling should be firm but still creamy. If you jiggle the pan, it shouldn’t wiggle too much. Overnight chilling is best for perfect texture and flavor melding.
Q: Can I make this ahead of time for a party?
A: Absolutely! In fact, it’s even better the next day. I usually make it the night before and keep it refrigerated until serving. Just dust with cocoa powder right before guests arrive for that fresh look.
Q: What if I don’t have ladyfingers? Can I use something else?
A: Definitely. You can substitute with vanilla wafers, sponge cake slices, or even pound cake. Just be mindful of soaking time since some of these soak up more liquid and can get soggy faster.
Q: Can I double this recipe for a larger crowd?
A: For sure! Double everything and use a larger pan or two springform pans. Keep an eye on chilling time—it might take a bit longer to set with a bigger volume. And fair warning: your kitchen will smell like a coffee shop, and everyone will want a slice.
Pin This Recipe!


Irresistible Tiramisu Cold Brew Coffee Cheesecake Recipe Easy No Bake Delight
- Total Time: 4 hours 25 minutes
- Yield: 12 servings 1x
Description
A no-bake tiramisu cheesecake combining bold cold brew coffee flavor with creamy, airy cheesecake layers and a buttery graham cracker crust. Perfect for coffee lovers seeking an effortless yet impressive dessert.
Ingredients
- 1 ½ cups (150g) graham cracker crumbs
- 6 tablespoons (85g) unsalted butter, melted
- 16 oz (450g) cream cheese, softened
- 1 cup (240ml) heavy whipping cream
- ½ cup (120ml) cold brew coffee concentrate
- ¾ cup (150g) granulated sugar
- 1 teaspoon vanilla extract
- 1 teaspoon espresso powder (optional)
- About 24 ladyfinger cookies
- Cocoa powder for dusting
Instructions
- Prepare the crust: In a medium bowl, mix graham cracker crumbs and melted butter until it resembles wet sand. Press firmly into the bottom of a 9-inch springform pan or pie dish. Refrigerate to chill.
- Whip the cream: Beat heavy whipping cream with half the sugar (½ cup / 100g) on medium-high speed until stiff peaks form. Set aside.
- Make the cream cheese filling: Beat softened cream cheese, remaining sugar (¼ cup / 50g), vanilla extract, and espresso powder until smooth. Slowly add cold brew coffee concentrate while mixing on low speed until fully incorporated.
- Fold in whipped cream: Gently fold whipped cream into the cream cheese mixture using a spatula to keep it light and airy.
- Assemble layers: Quickly dip ladyfingers one at a time into cold brew coffee (do not soak). Arrange a layer over the chilled crust, spread half the cheesecake filling over them, then repeat with another layer of dipped ladyfingers and remaining filling.
- Chill and set: Cover with plastic wrap and refrigerate for at least 4 hours, preferably overnight.
- Finish with cocoa: Just before serving, sift a generous layer of cocoa powder over the top.
Notes
[‘Do not over-soak ladyfingers to avoid mushiness.’, ‘Use softened cream cheese for a smooth filling.’, ‘Cold brew concentrate provides smooth, less acidic coffee flavor.’, ‘Whip cream to stiff peaks for best texture.’, ‘Chill overnight for optimal flavor and texture.’, ‘Brush crust with melted butter to prevent sogginess.’, ‘Strong brewed coffee can substitute cold brew if cooled and used in half the amount.’]
- Prep Time: 25 minutes
- Cook Time: 0 minutes
- Category: Dessert
- Cuisine: Italian-inspired
Nutrition
- Serving Size: 1 slice (1/12th of t
- Calories: 320
- Fat: 21
- Carbohydrates: 28
- Fiber: 1
- Protein: 6
Keywords: tiramisu, cold brew coffee, cheesecake, no bake, dessert, coffee dessert, easy cheesecake, tiramisu cheesecake