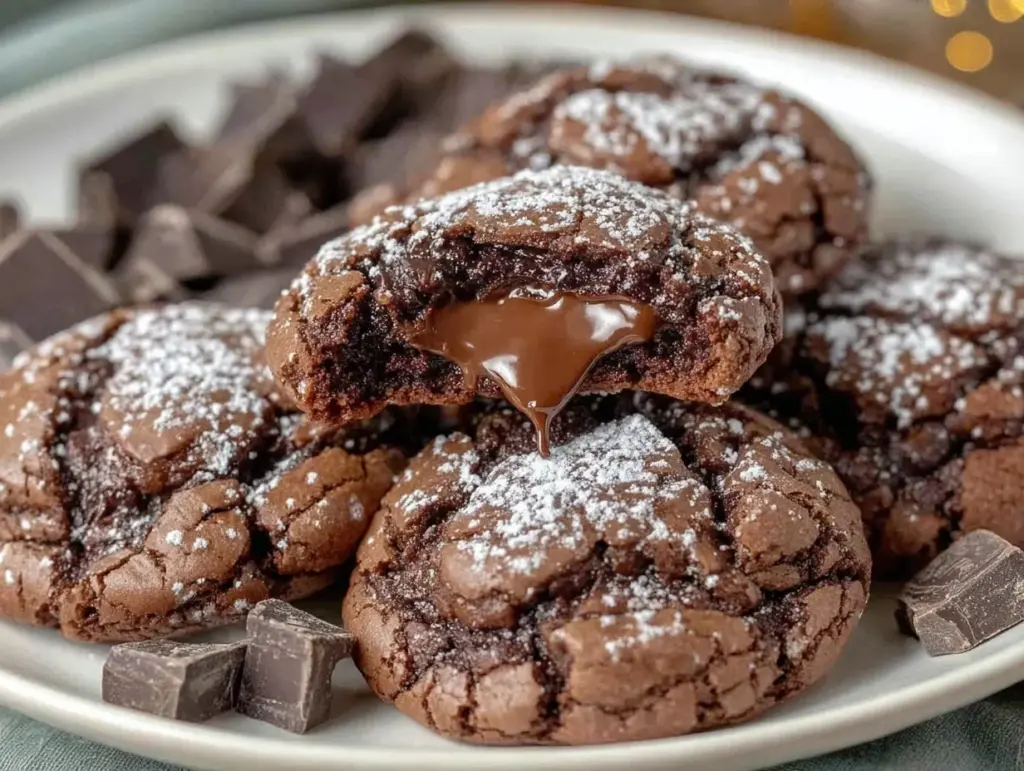
Let me tell you, these cookies are life-changing. The first time I made them, I was just experimenting—trying to combine my love of cookies with my obsession with anything molten chocolate. What I ended up with was pure magic. Imagine biting into a soft, chewy chocolate cookie, only to discover a warm, gooey, melted chocolate center. It’s like the best of a cookie and a lava cake rolled into one irresistible treat.
These chocolate lava cookies have become my go-to dessert for pretty much every occasion. Birthdays, holidays, bad days, even the “I need chocolate now” days—they never disappoint. And the best part? They’re way easier than they look. I’ll walk you through everything you need to know to make these crowd-pleasers, even if you’re not a pro baker. Trust me, if you like chocolate, you’re going to LOVE these.
Why You’ll Love This Recipe
Okay, these cookies are about to become your new obsession, and here’s why:
- Gooey molten center: The warm chocolate filling is the stuff dessert dreams are made of—it oozes out with every bite.
- Chewy cookie exterior: A soft, fudgy cookie shell that holds all that chocolatey goodness together.
- Easy to make: No fancy techniques or equipment required. If you can make regular cookies, you can make these.
- Perfect for any occasion: They’re impressive enough for a party but simple enough for a weeknight treat.
- Freezer-friendly: Make a big batch and freeze the dough so you can bake fresh cookies whenever you want.
Honestly, the best part is watching people’s faces when they take their first bite. It’s like a surprise party for your taste buds!
What Ingredients You’ll Need
Here’s what you’ll need to create these gooey chocolate lava cookies. You might already have most of this in your pantry!
- All-purpose flour (1 ½ cups / 180g) – For structure. Make sure to spoon and level it, don’t scoop directly from the bag, or you’ll end up with too much.
- Unsweetened cocoa powder (½ cup / 50g) – This gives the cookies their rich chocolatey flavor. Go for high-quality cocoa if you can.
- Granulated sugar (¾ cup / 150g) – Sweetness to balance the bitter cocoa.
- Brown sugar (¼ cup / 50g) – Adds chewiness and depth of flavor.
- Unsalted butter (½ cup / 115g, softened) – Butter makes everything better, doesn’t it? Make sure it’s room temp.
- Egg (1 large) – The binder that brings it all together.
- Vanilla extract (1 tsp) – A little extra oomph for the flavor.
- Semi-sweet chocolate chips (¾ cup / 135g) – These are melted and used as the gooey filling. You can also use dark chocolate for a less sweet option.
- Salt (¼ tsp) – Balances the sweetness and enhances the chocolate flavor.
- Baking soda (½ tsp) – For just the right amount of lift.
Quick note: If you’re out of brown sugar, you can replace it with granulated sugar, but brown sugar adds a better texture. And if you want to get fancy, use sea salt instead of regular—it adds a little crunch and makes the chocolate flavor pop.
Equipment Needed
You don’t need a professional kitchen to make these cookies, but a few basic tools will make your life much easier:
- Mixing bowls: One for dry ingredients, one for wet. Keeps things organized and less messy.
- Hand mixer or stand mixer: You can mix by hand if you’re feeling strong, but a mixer makes it faster.
- Cookie scoop: Not essential, but it makes portioning the dough so much easier. Plus, it keeps the cookies uniform.
- Baking sheet: Line it with parchment paper or a silicone mat for easy cleanup.
- Microwave-safe bowl: For melting the chocolate chips.
- Spatula: For scraping down the bowl because we don’t waste chocolate around here.
Oh, and if you don’t have parchment paper, just grease your baking sheet lightly. But seriously, invest in parchment—it’s a lifesaver.
How to Make It: Step-by-Step

Alright, let’s get baking! Follow these steps for cookies that are guaranteed to impress.
- Prep your oven and ingredients: Preheat your oven to 350°F (175°C). Line a baking sheet with parchment paper or a silicone mat. Set out your butter to soften and measure all your ingredients.
- Mix the dry ingredients: In a medium bowl, whisk together the flour, cocoa powder, baking soda, and salt. This ensures everything is evenly distributed.
- Cream the butter and sugars: In a large bowl, beat the softened butter, granulated sugar, and brown sugar together until light and fluffy. This takes about 2-3 minutes with a hand mixer.
- Add wet ingredients: Mix in the egg and vanilla extract until well combined.
- Combine wet and dry: Gradually add the dry ingredients into the wet mixture, stirring until just combined. Don’t overmix or your cookies will be tough.
- Make the chocolate filling: Melt your semi-sweet chocolate chips in a microwave-safe bowl in 20-second intervals, stirring between each round until completely smooth.
- Assemble the cookies: Scoop about 1 tablespoon of cookie dough and flatten it slightly in your hand. Add about 1 teaspoon of melted chocolate to the center, then top with another tablespoon of dough. Seal the edges so the chocolate stays inside.
- Bake: Place the cookies on your prepared baking sheet, leaving about 2 inches between them. Bake for 10-12 minutes, or until the edges are set but the centers are slightly soft.
- Cool and serve: Let the cookies cool on the sheet for 5 minutes, then transfer to a wire rack. Serve warm for maximum gooeyness!
Pro tip: If you’re making these ahead, you can refrigerate the dough for up to 3 days or freeze it for up to 3 months. Just thaw before assembling and baking.
My Best Tips & Techniques
Alright, here are my secrets to making these cookies perfect every time:
- Don’t skip the melted chocolate: I know it’s tempting, but trust me—this is what makes the gooey center happen.
- Chill the dough: If your dough feels too soft, pop it in the fridge for 20 minutes. It makes assembly way easier.
- Seal the edges: Be sure to pinch the dough closed around the chocolate filling so it doesn’t leak out while baking.
- Don’t overbake: The edges should be set, but the centers will still look slightly underdone. They’ll firm up as they cool.
- Use high-quality chocolate: This isn’t the time for bargain-brand chocolate chips. Good chocolate makes all the difference.
Oh, and one last thing—if you really want to impress, sprinkle a tiny bit of flaky sea salt on top of the cookies before serving. It’s the perfect finishing touch.
Ways to Mix It Up
Want to make these cookies your own? Here are some fun variations to try:
- Peanut Butter Lava: Replace the molten chocolate center with a dollop of peanut butter for a sweet-and-salty twist.
- Caramel Dream: Use a soft caramel candy instead of chocolate for a rich, buttery filling.
- Mint Chocolate: Add ½ teaspoon peppermint extract to the dough and use mint chocolate chips for the filling.
- Nutty Delight: Stir ½ cup chopped pecans or walnuts into the dough for extra texture.
- Spicy Kick: Add ¼ teaspoon cayenne pepper to the dough for a surprising hint of heat.
Feel free to experiment with different mix-ins or fillings. The possibilities are endless!
Serving Ideas & Storage
These cookies are best served warm, when the centers are still gooey. Here are some ideas for enjoying them:
- With ice cream: Place a warm cookie on a plate and top with a scoop of vanilla ice cream. Heaven.
- Fancy dessert: Drizzle with chocolate sauce and add a sprinkle of powdered sugar for an elegant touch.
- Snack time: Pair with a glass of cold milk for the ultimate comfort food combo.
As for storage, here’s what works:
- Room temperature: Keep in an airtight container for up to 3 days. Reheat in the microwave for 10 seconds to revive the gooey center.
- Freezer: Freeze the dough or baked cookies for up to 3 months. To reheat, bake frozen cookies at 350°F for 8 minutes.
Pro tip: If you accidentally overbake and the centers aren’t gooey, don’t panic—just crumble the cookies over ice cream. Problem solved!
Nutritional Info & Health Benefits
Let’s be real—these cookies aren’t health food, but they’re worth every indulgent bite. Here’s a rough breakdown per cookie:
| Nutrient | Amount |
|---|---|
| Calories | ~210 |
| Protein | 3g |
| Carbs | 28g |
| Fat | 11g |
| Sugar | 15g |
Quick note: You could make these slightly healthier by using dark chocolate for the filling or reducing the sugar by ¼ cup. But hey, sometimes dessert is just dessert.
Final Thoughts
And there you have it—my Irresistible Chocolate Lava Cookies! If you’re a chocolate lover like me, these are going to be your new favorite treat. They’re decadent, fun to make, and absolutely unforgettable.
I love whipping up a batch when I want to turn a regular day into something special. Whether it’s for a holiday party or just because you need a little pick-me-up, these cookies will deliver every time.
If you try them, I’d love to hear how they turn out! Leave a comment below or tag me on Instagram @YourHandle. Happy baking, and I hope your kitchen smells like chocolatey heaven soon!
FAQs
Q: Can I make these cookies ahead of time?
A: Absolutely! You can freeze the dough balls (with the filling already inside) for up to 3 months. Just bake them straight from frozen—add an extra 2-3 minutes to the baking time.
Q: Can I use dark chocolate instead of semi-sweet?
A: Yes! Dark chocolate gives a slightly less sweet, more intense flavor. I love using 70% dark chocolate for a sophisticated twist.
Q: My cookies didn’t spread—what happened?
A: This usually means your butter wasn’t soft enough when you started. Make sure it’s truly room temperature before mixing. You can also flatten the dough slightly before baking to help them spread.
Q: How do I know when they’re done?
A: The edges should look set, but the centers will still look slightly soft. They’ll finish cooking as they cool, so don’t overbake!
Q: Can I make these gluten-free?
A: Yes! Use a 1:1 gluten-free baking flour. I’ve tried it, and the texture is just a tiny bit softer but still amazing.
Pin This Recipe!


Irresistible Chocolate Lava Cookies
- Total Time: 32 minutes
- Yield: 12 cookies 1x
Description
Soft, chewy chocolate cookies with a warm, gooey molten chocolate center—perfect for any occasion and surprisingly easy to make.
Ingredients
- 1 ½ cups (180g) all-purpose flour
- ½ cup (50g) unsweetened cocoa powder
- ¾ cup (150g) granulated sugar
- ¼ cup (50g) brown sugar
- ½ cup (115g) unsalted butter, softened
- 1 large egg
- 1 tsp vanilla extract
- ¾ cup (135g) semi-sweet chocolate chips
- ¼ tsp salt
- ½ tsp baking soda
Instructions
- Preheat your oven to 350°F (175°C). Line a baking sheet with parchment paper or a silicone mat.
- In a medium bowl, whisk together the flour, cocoa powder, baking soda, and salt.
- In a large bowl, beat the softened butter, granulated sugar, and brown sugar together until light and fluffy (about 2-3 minutes).
- Mix in the egg and vanilla extract until well combined.
- Gradually add the dry ingredients into the wet mixture, stirring until just combined.
- Melt the semi-sweet chocolate chips in a microwave-safe bowl in 20-second intervals, stirring between each round until smooth.
- Scoop about 1 tablespoon of cookie dough and flatten it slightly in your hand. Add about 1 teaspoon of melted chocolate to the center, then top with another tablespoon of dough. Seal the edges.
- Place the cookies on the prepared baking sheet, leaving about 2 inches between them. Bake for 10-12 minutes, or until the edges are set but the centers are slightly soft.
- Let the cookies cool on the sheet for 5 minutes, then transfer to a wire rack. Serve warm.
Notes
[‘Chill the dough for 20 minutes if it feels too soft.’, ‘Seal the edges of the dough around the chocolate filling to prevent leaks.’, ‘Don’t overbake—the centers should look slightly underdone.’, ‘Sprinkle flaky sea salt on top of the cookies for an extra flavor boost.’]
- Prep Time: 20 minutes
- Cook Time: 12 minutes
- Category: Dessert
- Cuisine: American
Nutrition
- Serving Size: 1 cookie
- Calories: 210
- Sugar: 15
- Sodium: 85
- Fat: 11
- Saturated Fat: 6
- Carbohydrates: 28
- Fiber: 2
- Protein: 3
Keywords: chocolate lava cookies, gooey cookies, molten chocolate cookies, easy dessert, chocolate dessert