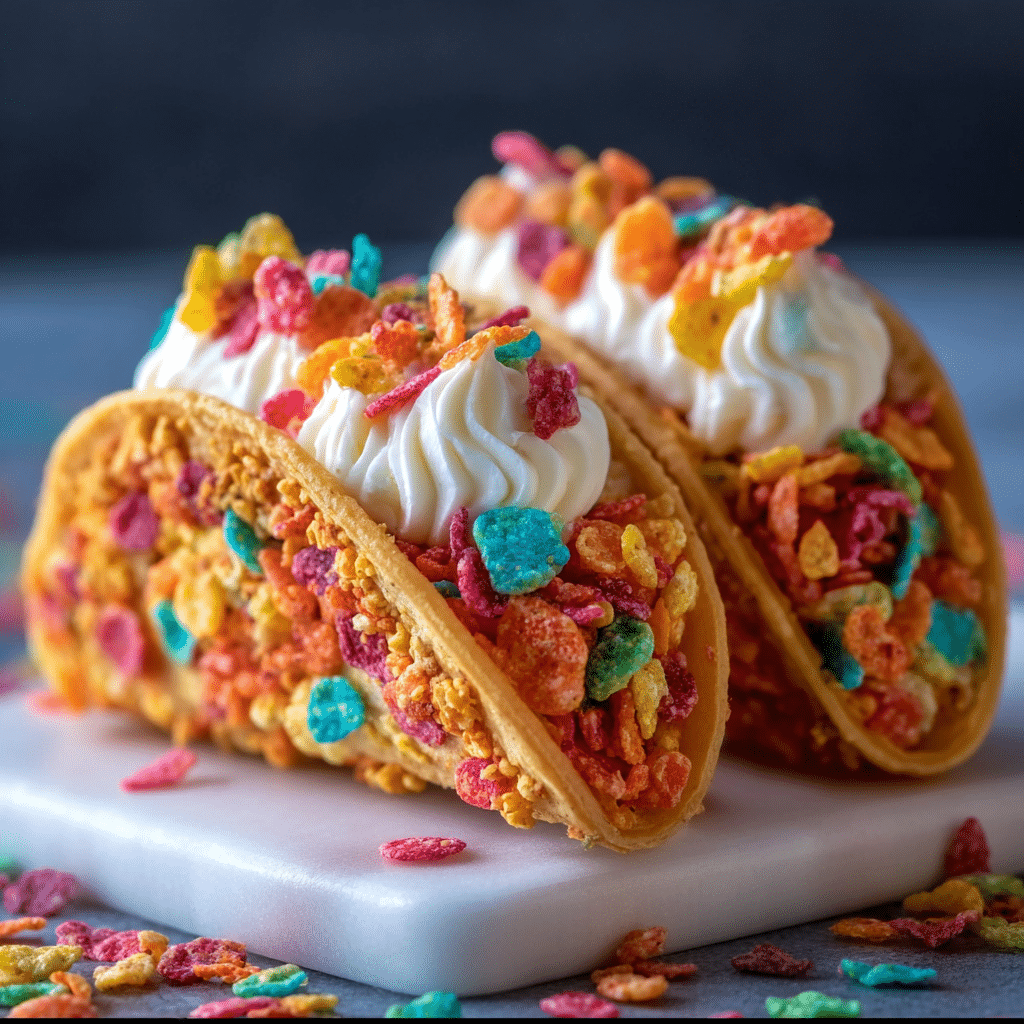
Are you ready for a dessert adventure that’ll make your taste buds dance? Let me introduce you to my Amazing Fruity Pebbles Cheesecake Tacos! These sweet treats are not only a feast for your palate but also a visual delight, with vibrant colors and textures that scream fun. Perfect for parties, family gatherings, or just a cozy night in, these tacos bring the nostalgic flavors of childhood cereal and creamy cheesecake together in one delightful bite. Trust me, you won’t want to miss making these!
Now, you might be wondering why you should give this recipe a try. Well, it’s all about combining two beloved treats into something magical! Imagine crispy taco shells filled with a luscious cheesecake mixture, topped with the iconic Fruity Pebbles. Plus, the joy of eating tacos—who can resist that? I have fond memories of making these with my kids, and they loved the colorful crunch that made each bite feel like a celebration. Whether you’re a sweet tooth or just looking to impress your friends, these Fruity Pebbles Cheesecake Tacos are sure to become a favorite!
Why You Will Love This Recipe
The origins of cheesecake can be traced back to ancient Greece, where it was considered a delicacy. Fast forward to today, and we have countless variations. Mixing cheesecake with the playful essence of Fruity Pebbles takes this classic dessert to a whole new level! My kids are always on board for anything that involves cereal, and they adore these tacos.
Over the years, I’ve seen cheesecake evolve into various forms, from traditional slices to no-bake versions and now, this taco twist! It’s the perfect dessert for summer barbecues or even winter parties, as everyone loves a little color and whimsy in their treats. Plus, if you want to make it even more seasonal, you can switch up the toppings based on the time of year—think fresh berries in the summer or pumpkin spice in the fall!
Ingredient Discussion
Let’s break down the ingredients that make these Fruity Pebbles Cheesecake Tacos so special:
- Taco Shells: The foundation of these tacos! You can use store-bought mini taco shells, or for an extra fun twist, consider making your own out of flour tortillas baked into a taco shape. Look for the freshest options at your local grocery store, as they’ll hold up better when filled.
- Cream Cheese: The star of the cheesecake filling! Choose a full-fat cream cheese for a rich and creamy texture. If you’re vegan, there are great plant-based cream cheese options available now that work well.
- Powdered Sugar: This sweetens the cheesecake and helps create that silky smooth texture. If you’re looking for a healthier option, you can use agave syrup instead.
- Vanilla Extract: Adds depth to the cheesecake flavor. Always opt for pure vanilla extract over imitation for the best taste.
- Fruity Pebbles: The crunchy, colorful cereal that brings nostalgia and fun! You can find this in the cereal aisle, and if you want to mix it up, consider using other colorful cereals for variety.
When selecting your ingredients, be sure to check expiration dates, especially for the cream cheese. If you have dietary restrictions, don’t hesitate to substitute where necessary. For example, gluten-free taco shells are widely available now. Store any leftover components in airtight containers in the refrigerator for future sweet creations!
Equipment Needed
Before we dive into the recipe, let’s talk equipment! Here’s what you’ll need:
- Mixing bowls
- Electric mixer or whisk
- Spatula
- Measuring cups and spoons
- Mini taco shell molds (optional, for homemade shells)
If you’re working with a tight budget, a simple whisk and a bowl will go a long way! Just remember, having the right tools can make the process smoother and more enjoyable.
Preparation Method
- Prepare the taco shells: If you’re using store-bought mini taco shells, you can skip this step! But if you’re making your own, preheat your oven to 375°F (190°C). Cut flour tortillas into circles using a cookie cutter, then drape them over the edges of an oven-safe muffin tin. Bake for about 10-12 minutes until they’re crispy. Let them cool completely.
- Make the cheesecake filling: In a mixing bowl, combine 8 oz (226 g) of cream cheese with 1 cup (120 g) of powdered sugar and 1 tsp (5 ml) of vanilla extract. Beat on medium speed until smooth and creamy, around 3-5 minutes. If it’s too thick, you can add 1-2 tbsp (15-30 ml) of milk to loosen it up.
- Add the fruity touch: Gently fold in 1 cup (30 g) of crushed Fruity Pebbles into the cheesecake mixture. This adds that delightful crunch!
- Fill the taco shells: Using a spatula or a piping bag, fill each taco shell generously with the cheesecake filling. Be sure to pack them in tightly for a satisfying bite!
- Top it off! Sprinkle more Fruity Pebbles on top of each filled taco for that extra color and crunch. You can also drizzle with chocolate or a fruity glaze if you’re feeling fancy!
Cooking Tips & Techniques
As you embark on making these delightful tacos, here are a few tips I’ve learned over the years:
- Make sure your cream cheese is at room temperature before mixing. This will prevent lumps and ensure a smooth filling.
- Don’t overmix the filling once you’ve added the Fruity Pebbles—this helps preserve their crunch.
- For a fun twist, try adding a splash of lemon juice to the filling for a zesty kick!
- If you’re concerned about the taco shells getting soggy, fill them right before serving.
- Experiment with different toppings! Fresh fruit, whipped cream, or even sprinkles can elevate your tacos.
Variations & Adaptations
Want to shake things up a bit? Here are some delicious variations you can try:
- Chocolate Lovers: Add cocoa powder to the cheesecake filling for a chocolatey twist, or use chocolate-flavored cereal.
- Fruit Fiesta: Incorporate chopped fresh fruits like strawberries or bananas into the filling for added flavor.
- Healthier Option: Substitute Greek yogurt for half of the cream cheese for a lighter version.
Feel free to get creative with your fillings and toppings. These tacos are so versatile; the possibilities are endless!
Serving & Storage Suggestions
These Fruity Pebbles Cheesecake Tacos are best served chilled. Arrange them on a colorful platter to showcase their vibrant colors—perfect for impressing your guests! Pair them with a scoop of vanilla ice cream or a refreshing fruit salad for a complete dessert experience.
For storage, keep any leftover tacos in an airtight container in the fridge for up to 3 days. If you want to prepare them in advance, store the filling separately and fill the taco shells right before serving to maintain their crunch.
Nutritional Information & Benefits
Each taco is a delightful mix of flavors and textures! While they’re definitely a treat, it’s worth noting that they provide a bit of protein from the cream cheese and some vitamins from the Fruity Pebbles. Here’s a rough estimate of the nutritional values for one taco:
- Calories: 200
- Protein: 3g
- Fat: 8g
- Carbohydrates: 30g
These tacos are not gluten-free due to the taco shells, but you can easily substitute with gluten-free options. Just remember, moderation is key when enjoying sweet treats!
Conclusion
If you’re looking for a fun and unique dessert that’ll bring a smile to your face, these Fruity Pebbles Cheesecake Tacos are a must-try! They’re not just delicious, but they also spark joy with their colorful presentation. I absolutely love making these for my family, and I can’t wait for you to try them out, too!
Don’t forget to customize them to your taste, and feel free to share your variations in the comments below! Happy cooking, and may your kitchen be filled with laughter and sweetness!
FAQs
1. Can I make these tacos ahead of time?
Yes! You can prepare the filling in advance and store it in the fridge. Just fill the taco shells right before serving to keep them crispy.
2. What can I use instead of cream cheese?
You can substitute Greek yogurt or a dairy-free cream cheese for a lighter or vegan option.
3. How do I store leftovers?
Keep any leftover tacos in an airtight container in the refrigerator for up to 3 days.
4. Can I use a different cereal?
Absolutely! Feel free to experiment with other colorful cereals for a fun twist.
5. Are these tacos gluten-free?
They’re not gluten-free unless you use gluten-free taco shells. Look for alternatives at your local store!
Print
Fruity Pebbles Cheesecake Tacos
- Total Time: 27 minutes
- Yield: 12 tacos 1x
Description
These Fruity Pebbles Cheesecake Tacos are a delightful combination of crispy taco shells filled with a creamy cheesecake mixture and topped with colorful Fruity Pebbles. Perfect for parties or a fun dessert at home!
Ingredients
- Mini taco shells
- 8 oz (226 g) cream cheese
- 1 cup (120 g) powdered sugar
- 1 tsp (5 ml) vanilla extract
- 1 cup (30 g) crushed Fruity Pebbles
Instructions
- Prepare the taco shells: If you’re using store-bought mini taco shells, you can skip this step! But if you’re making your own, preheat your oven to 375°F (190°C). Cut flour tortillas into circles using a cookie cutter, then drape them over the edges of an oven-safe muffin tin. Bake for about 10-12 minutes until they’re crispy. Let them cool completely.
- Make the cheesecake filling: In a mixing bowl, combine cream cheese, powdered sugar, and vanilla extract. Beat on medium speed until smooth and creamy, around 3-5 minutes. If it’s too thick, you can add 1-2 tbsp of milk to loosen it up.
- Add the fruity touch: Gently fold in crushed Fruity Pebbles into the cheesecake mixture.
- Fill the taco shells: Using a spatula or a piping bag, fill each taco shell generously with the cheesecake filling.
- Top it off: Sprinkle more Fruity Pebbles on top of each filled taco for that extra color and crunch.
Notes
Make sure your cream cheese is at room temperature before mixing to prevent lumps. Fill the taco shells right before serving to maintain their crunch.
- Prep Time: 15 minutes
- Cook Time: 12 minutes
- Category: Dessert
- Cuisine: American
Nutrition
- Serving Size: 1 taco
- Calories: 200
- Fat: 8
- Carbohydrates: 30
- Protein: 3
Keywords: Fruity Pebbles, cheesecake, tacos, dessert, easy recipe


")