
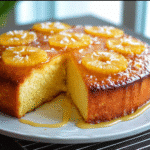
When you’re in the mood for something sweet, let me tell you, nothing beats a slice of Easy Cannoli Cake! Just imagine biting into a moist, fluffy cake layered with creamy ricotta filling and topped with a sprinkle of chocolate chips. Honestly, it’s like enjoying a traditional Italian cannoli but in cake form, and it’s perfect for any occasion—birthdays, holidays, or just because you deserve a treat! Plus, if you have a bit of a sweet tooth, this cake is worth every minute spent in the kitchen.
This cannoli cake is inspired by the classic Sicilian dessert, which has been around for centuries. It’s said that cannoli were traditionally made by the Sicilian women, who would prepare them during Carnevale. The transformation of this beloved dessert into a cake gives you all the flavors without the fuss of frying! So, whether you’re hosting a dinner party or simply looking to satisfy your dessert cravings, this Easy Cannoli Cake is sure to impress.
Why You Will Love This Recipe
The origins of cannoli date back to the Sicilian city of Palermo, where they were first created. These crispy pastry tubes filled with sweetened ricotta have become a symbol of Italian culture and cuisine. With my Easy Cannoli Cake, you get to enjoy those classic flavors in a way that’s accessible and fun! I remember the first time I tried cannoli at an Italian bakery; I was instantly hooked, and I knew I had to recreate that experience at home.
This cake has evolved over the years, adapting to different palettes and occasions. You can serve it at a summer picnic or a winter holiday feast. It’s versatile, seasonal, and honestly, it never goes out of style. With a rich history tied to Italian celebrations, this cake brings a slice of tradition right to your table. Plus, it’s incredibly easy to make, so you can focus on enjoying the moment with your loved ones!
Ingredient Discussion
Now, let’s talk about the ingredients that make this Easy Cannoli Cake truly special:
- All-purpose flour: This is the base of your cake. Make sure to choose a good quality flour for the best texture. You can substitute with a gluten-free blend if needed.
- Granulated sugar: It sweetens the cake. You can also use coconut sugar or a sugar substitute for a healthier option.
- Baking powder: This is essential for that perfect rise. Always check the expiration date to make sure it’s fresh.
- Unsalted butter: Use real butter for a richer flavor. If you’re dairy-free, coconut oil works well.
- Eggs: They provide moisture and richness. For a vegan option, flax eggs can be a great substitute.
- Ricotta cheese: This is the star ingredient! Look for whole-milk ricotta for a creamier texture. If you can’t find it, mascarpone is a fantastic alternative.
- Vanilla extract: A splash of pure vanilla adds depth to the flavor. Always opt for pure over imitation for the best taste.
- Chocolate chips: Mini chocolate chips are a fun addition to the filling. You can also use dark chocolate for a richer taste.
- Pistachios: These add a pop of color and crunch. Swap them for almonds or walnuts if you prefer.
When selecting ingredients, always go for the freshest options. Check local markets for seasonal produce to enhance the flavors of your cake. Storing your ricotta cheese properly is crucial; keep it in an airtight container in the fridge and use it within a week for the best taste.
Equipment Needed
Before you start baking, here’s what you’ll need:
- Two 9-inch round cake pans
- Mixing bowls
- Electric mixer or whisk
- Measuring cups and spoons
- Rubber spatula
- Cooling rack
- Offset spatula for frosting
If you don’t have round cake pans, you can use square ones instead—just adjust the baking time slightly. I always recommend investing in good-quality pans; they really make a difference. And be sure to line them with parchment paper for easy removal!
Preparation Method
- Preheat your oven: Start by preheating your oven to 350°F (175°C). This ensures your cake bakes evenly.
- Prepare your pans: Grease your cake pans with butter and line the bottoms with parchment paper. This makes it easier to remove the cakes later.
- Mix the dry ingredients: In a mixing bowl, whisk together 2 cups of all-purpose flour, 2 teaspoons of baking powder, and a pinch of salt. Set aside.
- Cream the butter and sugar: In another bowl, beat 1 cup of unsalted butter (softened) and 2 cups of granulated sugar until light and fluffy, about 3-4 minutes.
- Add eggs: Beat in 4 large eggs, one at a time, mixing well after each addition. Then stir in 1 teaspoon of vanilla extract.
- Combine wet and dry ingredients: Gradually mix in the dry ingredients until just combined. Be careful not to overmix! The batter should be smooth and creamy.
- Pour into pans: Divide the batter evenly between the two prepared pans and smooth the tops with a spatula. Give them a gentle tap on the counter to release any air bubbles.
- Bake: Bake in the preheated oven for 25-30 minutes, or until a toothpick inserted in the center comes out clean. Your kitchen will smell heavenly!
- Cool the cakes: Once baked, remove the cakes from the oven and let them cool in the pans for about 10 minutes. Then transfer them to a cooling rack to cool completely.
- Prepare the filling: While the cakes cool, mix together 2 cups of ricotta cheese, 1 cup of powdered sugar, and 1 teaspoon of vanilla extract in a bowl until smooth. Fold in 1 cup of mini chocolate chips.
- Assemble the cake: Once the cakes are completely cool, place one layer on a serving plate. Spread half of the ricotta filling on top, then add the second layer. Top with the remaining filling and sprinkle with chopped pistachios.
- Chill: Refrigerate the cake for at least 1 hour before serving. This helps the flavors meld beautifully!
Cooking Tips & Techniques
Cooking is all about learning from experience, and this recipe is no exception! Here are some tips to ensure your cannoli cake turns out perfectly:
- Don’t overmix your batter; this can lead to a dense cake. Mix until just combined!
- Use room temperature ingredients, especially butter and eggs, for a smoother batter.
- Check your cakes a few minutes before the suggested baking time. Ovens can vary, and you want to avoid overbaking.
- If you find your filling too thick, add a splash of milk to thin it out. It should be spreadable but not runny.
- For a little extra richness, consider adding a splash of almond extract to the filling.
And remember, if something doesn’t go as planned, it’s okay! I once had a cake collapse because I opened the oven door too soon. Just keep going, and don’t be afraid to adjust as needed—cooking is all about experimentation!
Variations & Adaptations
This Easy Cannoli Cake is versatile, and you can customize it in so many ways:
- Chocolate Cannoli Cake: Add cocoa powder to the cake batter for a chocolatey twist.
- Fruit-Infused Filling: Mix in fresh fruit like strawberries or raspberries into the ricotta filling for a refreshing flavor.
- Gluten-Free Version: Substitute the all-purpose flour with a gluten-free flour blend. Just ensure it includes xanthan gum for structure.
Feel free to play around with different flavors and textures! I once added orange zest to the ricotta filling, and it added a lovely brightness that I absolutely loved.
Serving & Storage Suggestions
When it comes to serving your Easy Cannoli Cake, presentation is key! Here are some tips:
- Serve chilled for the best flavor and texture. It’s like a refreshing slice of Italy on a hot day!
- Pair it with a cup of espresso or a glass of sweet dessert wine for an authentic Italian experience.
- Store any leftovers in an airtight container in the refrigerator for up to 3 days. The flavors get even better as they sit!
- To freeze, wrap individual slices in plastic wrap and foil. They can last up to 2 months in the freezer.
Just remember, as the cake sits, the ricotta filling may soften a bit, but it still tastes fantastic!
Nutritional Information & Benefits
This Easy Cannoli Cake is a delightful indulgence, but it also brings some benefits:
- Calories: Approximately 350 per slice
- Protein: Thanks to the ricotta cheese, each slice packs a protein punch.
- Calcium: Ricotta is rich in calcium, which is great for your bones.
- Dietary Considerations: This recipe can be made gluten-free and can be adjusted for lower sugar options.
As with any dessert, moderation is key. Enjoy this cake as a special treat to celebrate life’s sweet moments!
Conclusion
So there you have it—my Easy Cannoli Cake recipe that’s perfect for any occasion! Whether you’re looking to impress guests or treat yourself, this cake is sure to be a hit. I love how it brings a taste of Italy to my kitchen and evokes fond memories of family gatherings and celebrations.
Don’t be afraid to make it your own! Customize the flavors and share your creations with friends and family. I’d love to hear your thoughts and any variations you try. Feel free to drop a comment or share your photos—I can’t wait to see what you whip up! Happy baking!
FAQs
1. Can I make this cake ahead of time?
Yes! You can bake the cakes a day in advance and store them in the fridge. Just assemble it before serving.
2. What can I use instead of ricotta cheese?
You can substitute mascarpone cheese for a richer flavor or even cream cheese for a different texture.
3. How should I store leftovers?
Keep leftovers in an airtight container in the refrigerator for up to 3 days. You can also freeze individual slices!
4. Can I add different flavors to the filling?
Absolutely! Consider adding lemon or orange zest for a citrus twist or almond extract for a nutty flavor.
5. Is this cake suitable for gluten-free diets?
Yes! Just use a gluten-free flour blend, and you’re good to go!
Print
Easy Cannoli Cake
- Total Time: 45 minutes
- Yield: 12 servings 1x
Description
This Easy Cannoli Cake is a delightful twist on the traditional Italian dessert, featuring a moist cake layered with creamy ricotta filling and topped with chocolate chips. Perfect for any occasion, it’s a sweet treat that brings a taste of Italy to your table.
Ingredients
- 2 cups all-purpose flour
- 2 teaspoons baking powder
- 1 pinch salt
- 1 cup unsalted butter, softened
- 2 cups granulated sugar
- 4 large eggs
- 1 teaspoon vanilla extract
- 2 cups ricotta cheese
- 1 cup powdered sugar
- 1 cup mini chocolate chips
- Chopped pistachios for topping
Instructions
- Preheat your oven to 350°F (175°C).
- Grease your cake pans with butter and line the bottoms with parchment paper.
- In a mixing bowl, whisk together the flour, baking powder, and salt. Set aside.
- In another bowl, beat the softened butter and granulated sugar until light and fluffy, about 3-4 minutes.
- Beat in the eggs, one at a time, mixing well after each addition. Stir in the vanilla extract.
- Gradually mix in the dry ingredients until just combined.
- Divide the batter evenly between the two prepared pans and smooth the tops.
- Bake in the preheated oven for 25-30 minutes, or until a toothpick inserted in the center comes out clean.
- Let the cakes cool in the pans for about 10 minutes, then transfer them to a cooling rack to cool completely.
- While the cakes cool, mix together the ricotta cheese, powdered sugar, and vanilla extract until smooth. Fold in the mini chocolate chips.
- Once the cakes are completely cool, place one layer on a serving plate, spread half of the ricotta filling on top, then add the second layer. Top with the remaining filling and sprinkle with chopped pistachios.
- Refrigerate the cake for at least 1 hour before serving.
Notes
For a gluten-free version, substitute all-purpose flour with a gluten-free blend. Ensure to use room temperature ingredients for a smoother batter.
- Prep Time: 15 minutes
- Cook Time: 30 minutes
- Category: Dessert
- Cuisine: Italian
Nutrition
- Serving Size: 1 slice
- Calories: 350
Keywords: cannoli, cake, dessert, Italian, ricotta

")