It all started on a lazy Sunday afternoon when I was craving something warm, garlicky, and crispy—but not too complicated. I had recently been diving into homemade bread recipes, loving the smell of dough rising and the thrill of pulling fresh bread from the oven. But sometimes, the long rise times and kneading sessions just aren’t in the cards. That’s when I stumbled upon this crispy garlic flatbreads recipe, which has since become my secret weapon for quick homemade bread that tastes like a dream.
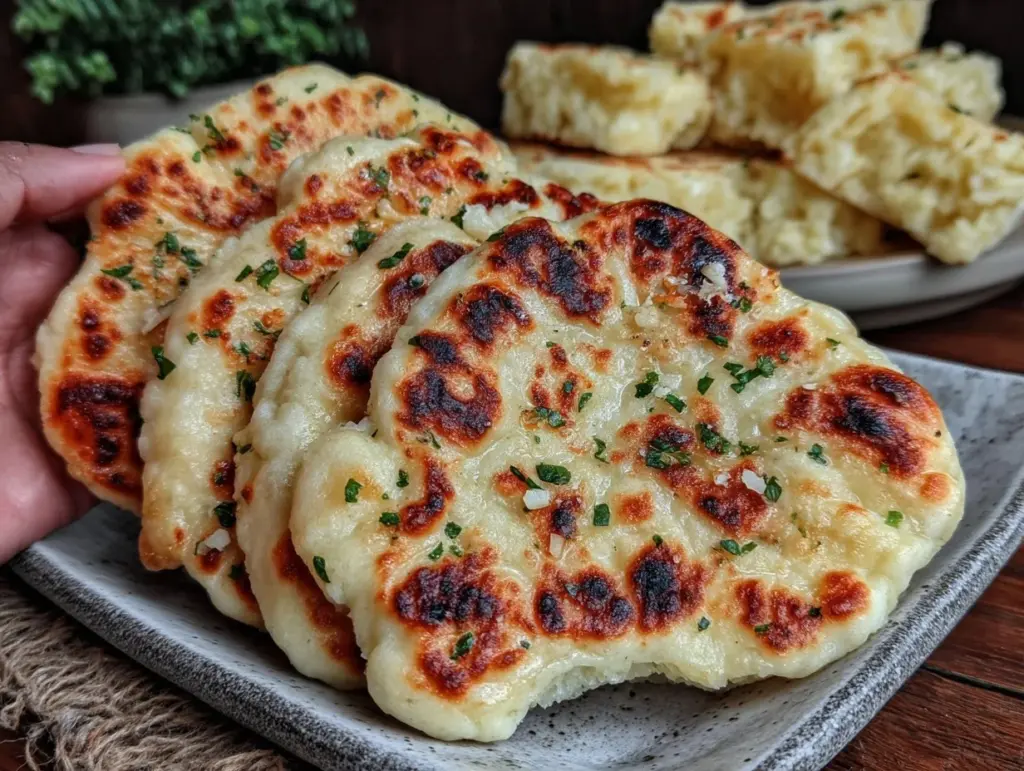
I remember the very first time I tried making these flatbreads: I was skeptical. Could something so simple really hit all the right notes? But as soon as they came out of the skillet, golden and crackling, with that intoxicating garlicky aroma filling the kitchen, I was hooked. They’re crispy on the outside, tender on the inside, and loaded with garlic butter flavor that’s just irresistible.
Whether you’re a seasoned bread baker or someone who’s just starting to experiment with homemade dough, this crispy garlic flatbreads recipe is perfect. It’s straightforward, fast, and uses ingredients you probably already have. Plus, it pairs beautifully with everything from hearty stews to fresh salads.
After testing this recipe more times than I can count (and eating way too many flatbreads), I finally nailed down a method that’s both foolproof and downright delicious. So let me take you through how to make these crispy garlic flatbreads your new favorite homemade bread, especially if you love that satisfying crunch and buttery garlic punch.
Why You’ll Love This Recipe
This crispy garlic flatbreads recipe has seriously changed my approach to homemade bread. Here’s why:
- Incredibly Easy to Make — You don’t need a bread machine or fancy tools. I’ve made this while juggling breakfast prep and school drop-offs, and it still turns out perfect.
- Quick Rise Time — Unlike traditional bread recipes that require hours of waiting, this dough rises in less than an hour. That means you get fresh bread fast without the stress.
- Crispy, Flavor-Packed Crust — The skillet cooking method creates a golden, crispy exterior that tastes like it’s straight from a restaurant. Plus, the garlic butter glaze takes it over the top.
- Super Versatile — These flatbreads are perfect as a snack, appetizer, or side. I’ve served them alongside everything from a slow-cooker honey garlic chicken dinner to a spicy jalapeño popper soup, and they never disappoint.
- Minimal Ingredients — You probably have everything you need right now: flour, yeast, garlic, butter, and a few pantry staples. No fancy or hard-to-find ingredients here.
- Great for Beginners — If you’ve ever been intimidated by baking bread, this recipe is a gentle introduction. It’s forgiving, quick, and rewarding.
Honestly, these crispy garlic flatbreads have become my go-to comfort food when I want something homemade but don’t have hours to spend in the kitchen. They satisfy my craving for fresh bread with a punch of garlic flavor and a satisfying crunch. Plus, they’re fun to make!
Ingredients You’ll Need
Here’s the best part: you probably already have most of these ingredients. I’m a stickler for certain basics because they make all the difference in texture and flavor, so I’ll explain my favorites and substitutions below.
- All-purpose flour (3 cups / 360g) — The base of the dough. You can use bread flour for a chewier texture, but all-purpose works perfectly.
- Active dry yeast (2 ¼ teaspoons / 1 packet) — This gets the dough rising. Make sure it’s fresh. If you want to skip proofing, instant yeast is a good shortcut.
- Warm water (1 cup / 240ml, around 110°F / 43°C) — Activates the yeast. Too hot will kill it; too cold and it won’t rise properly.
- Sugar (1 teaspoon) — Feeds the yeast and adds just a touch of sweetness.
- Salt (1 teaspoon) — Brings out flavor and balances the dough.
- Olive oil (2 tablespoons / 30ml) — Adds richness to the dough and prevents sticking. I always use extra virgin because it adds a subtle fruity note.
- Unsalted butter (4 tablespoons / 60g, melted) — Used for the garlic butter glaze that gives the flatbreads their irresistible crust.
- Fresh garlic (4 cloves, minced / about 2 tablespoons) — Freshness is key here. Jarred garlic just doesn’t have the same punch.
- Fresh parsley (2 tablespoons, finely chopped) — Optional but highly recommended. Adds brightness and color to the garlic butter.
Substitutions & Tips:
- If you don’t have fresh garlic, garlic powder can work in a pinch, but use half the amount and add it to the dough instead of the butter glaze.
- For a dairy-free version, swap butter for olive oil in the garlic glaze.
- Want to add herbs? Rosemary or thyme work beautifully mixed into the garlic butter.
- Don’t skip the olive oil in the dough—it keeps the flatbreads tender.
Equipment Needed
You really don’t need anything fancy to make these crispy garlic flatbreads. Here’s what I use and recommend:
- Large mixing bowl — For mixing and proofing the dough. I use a glass bowl because it holds heat nicely.
- Measuring cups and spoons — Accuracy is helpful, but eyeballing works once you get the hang of it.
- Wooden spoon or spatula — For stirring the dough before kneading.
- Clean kitchen towel or plastic wrap — To cover the dough while it rises.
- Cast iron skillet or heavy-bottomed non-stick skillet (10-inch / 25cm) — This is the secret to getting that crispy crust. I’ve tried non-stick, and cast iron definitely wins for even browning.
- Rolling pin — Optional. You can stretch the dough by hand, but a rolling pin makes it easier.
- Small bowl — For mixing the garlic butter glaze.
Quick note: If you don’t have a cast iron skillet, a heavy non-stick pan will work but watch the heat carefully to avoid burning the garlic butter glaze. I’ve used my trusty skillet for everything from slow cooker honey garlic chicken nights to quick flatbreads, and it never lets me down.
How to Make It: Step-by-Step
Alright, let’s dive into making these crispy garlic flatbreads! I’ll walk you through every step, including the little tricks I’ve picked up that make a huge difference.
Step 1: Proof the Yeast (5-7 minutes)
Start by sprinkling the active dry yeast and sugar into your warm water. Give it a gentle stir, then let it sit for 5-7 minutes until it gets foamy and bubbly on top. This means the yeast is alive and ready to work its magic.
Step 2: Make the Dough (5 minutes)
In your large mixing bowl, combine the flour and salt. Pour in the foamy yeast mixture along with the olive oil. Stir everything together with a wooden spoon until it starts to come together into a shaggy dough. Don’t worry about it being perfect yet.
Step 3: Knead the Dough (8-10 minutes)
Turn the dough out onto a lightly floured surface. Knead with the heels of your hands until the dough is smooth and elastic—about 8-10 minutes. It will feel sticky at first but keep going. (Confession: I burned my knuckles kneading once when I tried to rush it.) If it’s too sticky, add a tiny bit more flour, but don’t overdo it.
Step 4: Let the Dough Rise (45-60 minutes)
Place the dough ball back into the mixing bowl, cover it with a clean kitchen towel or plastic wrap, and let it rise in a warm spot until doubled in size—usually about 45 minutes to an hour. This is where the magic happens, so be patient!
Step 5: Prepare the Garlic Butter Glaze (while dough rises)
Mix the melted butter, minced garlic, and chopped parsley in a small bowl. Set aside so the flavors meld together.
Step 6: Shape the Flatbreads (5 minutes)
Once the dough has risen, punch it down gently and divide it into 4 equal pieces. Roll or stretch each piece into a flat circle about 7-8 inches (18-20cm) in diameter. Don’t worry if they’re not perfect circles—rustic is charming here.
Step 7: Cook the Flatbreads (10 minutes total)
Heat your skillet over medium-high heat. Place one flatbread in the dry skillet and cook for about 2 minutes until bubbles form and the bottom is golden and crispy. Flip and cook the other side for 2 minutes.
Remove from the skillet and immediately brush generously with the garlic butter glaze while still hot. The butter will soak in and create that perfect savory crust.
Repeat with remaining flatbreads.
Step 8: Serve Warm
Serve these crispy garlic flatbreads warm—ideally straight from the skillet with extra garlic butter on the side. They’re perfect for dipping, tearing, or stacking with your favorite toppings.
Expert Tips & Tricks
Here’s everything I’ve learned after making these flatbreads dozens of times. These tips will save you from my early mistakes and help you get perfect results every time.
- Don’t rush the yeast proofing: If your yeast doesn’t foam, it’s probably old or the water was too hot/cold. Fresh yeast makes all the difference.
- Keep the heat at medium-high: Too low and your flatbreads won’t crisp; too high and the garlic butter will burn. I keep a close eye and adjust as needed.
- Brush the garlic butter immediately: The flatbreads absorb the butter best while hot. Wait too long and it won’t soak in as well.
- Use fresh garlic: Nothing beats the punch of fresh minced garlic in the butter glaze. I take a little extra time mincing it finely for even flavor.
- Try mixing herbs in the dough: Adding rosemary or thyme to the dough adds a wonderful aroma that elevates the flatbreads.
- Warm your water properly: I use a thermometer to get it just right (about 110°F). If it’s too hot, yeast dies; too cold, it won’t activate.
Variations & Substitutions
Once you’ve nailed the basic crispy garlic flatbreads, it’s fun to mix things up. Here are some of my favorite variations that I’ve tested and love:
- Cheesy Garlic Flatbreads: Sprinkle shredded mozzarella or Parmesan on top after brushing with garlic butter, then cover the skillet with a lid for a minute to melt.
- Spicy Kick: Add a pinch of red pepper flakes to the garlic butter for a little heat. Great alongside a spicy jalapeño popper soup.
- Herb-Infused: Mix chopped fresh rosemary or thyme into your dough or garlic butter for extra aroma.
- Whole Wheat Version: Substitute half the all-purpose flour with whole wheat flour for a nuttier flavor and more fiber.
- Garlic & Onion Flatbreads: Sauté some finely chopped onions until golden and mix them into the garlic butter glaze.
- Dairy-Free Option: Use olive oil instead of butter for the garlic glaze. It’s still fantastic and perfect if you’re avoiding dairy.
Serving & Storage
How to Serve: These flatbreads are incredibly versatile. I love serving them warm alongside hearty dishes like slow cooker honey garlic chicken or a fresh green salad. They’re also perfect for tearing and dipping into hummus, pesto, or your favorite spreads.
If you’re hosting, set up a toppings bar with things like crumbled feta, olives, sun-dried tomatoes, and fresh herbs—your guests will love customizing their flatbreads.
Storage: Store leftover flatbreads in an airtight container or zip-top bag at room temperature for up to 2 days. To reheat, pop them in a hot skillet for a minute or two until warmed and crispy again. Avoid the microwave if you want to keep that crunch.
These flatbreads don’t freeze well because the garlic butter glaze can separate and the texture changes. If you want to meal prep, make the dough ahead and cook the flatbreads fresh on the day you plan to eat them.
Nutrition Information
I’m not a nutritionist, but here’s a rough breakdown per flatbread (based on 4 servings):
| Calories | 280 |
|---|---|
| Protein | 6g |
| Carbohydrates | 38g |
| Fiber | 2g |
| Fat | 9g |
| Saturated Fat | 5g |
| Sodium | 350mg |
The fat mostly comes from butter and olive oil, which adds richness and flavor. You can reduce calories slightly by using less butter or swapping for olive oil. Adding herbs or whole wheat flour boosts fiber and nutrients.
These flatbreads are definitely a delicious treat—not a diet food—but they’re homemade, cost-effective, and way better than most store-bought alternatives.
Final Thoughts
So there you have it—my go-to crispy garlic flatbreads recipe that’s easy enough for beginners but tasty enough for bread lovers who crave that perfect homemade crunch. I probably talk about this recipe more than any other because it’s saved me on busy days and impressed guests more times than I can count.
It’s one of those recipes that feels fancy but is really just simple ingredients and a little patience. Whether you enjoy them with a bowl of slow cooker honey garlic chicken or alongside a spicy soup, these flatbreads bring that warm, cozy, homemade vibe that makes a meal feel special.
Make it yours—try adding your favorite herbs, spices, or cheeses. And if you make these crispy garlic flatbreads, I’d love to hear how they turned out or what twists you tried. Drop a comment below and let’s swap stories!
Happy baking, and may your kitchen smell like garlic heaven.
Frequently Asked Questions
Q: Can I use instant yeast instead of active dry yeast?
A: Absolutely! Instant yeast is a great shortcut because it doesn’t need to be proofed in warm water first. You can mix it directly into the flour. Just reduce the water slightly if your dough feels too wet. I’ve used instant yeast when I’m in a hurry, and it still yields soft, fluffy flatbreads.
Q: My flatbreads didn’t get crispy—what went wrong?
A: The key to crispiness is cooking on medium-high heat in a heavy skillet like cast iron. If your pan isn’t hot enough, the flatbreads won’t brown properly. Also, avoid overcrowding the skillet; cook one flatbread at a time for the best crust.
Q: Can I make the dough ahead of time?
A: Yes! You can make the dough the night before and let it rise slowly in the fridge overnight. Just bring it to room temperature before shaping and cooking. This slow rise actually deepens the flavor.
Q: Is there a way to make these flatbreads gluten-free?
A: Gluten-free doughs are a bit trickier because they don’t have the same elasticity. You can try a gluten-free baking mix that’s designed for yeast breads, but the texture will be different—less chewy and possibly more crumbly. I haven’t perfected a gluten-free version of this yet, but it’s on my list!
Q: Can I add cheese inside the dough?
A: You can! Stuffing the dough with a bit of mozzarella or cheddar before cooking makes for a delicious cheesy flatbread. Just don’t overfill or the cheese may leak out during cooking.
Q: Why does my garlic butter sometimes taste bitter?
A: Garlic burns quickly, and burnt garlic tastes bitter. When mixing your garlic butter glaze, make sure the butter isn’t too hot when you add the garlic. If you want a milder flavor, sauté the garlic gently in butter first and then brush on the flatbreads.
Q: Can I bake the flatbreads instead of cooking on the stove?
A: You can bake them on a preheated pizza stone or baking sheet at 450°F (232°C) for about 8-10 minutes until golden and crisp. The skillet method gives you a better crust, but baking is a good alternative if you’re making a bunch.


