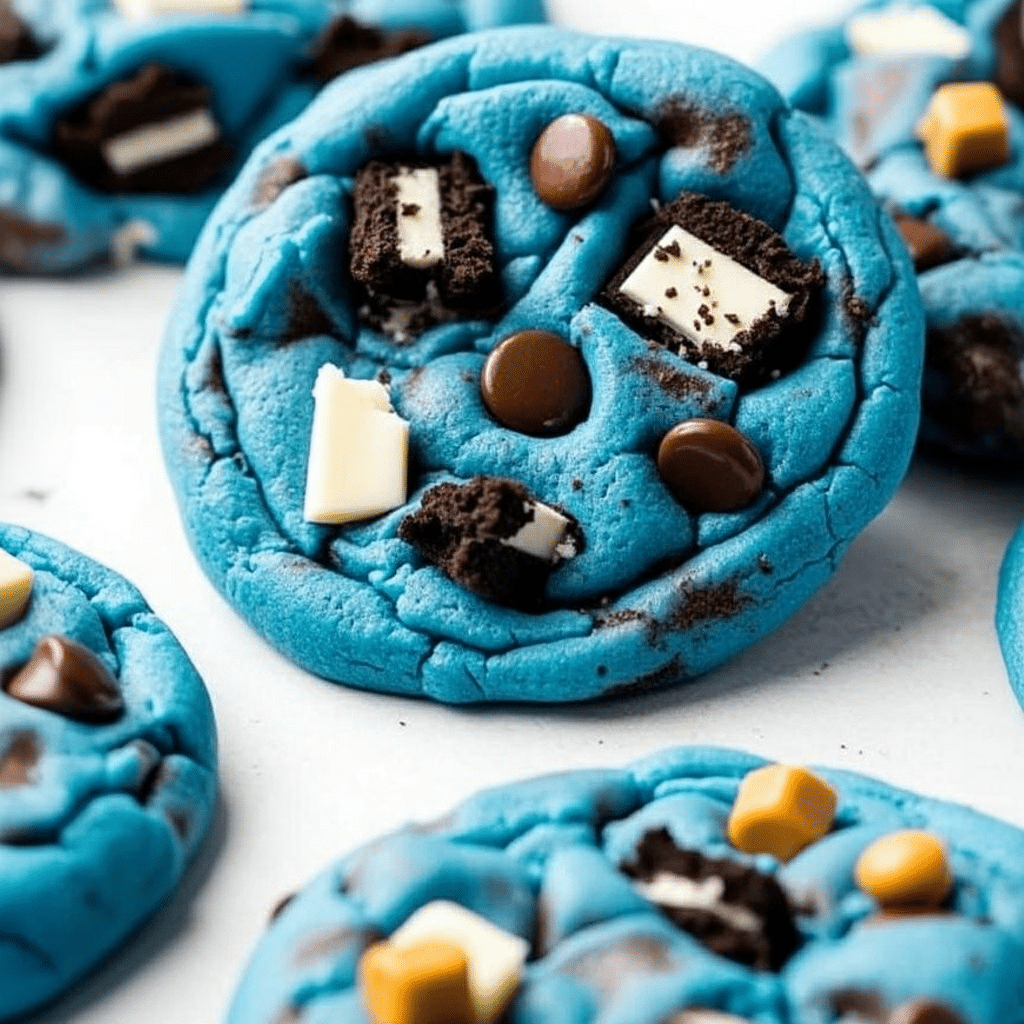
Imagine biting into a cookie that’s soft, chewy, and loaded with colorful chocolate candies! That’s the magic of Cookie Monster Cookies, a delightful treat that’s perfect for any occasion. Whether you’re baking for a party, a school event, or just because it’s Tuesday, these cookies will surely bring a smile to your face. Honestly, there’s something so comforting about cookies fresh from the oven, especially when they’re as fun and whimsical as these!
What makes these cookies extra special? Well, they’re not just your average chocolate chip cookies. With a vibrant blue cookie dough and the crunch of M&M’s, each bite takes you back to childhood, reminding you of the beloved Sesame Street character. Plus, the sweetness of the cookie dough paired with the chocolatey goodness creates a flavor explosion that you won’t forget. Let’s face it, who can resist a cookie that looks this fun?
The Story Behind Cookie Monster Cookies
Cookie Monster Cookies have become a popular treat in recent years, and it’s easy to see why! Inspired by the iconic Muppet from Sesame Street, these cookies are often made with fun colors and lots of chocolate. Growing up, I have fond memories of watching Cookie Monster devour cookies with sheer joy. It made me think, “Hey, I want to create something that embodies that happiness!”
These cookies are perfect for birthdays, bake sales, or just to brighten your day. Over time, I’ve experimented with various recipes to create the ideal chewy texture. I love how these cookies can be customized with seasonal colors or different types of candy. They really are a celebration in cookie form!
As the seasons change, you can even adjust the colors of the dough and candies to suit holidays or special occasions. Just imagine a pink version for Valentine’s Day or pastel colors for Easter! The possibilities are endless, and they make for a great family baking project, too.
Ingredient Discussion
- All-Purpose Flour: The backbone of our cookies, it provides structure. For a gluten-free option, you might try a 1:1 gluten-free flour blend.
- Granulated Sugar: This sweetener contributes to the chewy texture. You can substitute brown sugar for a richer flavor.
- Brown Sugar: Adds moisture and a hint of caramel flavor. Light or dark brown sugar works well.
- Butter: Use unsalted butter for the best flavor. Make sure it’s softened to room temperature for even mixing.
- Eggs: They bind the ingredients together. For a vegan alternative, try flax eggs or unsweetened applesauce.
- Baking Soda: This leavening agent helps the cookies rise. Be sure it’s fresh for the best results.
- Vanilla Extract: A must for flavor! Use pure vanilla for the best taste.
- Food Coloring: To achieve that vibrant blue hue, gel food coloring works best. You can adjust the amount to get your desired shade.
- M&M’s: These colorful candies add a pop of color and sweetness. Feel free to mix in other chocolates or nuts!
When selecting ingredients, always look for high-quality options. For example, I prefer European-style butter because it has a higher fat content, which makes for richer cookies. If you’re unsure about where to find specialty items like gel food coloring, most grocery stores carry them, or you can find them at craft stores.
Equipment Needed
- Mixing bowls
- Electric mixer (hand or stand)
- Measuring cups and spoons
- Baking sheets
- Parchment paper
- Cookie scoop or tablespoon
- Cooling rack
If you don’t have an electric mixer, a good old-fashioned whisk works fine, though it takes a bit more elbow grease! Parchment paper is a game-changer for easy cleanup and prevents sticking. And if you’re on a budget, remember that generic brands of kitchen tools can work just as well as the fancy ones.
Preparation Method
- Preheat your oven: Set it to 350°F (175°C) so it’s ready to go when your cookie dough is prepared.
- Mix the butter and sugars: In a large bowl, cream together 1 cup (227g) of softened unsalted butter, 1 cup (200g) of granulated sugar, and 1 cup (220g) of brown sugar until light and fluffy, about 2-3 minutes.
- Add the eggs and vanilla: Beat in 2 large eggs, one at a time, along with 1 teaspoon of vanilla extract until well combined.
- Incorporate the food coloring: Add 1-2 tablespoons of blue gel food coloring at this stage, mixing until you achieve your desired color.
- Combine dry ingredients: In a separate bowl, whisk together 3 cups (360g) of all-purpose flour, 1 teaspoon of baking soda, and a pinch of salt.
- Mix the dry ingredients with wet: Gradually add the dry mixture to the wet ingredients, mixing until just combined. Do not overmix!
- Add the M&M’s: Fold in 1-2 cups (150-300g) of M&M’s, reserving a few for topping if desired.
- Chill the dough: Cover the bowl with plastic wrap and chill in the refrigerator for at least 30 minutes. This helps to develop flavor and prevent spreading.
- Scoop the dough: Using a cookie scoop or tablespoon, drop balls of dough onto prepared baking sheets lined with parchment paper, spacing them about 2 inches apart.
- Bake the cookies: Bake in the preheated oven for 10-12 minutes. They should look slightly underbaked in the center (they’ll continue to cook on the baking sheet). Let cool for a few minutes before transferring them to a cooling rack.
As you mix the dough, you might notice it’s a bit sticky—this is perfectly normal! If it feels too wet, don’t panic; just add a little more flour, a tablespoon at a time. Remember, the key is to not overmix after adding the flour, as this can lead to tougher cookies.
Cooking Tips & Techniques
Here are some tried-and-true tips to ensure your Cookie Monster Cookies turn out perfectly every time:
- Use room temperature ingredients: This helps them combine more easily, leading to a smoother dough.
- Watch your baking time: Cookies will continue to cook after being removed from the oven. Pull them out when they look slightly underdone for that perfect chewy texture.
- Chill your dough: This step is crucial! Chilling helps to firm up the butter, resulting in cookies that don’t spread too much.
- Experiment with mix-ins: Feel free to swap out the M&M’s for your favorite candies, nuts, or even chocolate chips!
- Store properly: Keep cookies in an airtight container at room temperature to maintain their chewiness.
In my early baking days, I learned the hard way that overmixing leads to tough cookies. Trust me, you want to keep that dough light and fluffy!
Variations & Adaptations
These Cookie Monster Cookies are super versatile! Here are a few fun variations you can try:
- Chocolate Chip Cookie Monster: Swap half of the M&M’s for chocolate chips for a double chocolate delight!
- Nutty Cookie Monster: Add 1 cup (100g) of chopped walnuts or pecans for a crunchy twist.
- Seasonal Colors: Change the food coloring and M&M’s to fit holidays—think pastel for Easter or red and green for Christmas!
Feel free to get creative! I once made a batch with peanut butter chips instead of M&M’s, and it was a huge hit with my friends. You can also adjust cooking times slightly if you’re using different sizes of cookies.
Serving & Storage Suggestions
For the best experience, serve these cookies warm with a glass of milk or a scoop of vanilla ice cream! They’re perfect as an after-school snack or for a fun dessert at a gathering. Pair them with a fruit platter or even some brownies for a delightful dessert spread.
To store your cookies, place them in an airtight container at room temperature for up to a week. If you want to keep them longer, you can freeze the baked cookies for up to three months. Just make sure to layer parchment paper between them to prevent sticking!
Nutritional Information & Benefits
Each Cookie Monster Cookie is about 150 calories, depending on the size and ingredients used. They contain a good balance of carbohydrates, sugars, and fats. While not known for being a health food, these cookies can offer a sweet treat that brings joy and satisfaction!
Using ingredients like whole grain flour or dark chocolate can add some nutritional benefits. Just be cautious if you have allergies; these cookies contain gluten and dairy, and M&M’s may contain allergens.
Conclusion
These Cookie Monster Cookies are not only fun to make but also deliciously satisfying! I love how each batch brings a little nostalgia and a lot of joy. Feel free to customize the recipe to suit your taste—after all, that’s the beauty of baking!
If you give these cookies a try, I’d love to hear how they turned out! Leave a comment below with your thoughts or any variations you tried. Happy baking, and remember—cookies are always better when shared!
FAQs
1. Can I use whole wheat flour instead of all-purpose flour?
Yes, you can! Just keep in mind that it may change the texture slightly.
2. How do I store leftover cookies?
Keep them in an airtight container at room temperature for up to a week.
3. Can I freeze the cookie dough?
Absolutely! You can freeze unbaked cookie dough balls for up to three months.
4. What can I substitute for eggs?
Try using a flax egg (1 tablespoon ground flaxseed + 2.5 tablespoons water) or 1/4 cup of unsweetened applesauce.
5. How do I make the cookies less sweet?
You can reduce the amount of sugar by a quarter cup or use less sweet mix-ins like dark chocolate.
Print
Cookie Monster Cookies
- Total Time: 42 minutes
- Yield: 24 cookies 1x
Description
Imagine biting into a cookie that’s soft, chewy, and loaded with colorful chocolate candies! These delightful treats are perfect for any occasion and will surely bring a smile to your face.
Ingredients
- 3 cups all-purpose flour
- 1 cup granulated sugar
- 1 cup brown sugar
- 1 cup unsalted butter, softened
- 2 large eggs
- 1 teaspoon baking soda
- 1 teaspoon vanilla extract
- 1–2 tablespoons blue gel food coloring
- 1–2 cups M&M’s
Instructions
- Preheat your oven to 350°F (175°C).
- In a large bowl, cream together the softened unsalted butter, granulated sugar, and brown sugar until light and fluffy, about 2-3 minutes.
- Beat in the eggs, one at a time, along with the vanilla extract until well combined.
- Add the blue gel food coloring and mix until you achieve your desired color.
- In a separate bowl, whisk together the all-purpose flour, baking soda, and a pinch of salt.
- Gradually add the dry mixture to the wet ingredients, mixing until just combined. Do not overmix!
- Fold in the M&M’s, reserving a few for topping if desired.
- Cover the bowl with plastic wrap and chill in the refrigerator for at least 30 minutes.
- Using a cookie scoop or tablespoon, drop balls of dough onto prepared baking sheets lined with parchment paper, spacing them about 2 inches apart.
- Bake in the preheated oven for 10-12 minutes. They should look slightly underbaked in the center. Let cool for a few minutes before transferring them to a cooling rack.
Notes
Chilling the dough is crucial for preventing spreading. Store cookies in an airtight container at room temperature for up to a week.
- Prep Time: 30 minutes
- Cook Time: 12 minutes
- Category: Dessert
- Cuisine: American
Nutrition
- Serving Size: 1 cookie
- Calories: 150
- Sugar: 10
- Sodium: 100
- Fat: 7
- Saturated Fat: 4
- Carbohydrates: 22
- Protein: 2
Keywords: Cookie Monster Cookies, chewy cookies, colorful cookies, dessert recipes

")