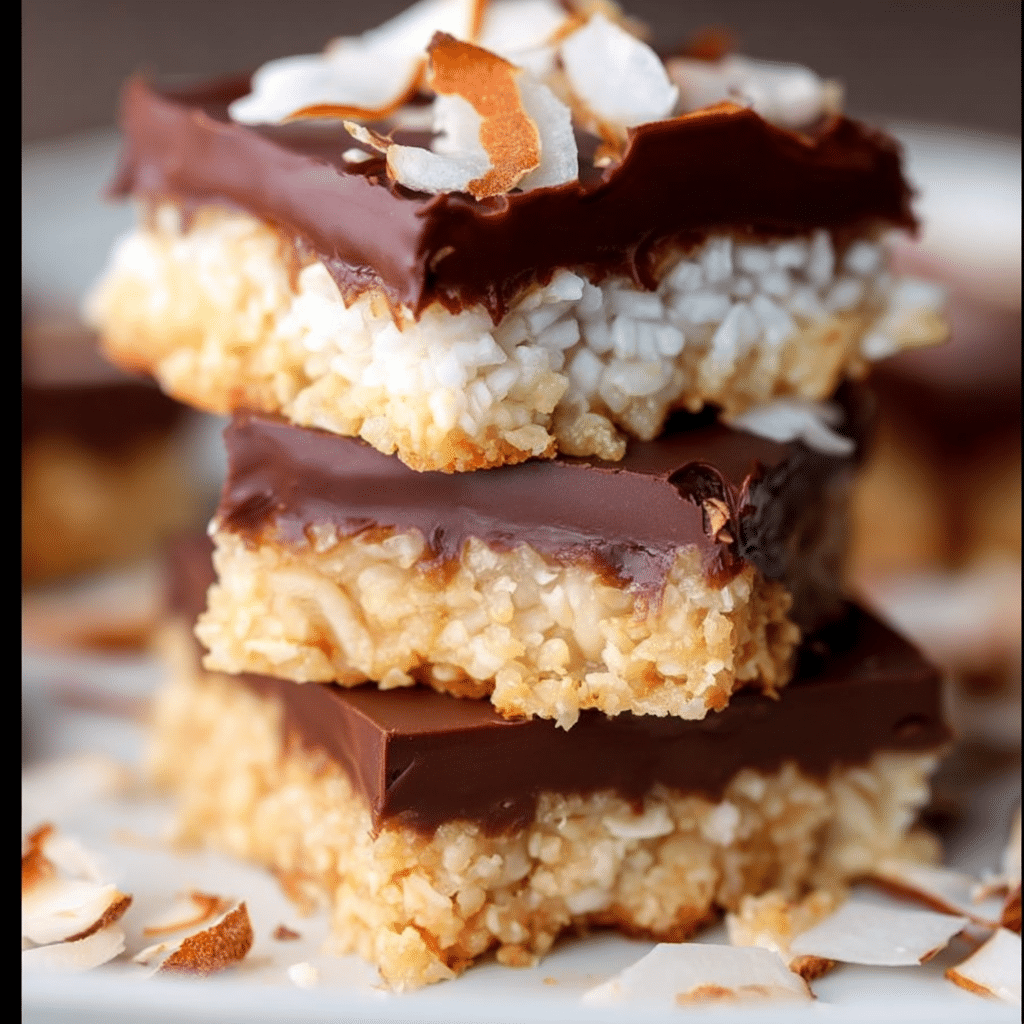
Are you ready for a dessert that’s pure bliss? Let me introduce you to my Chocolate Coconut Dream Bars! Imagine a delightful combination of rich chocolate and creamy coconut in every bite. If you’ve got a sweet tooth, this recipe is definitely worth making! Not only are these bars decadent, but they also bring back memories of sunny days and tropical adventures. Honestly, they remind me of sitting on a beach somewhere, savoring each mouthful as the waves crash nearby. With just a few ingredients and simple steps, you’ll be on your way to creating a treat that will impress friends and family alike!
Why You Will Love This Recipe
Chocolate and coconut are a match made in heaven! This delectable combination has roots in many cultures, from the tropical islands to the rich desserts of Europe. Growing up, my mom would make chocolate coconut treats for special occasions, and they were always the highlight of any gathering. The recipe has evolved from simple chocolate-covered coconut balls to these luscious bars, which are perfect for sharing or indulging in on your own—no judgment here!
Plus, these Chocolate Coconut Dream Bars are perfect for any season. Whether you’re hosting a summer barbecue or cozying up during winter, they fit right in. And let’s face it, who doesn’t love a sweet treat that transports you to a sunny paradise? With the creamy layers and a chocolatey finish, these bars will quickly become a favorite in your dessert repertoire!
Ingredient Discussion
Let’s break down the main ingredients you’ll need to create these heavenly bars:
- Sweetened Condensed Milk: This creamy ingredient is essential for binding the coconut and chocolate together while adding sweetness. Look for brands with no additives for the best results.
- Unsweetened Coconut Flakes: The star of the show! Choose large flake coconut for a chewy texture. If you’re looking for a healthier option, you can use unsweetened coconut that’s been lightly toasted for a nuttier flavor.
- Chocolate Chips: Semi-sweet chocolate chips give a rich flavor that perfectly balances the sweetness of the coconut. You can also use dark chocolate for a more intense cocoa experience!
- Butter: Adds richness and helps with the texture of the crust. I recommend unsalted butter to control the saltiness in your bars.
- Vanilla Extract: A splash of vanilla elevates the flavors in the bars. Use pure vanilla extract for the best taste; it makes a noticeable difference!
When it comes to substitutions, feel free to experiment! If you’re looking for a dairy-free option, try coconut milk or almond milk condensed alternatives. For those needing gluten-free, just ensure your chocolate chips are labeled as such. And if you want to kick it up a notch, toss in some chopped nuts or dried fruit for added texture and flavor!
Equipment Needed
Before diving into the recipe, gather these kitchen tools:
- 9×9-inch baking pan (or similar size)
- Parchment paper (for easy removal)
- Mixing bowls
- Spatula or wooden spoon
- Microwave-safe bowl or double boiler (for melting chocolate)
Don’t have a specific baking pan? No worries! You can use any pan of similar size, just adjust the baking time slightly if needed. And honestly, I love using parchment paper—it makes cleanup a breeze!
Preparation Method
Are you ready to create your Chocolate Coconut Dream Bars? Follow these simple steps:
- Preheat your oven: Start by preheating your oven to 350°F (175°C). This is crucial for ensuring your bars bake evenly.
- Prepare the baking pan: Line your 9×9-inch pan with parchment paper, letting it hang over the edges. This will help you lift the bars out later.
- Mix the base: In a mixing bowl, combine 2 cups of unsweetened coconut flakes, 1 can of sweetened condensed milk, and 1 teaspoon of vanilla extract. Stir until everything is well combined.
- Spread the mixture: Pour the coconut mixture into the prepared pan, spreading it evenly with a spatula. Press it down firmly to create a solid base.
- Bake the base: Place the pan in the preheated oven and bake for about 20-25 minutes. You’ll know it’s ready when the edges are golden brown and the center is firm.
- Prepare the chocolate topping: While the base is baking, melt 1 cup of chocolate chips and 2 tablespoons of butter in a microwave-safe bowl, stirring every 30 seconds until smooth. Alternatively, use a double boiler for a gentle melt.
- Top the bars: Once the base is baked, remove it from the oven and let it cool for a few minutes. Then, pour the melted chocolate over the coconut base, spreading it evenly with a spatula.
- Chill the bars: Allow the bars to cool at room temperature for about 30 minutes, then transfer them to the refrigerator to set for at least 2 hours.
- Slice and serve: Once set, lift the bars out of the pan using the parchment paper. Cut them into squares or rectangles and enjoy!
Remember, if the chocolate topping seems too thick, just give it a quick stir and it will smooth out. And honestly, aim for a glossy finish—it looks so inviting!
Cooking Tips & Techniques
Here are some handy tips to ensure your Chocolate Coconut Dream Bars turn out perfectly:
- Don’t rush the cooling: Letting the base cool slightly before adding the chocolate helps create a nice layer without mixing.
- Check for doneness: Keep an eye on the coconut base while it bakes. If it starts to brown too quickly, cover it with foil.
- Let them chill: Chilling is key! This allows the chocolate to harden properly and makes cutting easier.
- Use a sharp knife: For clean cuts, use a sharp knife and wipe it clean between cuts for neat squares.
Honestly, I’ve made my share of mistakes in the kitchen, and these tips come from experience. I once rushed the chilling time and ended up with a melty mess—so trust me, patience pays off!
Variations & Adaptations
If you want to switch things up, here are a few variations you might love:
- Nutty Coconut Bars: Add ½ cup of chopped nuts, such as almonds or pecans, to the coconut mixture for extra crunch and flavor.
- Fruit-Infused: Mix in ½ cup of dried fruit like cherries or cranberries for a burst of flavor and a fun chewiness.
- Mint Chocolate Dream: Add a few drops of peppermint extract to the chocolate mixture for a minty twist!
And don’t forget, you can also try using different types of chocolate—white chocolate, dark chocolate, or even a mix! Each variation brings its unique flavor profile.
Serving & Storage Suggestions
These bars are best served chilled, so keep them in the refrigerator until you’re ready to enjoy them. They make excellent party treats or a sweet snack throughout the week!
- Presentation: Serve them on a beautiful platter, garnished with a sprinkle of coconut flakes or a drizzle of chocolate for added appeal.
- Complementary flavors: Pair them with a cup of coffee or a scoop of vanilla ice cream for an indulgent dessert experience.
- Storage: Store any leftovers in an airtight container in the refrigerator for up to a week. They also freeze well—just layer them with parchment paper for easy separation!
You’ll find that the flavors develop a bit over time, so don’t hesitate to make a batch ahead of time!
Nutritional Information & Benefits
These Chocolate Coconut Dream Bars not only satisfy your sweet cravings, but they also offer some nutritional benefits:
- Each bar contains healthy fats from coconut, which can provide energy and support heart health.
- Dark chocolate is packed with antioxidants and may improve heart health.
- When using whole ingredients, you can avoid artificial additives and preservatives.
Just remember, moderation is key! These bars are rich, so enjoy them as an occasional treat.
Conclusion
Chocolate Coconut Dream Bars are a delightful indulgence that you absolutely need to try! They’re simple to prepare and can be customized to fit your taste preferences. Whether you’re treating yourself or sharing with loved ones, these bars are sure to impress!
I love making these bars because they remind me of carefree beach days and sweet memories. So, go ahead and whip up a batch, and don’t forget to share your variations or experiences in the comments! Happy baking!
FAQs
How long do Chocolate Coconut Dream Bars last?
They can last up to a week in the refrigerator and even longer if frozen!
Can I make these bars gluten-free?
Yes! Just ensure your chocolate chips and any added ingredients are gluten-free.
What can I use instead of sweetened condensed milk?
You can use coconut milk or almond milk condensed alternatives.
Can I make these bars vegan?
Absolutely! Use plant-based butter and a vegan chocolate option.
What’s the best way to cut these bars?
Use a sharp knife and wipe it clean between cuts for neat squares.
Print
Chocolate Coconut Dream Bars
- Total Time: 2 hours 40 minutes
- Yield: 16 servings 1x
Description
These Chocolate Coconut Dream Bars are a delightful combination of rich chocolate and creamy coconut, perfect for satisfying your sweet tooth. Simple to prepare, they are sure to impress friends and family alike!
Ingredients
- 1 can sweetened condensed milk
- 2 cups unsweetened coconut flakes
- 1 cup semi-sweet chocolate chips
- 2 tablespoons unsalted butter
- 1 teaspoon vanilla extract
Instructions
- Preheat your oven to 350°F (175°C).
- Line your 9×9-inch pan with parchment paper, letting it hang over the edges.
- In a mixing bowl, combine the coconut flakes, sweetened condensed milk, and vanilla extract. Stir until well combined.
- Pour the coconut mixture into the prepared pan, spreading it evenly with a spatula. Press it down firmly to create a solid base.
- Place the pan in the preheated oven and bake for about 20-25 minutes until the edges are golden brown and the center is firm.
- While the base is baking, melt the chocolate chips and butter in a microwave-safe bowl, stirring every 30 seconds until smooth.
- Once the base is baked, remove it from the oven and let it cool for a few minutes. Pour the melted chocolate over the coconut base, spreading it evenly.
- Allow the bars to cool at room temperature for about 30 minutes, then transfer them to the refrigerator to set for at least 2 hours.
- Once set, lift the bars out of the pan using the parchment paper. Cut them into squares or rectangles and enjoy!
Notes
Letting the base cool slightly before adding the chocolate helps create a nice layer without mixing. Chilling is key for the chocolate to harden properly.
- Prep Time: 15 minutes
- Cook Time: 25 minutes
- Category: Dessert
- Cuisine: American
Nutrition
- Serving Size: 1 bar
- Calories: 150
- Sugar: 14
- Sodium: 50
- Fat: 7
- Saturated Fat: 4
- Carbohydrates: 20
- Fiber: 1
- Protein: 2
Keywords: chocolate, coconut, dessert, bars, easy recipe
")