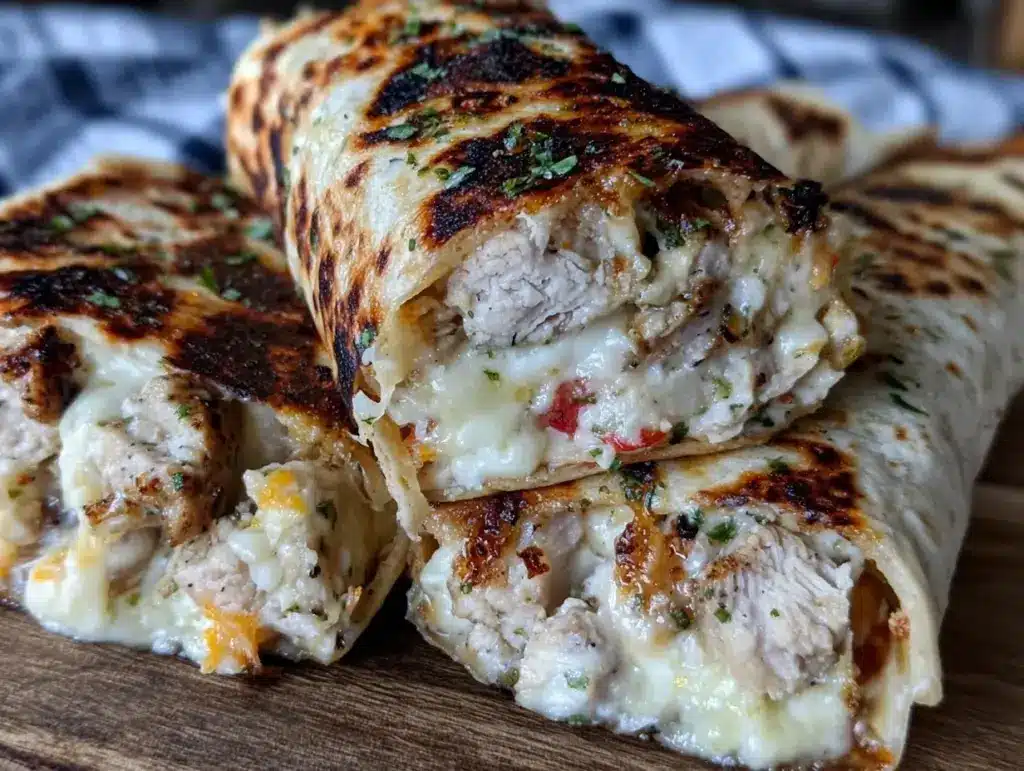
I still remember the first time I threw together these cheesy garlic chicken wraps—it was one of those frantic Wednesdays when my fridge looked sad, my energy was low, and my craving for something comforting was sky-high. All I had was leftover rotisserie chicken, a block of cheddar, and a handful of tortillas. Oh, and garlic (because honestly, I panic if I have less than three bulbs in the house).
I had zero expectations—just hunger and desperation. But the moment I pulled that crispy, cheesy wrap off the pan, the smell alone had me grinning. There’s something about the combination of gooey cheese, golden garlic, and juicy chicken that makes you feel like you’ve hacked the lunch game. Fast, easy, and so good it’s almost embarrassing.
Since then, these cheesy garlic chicken wraps have become my go-to move when I want something that feels indulgent but takes less time than scrolling Instagram. I’ve tested them with every cheese in the dairy aisle, tried them with leftover turkey (Thanksgiving remix!), and experimented with about a dozen spice blends. But nothing beats the classic—garlic, cheddar, chicken, and that crispy tortilla hug.
Why You’ll Love These Cheesy Garlic Chicken Wraps
Real talk: I make these wraps at least twice a week, and I’m not bored yet. Here’s why you’ll be obsessed too:
- Ready in 20 Minutes, Start to Finish: I’ve made these during Zoom lunch breaks and they never let me down. No fancy prep, no waiting around.
- That Cheese Pull: You know the one. Stretchy, melty cheddar (or mozzarella if you’re feeling wild) oozes out with every bite. I can’t resist snapping a photo for Pinterest every time.
- Garlic Lovers’ Dream: Four cloves, minimum. Sautéed until golden, it infuses every bite with that savory kick. If you love garlic bread, you’re in for a treat.
- Perfect for Leftovers: Shredded rotisserie chicken works best, but any cooked chicken (even grilled or poached) fits. I’ve even used tofu when I was out—still delicious.
- Customizable for Every Taste: Spice it up, swap the cheese, add veggies. This wrap is basically a blank canvas for whatever you’re craving.
- Crispy Outside, Gooey Inside: Pan-toasted tortillas get that irresistible crunch while the filling stays warm and melty. It’s the texture dream team.
Honestly, these cheesy garlic chicken wraps are the answer to “What should I eat for lunch?” when you want something that tastes way more decadent than the effort you put in. They’re my comfort food, my lazy meal, my “I need to impress someone quickly” trick. And now, yours too.
What Ingredients You’ll Need for Cheesy Garlic Chicken Wraps
Here’s what I love about this ingredient list: you probably have most of it already, and if not, you can swap things around (I’ll tell you how). I’m a little particular about some things—trust me, it makes a difference.
- Flour Tortillas (4 large, 10-inch / 25cm): I use Mission brand, but any soft flour tortilla works. Whole wheat is fine, but I prefer classic for that golden crisp.
- Cooked Chicken (2 cups / 250g, shredded): Rotisserie is my shortcut of choice. Grilled, poached, or leftover roast chicken—anything goes. Just make sure it’s shredded small enough to fold easily.
- Cheddar Cheese (1.5 cups / 150g, shredded): Sharp cheddar is my personal favorite. Mozzarella works for extra gooeyness. Colby Jack is great if you want a milder flavor.
- Fresh Garlic (4 cloves, minced): The heart of this recipe. Don’t skimp. I use a garlic press because I’m lazy and hate sticky fingers.
- Butter (2 tbsp / 30g): For sautéing garlic and brushing tortillas. Salted or unsalted—it’s up to you. Adds flavor and helps with browning.
- Parsley (2 tbsp / 8g, finely chopped): Optional, but I love the fresh pop (and the color for Pinterest photos). Dried works in a pinch.
- Salt & Pepper (to taste): I’m a little heavy-handed with black pepper.
- Optional Fillings:
- Sliced green onions (2 stalks)
- Baby spinach (handful)
- Diced tomatoes (½ cup / 80g)
Quick shopping note: If you’re out of rotisserie chicken, grab a pack of pre-cooked grilled strips or roast up a couple breasts the night before. Cheese-wise, block cheese melts better than pre-shredded (less anti-caking stuff). As for garlic, I stock up at Costco because I go through it embarrassingly fast.
Substitutions:
- No cheddar? Use mozzarella, provolone, or a Mexican blend.
- Dairy-free? Violife cheddar shreds are surprisingly good.
- Gluten-free? Try Siete or Mission gluten-free tortillas.
- No fresh garlic? Use ¾ teaspoon garlic powder in the butter, but fresh is better.
I learned the hard way that dry, overcooked chicken makes for sad wraps. Moist, juicy shreds are key. And don’t skip the butter—it’s what makes that garlic flavor pop.
Equipment Needed for Cheesy Garlic Chicken Wraps
You do not need a gourmet kitchen for these wraps. I’ve made them in a tiny apartment, on a camping stove, and (don’t judge) even in a dorm room skillet.
- Large Nonstick Skillet or Frying Pan: My go-to is a heavy skillet with a lid. Cast iron works, but nonstick is easier for flipping.
- Spatula: I’m obsessed with my flexible silicone spatula—makes flipping wraps a breeze and doesn’t scratch pans.
- Mixing Bowl: For tossing chicken and cheese together.
- Knife & Cutting Board: For chopping garlic and parsley.
- Measuring Cups & Spoons: I eyeball cheese, but measure garlic (it matters!).
- Pastry Brush (optional): For brushing butter on tortillas. You can use the back of a spoon if you don’t have one.
No skillet? A griddle or even a sandwich press will do the trick. I’ve done it in a waffle iron for fun—super crispy edges! Just don’t use metal utensils on nonstick pans (learned that lesson the hard way).
The only “fancy” thing I use is a garlic press because I hate mincing garlic by hand. Totally optional, but worth it if you’re a garlic fiend like me.
How to Make Cheesy Garlic Chicken Wraps – Step-by-Step

Alright, let’s get into it. I’m walking you through exactly how I do it, with all the little tips that make these wraps come out perfect every time.
- Sauté the Garlic (3 minutes)
Melt 2 tablespoons (30g) butter in your skillet over medium heat. Toss in your minced garlic and cook for about 1 minute, stirring constantly, until fragrant and just golden—not brown. Your kitchen will smell heavenly at this point. Turn off the heat and let it sit for a minute. - Make the Filling (2 minutes)
In a mixing bowl, combine 2 cups (250g) shredded chicken, 1.5 cups (150g) shredded cheddar, half the sautéed garlic butter, parsley, salt, and pepper. Toss until everything is evenly coated and cheesy. If you want extra gooey wraps, toss in an extra handful of cheese (I always do). - Fill the Tortillas (3 minutes)
Lay out your tortillas. Spoon the chicken-cheese mixture evenly down the center of each. If you’re adding extras (spinach, tomatoes, green onions), sprinkle them on now. Roll each tortilla up tightly—think burrito style, tucking in the sides first for maximum cheese containment. - Toast the Wraps (8-10 minutes)
Heat the skillet back to medium. Brush the outside of each wrap with the remaining garlic butter (THIS is where the magic happens—crispy, garlicky exterior). Place seam-side down in the pan. Cook 2-3 minutes per side, pressing gently with the spatula, until golden brown and crispy. If you’re doing all four at once, cover the pan to help the cheese melt inside. - Serve Hot (2 minutes)
Slice wraps in half on the diagonal for maximum cheese pull and Pinterest-worthy presentation. Sprinkle with extra parsley or a pinch of flaky salt if you’re feeling fancy.
Time check: You’re at about 18 minutes, start to finish. The hardest part? Not eating them straight from the pan. You’ll know they’re done when the outside is sizzling, golden, and you see cheese starting to ooze at the seams.
Troubleshooting:
- Wrap splitting? Tortilla too cold—warm it in the microwave for 10 seconds first.
- Cheese not melting? Cover the pan for a minute.
- Garlic burning? Lower the heat and stir constantly.
The best part? The smell in your kitchen—think garlic bread meets grilled cheese, but with protein.
My Best Tips & Techniques for Cheesy Garlic Chicken Wraps
Okay, here’s where I spill all my secrets from making these cheesy garlic chicken wraps way too many times.
- Warm the Tortillas First: Cold tortillas crack. I microwave them for 10 seconds under a damp paper towel. Makes rolling way easier.
- Don’t Overstuff: Tempting, but too much filling = wraps that burst and leak cheese everywhere. About ½ cup filling per wrap is the sweet spot.
- Garlic Butter on the Outside: Game changer. Brush it on before toasting for that crispy, golden finish. I sometimes add a pinch of garlic powder to the butter for extra oomph.
- Press While Toasting: Use your spatula to gently press the wraps as they toast. Helps them brown evenly and makes the cheese extra melty.
- Cover the Pan: If you want the cheese super gooey, cover the skillet for a minute or two. Steam helps everything melt together.
- Let Rest Before Slicing: Give your wraps a minute to cool before cutting. Cheese won’t ooze out everywhere, and the wraps hold their shape better.
First time I made these, I went wild with the filling and ended up with a wrap volcano—cheese everywhere but inside the tortilla. Lesson learned! Also, I’ve burned garlic more times than I care to admit. Watch it closely—it goes from golden to bitter in seconds.
Pro tip: Make extra garlic butter and keep it in the fridge for future wraps (or garlic bread emergencies).
Ways to Mix Up Cheesy Garlic Chicken Wraps
Once you’ve mastered the basic cheesy garlic chicken wraps, you can go wild with variations. I’ve tested all these—some are regulars in my rotation.
- Buffalo Chicken Version: Toss the chicken in 2 tbsp buffalo sauce before adding cheese. Top with a drizzle of ranch or blue cheese dressing inside the wrap. My husband requests this weekly.
- Pesto Chicken Wraps: Swap the garlic butter for basil pesto. Use mozzarella instead of cheddar. Add a handful of baby spinach. It’s basically Italian grilled cheese.
- Veggie-Packed: Add roasted red peppers, zucchini, or baby spinach to the filling. Makes it feel “healthy” and adds color.
- Korean BBQ Twist: Mix chicken with 1 tbsp gochujang and 1 tsp honey. Use provolone cheese. Sprinkle with sesame seeds before serving.
- Breakfast Wraps: Add scrambled eggs to the filling. Swap cheddar for pepper jack. Serve with salsa.
- Gluten-Free or Low-Carb: Use gluten-free tortillas or big lettuce leaves. Cheese still gets melty, and the garlic flavor shines through.
- Vegan Version: Use shredded jackfruit instead of chicken, vegan cheddar, and vegan butter. Still crispy, still garlicky, still amazing.
Flavor add-ins I love:
- Jalapeños for heat
- Sun-dried tomatoes for tang
- Crispy bacon bits for extra indulgence
- Swap cheddar for smoked gouda or Swiss
Honestly, you can stuff almost anything in these wraps. I’ve tried Thanksgiving leftovers (turkey, stuffing, cranberry)—pretty epic. If you find a new combo that rocks, let me know!
Serving Ideas & Storage for Cheesy Garlic Chicken Wraps
How to Serve
These wraps are killer hot off the skillet, but they’re also pretty great at room temp. I slice them on the diagonal—it’s a Pinterest thing, but also makes them easier to dip.
- Lunch: Serve with a simple salad or veggies and hummus
- Snack: Cut into small rounds for party platters or kids’ lunches
- Dinner: Pair with tomato soup or garlic fries (double the garlic, double the fun)
- Brunch: Make breakfast-style with scrambled eggs and serve alongside fruit
- Party Food: Cut into pinwheels and secure with toothpicks for appetizers
Storage Instructions
Room Temperature: Store cooled wraps in an airtight container for up to 4 hours. Not ideal overnight unless it’s chilly.
Refrigerator: Wrap tightly in foil or plastic wrap and refrigerate for up to 3 days. The wraps stay moist and reheat well.
Freezer: Yes, you can freeze these! Slice in half, wrap in parchment, and seal in a freezer bag. Lasts up to 2 months. Reheat straight from frozen in a skillet or microwave.
Reheating Tips
- Microwave: 30 seconds per half wrap. Cover with a damp paper towel to keep them soft.
- Skillet: Toast over medium heat for 2-3 minutes per side until warmed through and crispy again.
- Oven: 350°F (175°C) for 10 minutes if reheating a bunch at once.
Pro tip: If your wrap is starting to get stale, slice it up and toss in a hot pan for “wrap croutons.” Great on salad or soup!
Nutritional Info & Health Benefits of Cheesy Garlic Chicken Wraps
I’m not a dietitian, but here’s why I feel good about eating these cheesy garlic chicken wraps for lunch.
| Per Wrap (Approx.) | Calories | Protein | Carbs | Fat | Fiber |
|---|---|---|---|---|---|
| 370 | 27g | 29g | 15g | 2g |
- High protein from chicken and cheese—keeps you full way longer than a plain grilled cheese.
- Lower sugar than most “quick lunch” options.
- Calcium and Vitamin D from the cheese (your bones will thank you).
- Garlic is good for you—immune support and flavor power!
Dietary notes: These wraps contain gluten, dairy, and chicken. You can swap in gluten-free tortillas, vegan cheese, and jackfruit or tofu to suit your needs. I’ve made every version—still tasty, just a little different.
Let’s be honest: it’s still a cheesy wrap. But compared to most takeout sandwiches? You’re getting more protein, less sodium, and way more flavor.
Final Thoughts on Cheesy Garlic Chicken Wraps
So that’s my cheesy garlic chicken wraps recipe! I know I’ve gone on about it, but when you find a recipe this easy and delicious, you want everyone to try it. These wraps have saved me from so many boring lunches and “what do I make now?” moments.
This is my go-to when I need something comforting, fast, and (let’s be real) impressive-looking enough for Instagram or a quick Pinterest pin. My family asks for these all the time, and every friend who tries them wants the recipe. Now it’s yours!
Make it your own—swap the cheese, add veggies, spice it up. That’s how the best recipes happen. If you make these, I’d love to hear how it turns out! Drop a comment below, tag me on Instagram @myhomecookingjoy, or ask questions in the comments (I check them daily and love helping troubleshoot).
Happy wrapping! Hope your kitchen smells as amazing as mine does right now.
FAQs – Cheesy Garlic Chicken Wraps
Q: Can I use mozzarella instead of cheddar?
A: Absolutely! Mozzarella gives you extra cheese pull and a milder flavor. Sometimes I do half cheddar, half mozzarella for the best of both worlds.
Q: How do I keep my wraps from falling apart?
A: Warm the tortillas before filling (10 seconds in the microwave works wonders) and don’t overstuff. Tuck the sides in and roll tightly. If you’re struggling, try a toothpick to hold them closed while cooking.
Q: Can I make these ahead for meal prep?
A: Yes, and I do it all the time! Prepare and refrigerate the wraps un-toasted, then cook fresh when you’re ready to eat. Or toast and cool, wrap tightly, and reheat in the skillet or microwave.
Q: What’s the best way to shred chicken quickly?
A: Toss warm cooked chicken in a stand mixer with the paddle attachment (low speed for 30 seconds). Magic. If you don’t have a mixer, two forks work fine—just takes a bit longer.
Q: Can I freeze cheesy garlic chicken wraps?
A: Definitely! Freeze after toasting or before—both work. I slice them in half, wrap in parchment, and stash in a freezer bag. Reheat straight from frozen in a skillet or microwave. Perfect for busy weeks or lazy lunches.
Pin This Recipe!


Cheesy Garlic Chicken Wraps
- Total Time: 20 minutes
- Yield: 4 servings 1x
Description
These cheesy garlic chicken wraps are a quick, comforting lunch packed with juicy chicken, gooey cheddar, and golden garlic, all wrapped in a crispy tortilla. Ready in just 20 minutes, they’re perfect for using up leftovers and customizable to suit any taste.
Ingredients
- 4 large flour tortillas (10-inch)
- 2 cups cooked chicken, shredded
- 1.5 cups cheddar cheese, shredded
- 4 cloves fresh garlic, minced
- 2 tablespoons butter
- 2 tablespoons parsley, finely chopped (optional)
- Salt & pepper, to taste
- Optional: 2 stalks green onions, sliced
- Optional: 1 handful baby spinach
- Optional: 1/2 cup diced tomatoes
Instructions
- Melt butter in a large skillet over medium heat. Add minced garlic and sauté for about 1 minute until fragrant and just golden. Remove from heat and let sit for a minute.
- In a mixing bowl, combine shredded chicken, shredded cheddar, half the sautéed garlic butter, parsley, salt, and pepper. Toss until evenly coated.
- Lay out tortillas. Spoon the chicken-cheese mixture evenly down the center of each. Add optional fillings if desired. Roll each tortilla up tightly, tucking in the sides.
- Heat the skillet back to medium. Brush the outside of each wrap with the remaining garlic butter. Place seam-side down in the pan. Cook 2-3 minutes per side, pressing gently with a spatula, until golden brown and crispy. Cover the pan to help the cheese melt if needed.
- Slice wraps in half on the diagonal. Sprinkle with extra parsley or flaky salt if desired. Serve hot.
Notes
Warm tortillas before filling to prevent cracking. Don’t overstuff wraps to avoid bursting. Brush garlic butter on the outside for extra crispiness. Cover the pan for gooier cheese. Let wraps rest a minute before slicing for best results. Can be made gluten-free or dairy-free with substitutions.
- Prep Time: 7 minutes
- Cook Time: 10 minutes
- Category: Lunch
- Cuisine: American
Nutrition
- Serving Size: 1 wrap
- Calories: 370
- Sugar: 2
- Sodium: 650
- Fat: 15
- Saturated Fat: 8
- Carbohydrates: 29
- Fiber: 2
- Protein: 27
Keywords: cheesy chicken wraps, garlic chicken wraps, easy lunch, quick chicken wrap, rotisserie chicken recipe, comfort food, skillet wrap, crispy tortilla, cheddar chicken wrap