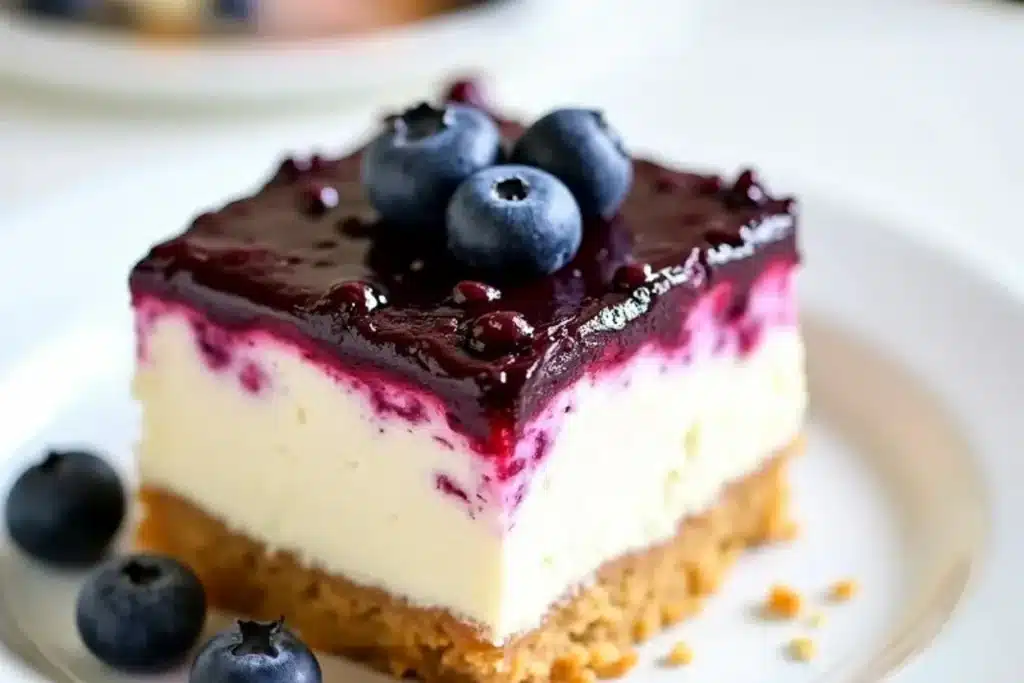
If you’ve ever craved a sweet treat that’s both tangy and creamy, these Blueberry Bars with Cheesecake Layers are about to become your new go-to. Imagine biting into a buttery crust, a ribbon of silky cheesecake, and a burst of juicy blueberries—now, picture making a whole tray of them with hardly any fuss! Honestly, big batch desserts like this make life a little sweeter, especially if you love sharing. Whether you’re prepping for a picnic, family reunion, or just want something special with your afternoon coffee, these blueberry cheesecake bars fit the bill.
I still remember the first time I made these bars. The scent of bubbling blueberries and vanilla drifting through my kitchen was enough to make my family wander in, asking, “Is it ready yet?” There’s something magical about the combination of luscious cream cheese and bright, tart berries. Plus, the recipe is super forgiving—perfect for home bakers who want a reward without too much technical drama. These bars not only taste like summer but also look gorgeous on a dessert table (hello, Pinterest-worthy pics!).
What I love most is their versatility. You can prep them ahead, cut them into neat squares, and stack them up for an easy grab-and-go dessert. And did I mention how stunning the layers look? Let’s face it—these blueberry bars with cheesecake layers are as enjoyable to look at as they are to eat. If you’re searching for the best big batch dessert, you’ve landed in the right spot!
Why You Will Love This Blueberry Cheesecake Bar Recipe
These blueberry bars with cheesecake layers are not just a delicious treat—they’re a slice of food history with a modern twist. Blueberry desserts have always had a soft spot in my heart. Growing up in the Midwest, summer meant blueberry picking with stained fingers and sun-warmed cheeks. Blueberries have been a beloved ingredient in American kitchens for centuries, especially in pies and cobblers. But turning them into bars layered with creamy cheesecake? That’s a game-changer.
The cultural origins of cheesecake trace all the way back to ancient Greece, where athletes were served a version of cheesecake during the first Olympic Games (fun fact, right?). Over time, the recipe traveled and adapted, eventually merging with American traditions—think New York cheesecake. The idea of combining seasonal fruit with cheesecake has popped up in various forms, but this bar version is hands-down the most convenient for sharing.
As for these bars, I first made them for a summer block party. They held up well outside, and every bite was bursting with blueberry flavor—plus, that creamy middle layer made them a hit with both kids and adults. You know, sometimes recipes change over time as you tweak them: maybe a little more lemon zest, a thicker swirl of cream cheese, or an extra scoop of berries for good measure. I’ve made these bars with frozen berries in the winter and fresh ones in July—they’re always a crowd-pleaser. And if you’re wondering about seasonality, blueberries are at their peak in mid-summer, but thanks to their popularity, you can find good ones almost year-round.
There’s a reason why blueberry bars with cheesecake layers are a favorite for potlucks and bake sales. They’re easy to transport, don’t require fancy serving skills, and look absolutely stunning cut into squares. Plus, the combination of flavors is timeless. If you’re after a dessert that feels both classic and a little bit special, this is the one to try.
Ingredient Discussion: Choosing the Best for Your Blueberry Bars with Cheesecake Layers
Let’s talk ingredients. Each one brings something special to these blueberry bars with cheesecake layers, and choosing the right ones really makes a difference. Here’s what you’ll need, plus some tips from my own kitchen trials:
- Blueberries: Fresh are fantastic, especially in summer, but frozen work beautifully too (just don’t thaw them first, or things get messy). Look for plump, deep-blue berries—avoid mushy or shriveled ones. If you’re using wild blueberries, expect a more intense flavor. No blueberries? Try raspberries or blackberries as a swap!
- Cream Cheese: Full-fat blocks make the creamiest layer. Skip the whipped or spreadable versions—they tend to make the filling too soft. Let your cream cheese come to room temperature for easy mixing. For a lighter version, you can use Neufchâtel cheese, but honestly, I think the flavor is best with good old Philadelphia brand. Dairy-free? Go with your favorite plant-based cream cheese, but keep an eye on texture.
- Granulated Sugar: Regular white sugar sweetens both the crust and the cheesecake layer. Coconut sugar or a 1:1 baking stevia blend can work for a lower-glycemic option, though the flavor will be a bit different. Brown sugar adds a hint of caramel—delicious if you like!
- All-Purpose Flour: This forms the structure of the crust and the crumble topping. Use a gluten-free blend if you need to avoid wheat (I’ve tried Bob’s Red Mill with good results). For a nuttier flavor, try swapping a quarter of the flour for finely ground almond flour.
- Butter: Unsalted is best, so you control the salt. If all you have is salted, just skip the added salt in the recipe. Vegan butter or coconut oil (solid, not melted!) can be used for a dairy-free version. Pro tip: keep your butter cold for the crust—it makes the bars extra flaky.
- Lemon Zest and Juice: Lemon brightens the blueberry flavor and adds a fresh zing to the cheesecake. Always zest the lemon before juicing! Organic lemons are my go-to since the zest isn’t waxed.
- Eggs: These bind the cheesecake layer and give it a rich, velvety finish. Room temperature eggs blend in more smoothly. For an egg-free version, try a flaxseed “egg” or a commercial egg replacer, though the texture will shift a little.
- Vanilla Extract: Real vanilla extract brings warmth and depth to the cheesecake. I’m partial to Nielsen-Massey, but any pure vanilla works. If you’re in a pinch, almond extract is a fun swap (just use half as much—it’s strong!).
- Cornstarch: This thickens the blueberry filling so it sets up nicely. Arrowroot powder can work as a 1:1 substitute if you avoid corn products.
- Salt: Just a pinch sharpens all the flavors—don’t skip it!
When it comes to sourcing, local farmers’ markets often have the best blueberries in season. For off-season baking, I grab frozen wild blueberries from the grocery store—just as good, sometimes even better. Store your berries in the fridge if you’ll use them in a day or two, or freeze for longer storage (just don’t rinse them before freezing—they’ll clump). And if you’re feeling adventurous, swap in whatever berries look best that week. Baking’s about making it work, right?
Equipment Needed for Blueberry Bars with Cheesecake Layers
You don’t need a fancy kitchen to whip up these blueberry bars with cheesecake layers. Here’s what you’ll want to grab:
- 9×13-inch Baking Pan: This size gives you perfectly thick bars. Metal pans heat more evenly than glass, in my experience, and give a crisper edge. If you don’t have a 9×13, two 8×8-inch pans work (just adjust baking time).
- Mixing Bowls: At least two—one for the crust/crumble, one for the cheesecake filling. I love glass because you can see what’s going on, but any will do.
- Hand Mixer or Stand Mixer: For the creamiest cheesecake layer, a mixer is your friend. If you’re strong-armed (or feeling old-school), a sturdy whisk and some elbow grease work too.
- Measuring Cups & Spoons: Precision matters here. I like using a scale for flour (120g per cup) but cups are fine if you fluff and spoon, not scoop.
- Zester or Microplane: For lemon zest. I used to use a box grater, but microplanes are worth the investment—so much easier to clean.
- Parchment Paper: Makes lifting the bars out a breeze. If you’re out, grease the pan well.
- Spatula & Offset Spreader: For smooth cheesecake layers and even spreading. A butter knife does the trick in a pinch.
Maintenance tip: If you use nonstick pans, avoid metal spatulas to keep them scratch-free. And for budget options, thrift stores are a goldmine for sturdy pans and bowls—just give them a good scrub. Honestly, you don’t need anything fancy to make these bars shine!
How to Make Blueberry Bars with Cheesecake Layers: Step-by-Step
-
Prep the Pan & Oven:
Preheat your oven to 350°F (175°C). Line a 9×13-inch (23x33cm) baking pan with parchment paper, leaving an overhang for easy lifting. Lightly grease the paper. This helps the bars pop out neatly later. -
Make the Crust & Crumble:
In a large bowl, combine 2 1/2 cups (312g) all-purpose flour, 1 cup (200g) granulated sugar, 1/2 teaspoon salt, and zest of 1 lemon. Cut in 1 cup (226g) cold unsalted butter, cubed. Use a pastry cutter or your fingers to work the butter in until the mixture resembles coarse crumbs. (If the butter gets too soft, pop the bowl in the fridge for 10 minutes.) Reserve 1 1/2 cups (about 225g) of this mixture for the topping; press the rest into the bottom of your prepared pan, creating an even layer. -
Bake the Crust:
Bake for 10-12 minutes, until just set and lightly golden at the edges. This step keeps the crust crisp under all that filling. Let cool slightly while you prep the other layers. -
Prepare the Blueberry Layer:
In a medium bowl, toss 3 cups (450g) blueberries (fresh or frozen) with 1/2 cup (100g) sugar, 1 tablespoon (8g) cornstarch, and 1 tablespoon (15ml) lemon juice. Set aside. If using frozen berries, don’t thaw—just toss straight from the freezer. The cornstarch helps thicken the berry juices so your bars aren’t soggy. -
Mix the Cheesecake Layer:
In another bowl, beat 16oz (450g) room temperature cream cheese with 1/2 cup (100g) sugar and 1 teaspoon (5ml) pure vanilla extract until smooth and creamy. Add 2 large eggs, one at a time, mixing well after each. Don’t overmix—just blend until combined. Scrape down the sides for a silky texture. -
Layer and Assemble:
Pour the cheesecake mixture over the cooled crust, spreading evenly with a spatula. Scatter the blueberry mixture over the cheesecake layer—some will sink, some will stay on top. Sprinkle the reserved crumb mixture evenly over the berries. (I usually pinch some of the topping into bigger crumbs for texture.) -
Bake:
Bake for 40-45 minutes, until the crumble is golden and the cheesecake layer looks just set in the center (it might jiggle a little, that’s normal—it’ll firm up as it cools). If the top browns too quickly, loosely tent with foil for the last 10 minutes. -
Cool & Chill:
Let the bars cool completely in the pan (about 2 hours), then refrigerate for at least 3 hours, or overnight. This helps the layers set for clean slicing. Trust me, the wait is worth it! The bars slice easier when cold. -
Cut & Serve:
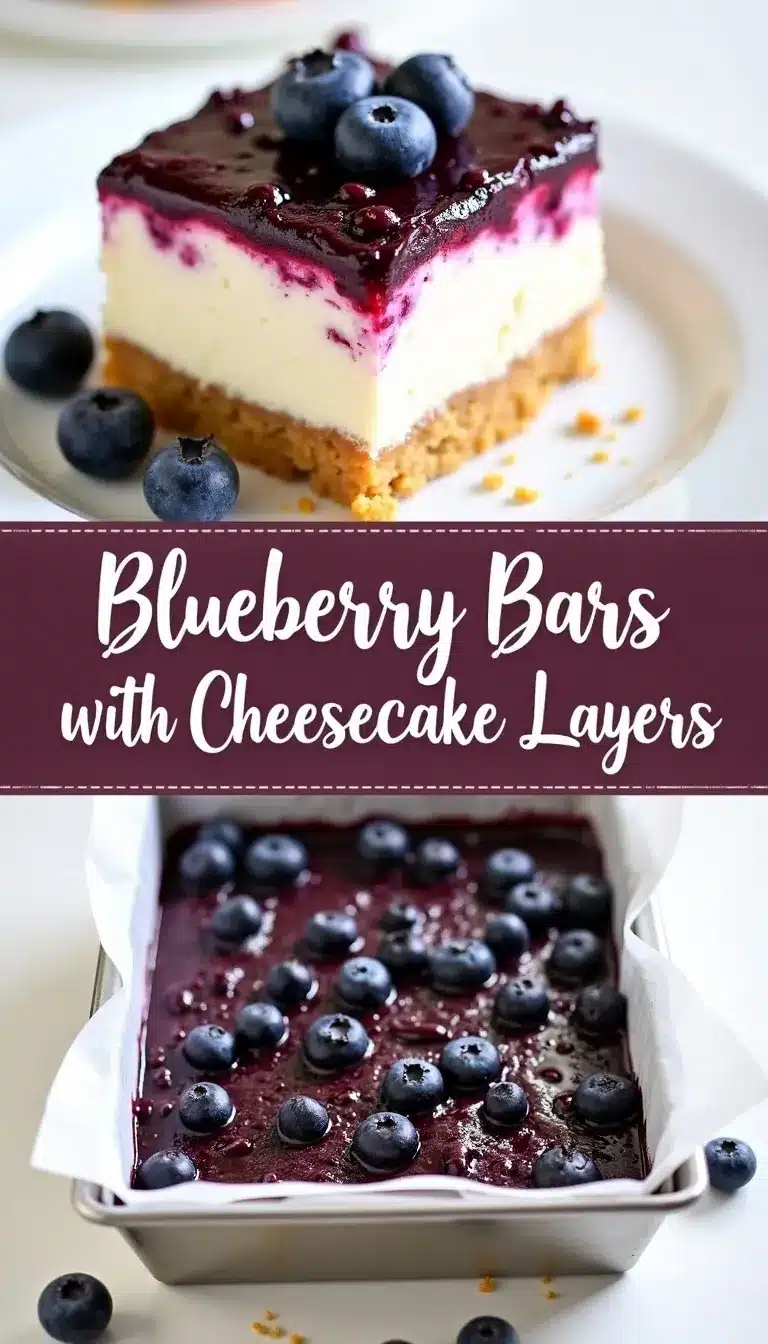
Use the parchment overhang to lift the bars out. Cut into 24 squares with a sharp knife, wiping the blade between cuts for neat edges. The layers should be visible—creamy, berry-bright, and crumbly!
Troubleshooting: If your crust crumbles, it might need more butter or firmer packing. If the cheesecake layer cracks, don’t stress—crumb topping covers all. Bars too soft? Chill longer for cleaner cuts. And if you’re short on time, you can cool the bars in the freezer for 30 minutes, but watch for condensation when slicing.
Cooking Tips & Techniques for Perfect Blueberry Bars with Cheesecake Layers
After dozens of pans (and a few messy mishaps), I’ve got a handful of tricks that make these blueberry bars with cheesecake layers come out just right every time. First, keep your butter cold when making the crust and crumble—it gives you that tender, slightly crunchy base everyone loves. If your kitchen is hot (mine turns into a sauna in July), chill the dough for a few minutes before pressing it into the pan.
For the cheesecake layer, always soften your cream cheese at room temperature. Cold cream cheese clumps, and nobody wants lumpy bars. Don’t overmix the eggs—just blend until smooth, or the filling can puff and crack in the oven. If you do get cracks, just call it “rustic” (we’re all friends here, right?).
Layering is key. Don’t stress if the blueberries seem uneven; they’ll distribute themselves as they bake. Sometimes I swirl the top gently with a knife for a marbled look. Let the bars cool completely before cutting
Blueberry Bars with Cheesecake Layers
- Total Time: 4 hours 20 minutes
- Yield: 24 bars 1x
Description
These blueberry bars feature a buttery crust, creamy cheesecake layer, and juicy blueberries, making them the perfect big batch dessert for sharing at gatherings or enjoying with coffee. Easy to make ahead and slice, they’re as beautiful as they are delicious.
Ingredients
- 2 1/2 cups all-purpose flour
- 1 cup granulated sugar (plus 1/2 cup for blueberry layer, plus 1/2 cup for cheesecake layer)
- 1/2 teaspoon salt
- Zest of 1 lemon
- 1 cup (2 sticks) unsalted butter, cold and cubed
- 3 cups blueberries (fresh or frozen)
- 1 tablespoon cornstarch
- 1 tablespoon lemon juice
- 16 oz cream cheese, room temperature
- 1 teaspoon pure vanilla extract
- 2 large eggs
Instructions
- Preheat oven to 350°F (175°C). Line a 9×13-inch baking pan with parchment paper, leaving an overhang for easy lifting. Lightly grease the paper.
- In a large bowl, combine 2 1/2 cups flour, 1 cup sugar, 1/2 teaspoon salt, and zest of 1 lemon. Cut in 1 cup cold unsalted butter until the mixture resembles coarse crumbs. Reserve 1 1/2 cups of this mixture for the topping; press the rest into the bottom of the prepared pan.
- Bake the crust for 10-12 minutes, until just set and lightly golden at the edges. Let cool slightly.
- In a medium bowl, toss 3 cups blueberries with 1/2 cup sugar, 1 tablespoon cornstarch, and 1 tablespoon lemon juice. Set aside.
- In another bowl, beat 16 oz cream cheese with 1/2 cup sugar and 1 teaspoon vanilla extract until smooth. Add 2 large eggs, one at a time, mixing just until combined.
- Pour the cheesecake mixture over the cooled crust and spread evenly. Scatter the blueberry mixture over the cheesecake layer. Sprinkle the reserved crumb mixture evenly over the top.
- Bake for 40-45 minutes, until the crumble is golden and the cheesecake layer is just set in the center. Tent with foil if the top browns too quickly.
- Let the bars cool completely in the pan (about 2 hours), then refrigerate for at least 3 hours or overnight.
- Use the parchment overhang to lift the bars out. Cut into 24 squares with a sharp knife, wiping the blade between cuts for neat edges.
Notes
For best results, use cold butter for the crust and room temperature cream cheese for the filling. Don’t overmix the cheesecake layer to avoid cracks. Bars slice best when fully chilled. You can substitute other berries or use a gluten-free flour blend if needed.
- Prep Time: 25 minutes
- Cook Time: 55 minutes
- Category: Dessert
- Cuisine: American
Nutrition
- Serving Size: 1 bar (1/24 of recipe)
- Calories: 210
- Sugar: 15
- Sodium: 110
- Fat: 10
- Saturated Fat: 6
- Carbohydrates: 28
- Fiber: 1
- Protein: 3
Keywords: blueberry bars, cheesecake bars, big batch dessert, summer dessert, easy blueberry dessert, potluck dessert, picnic dessert, cream cheese bars