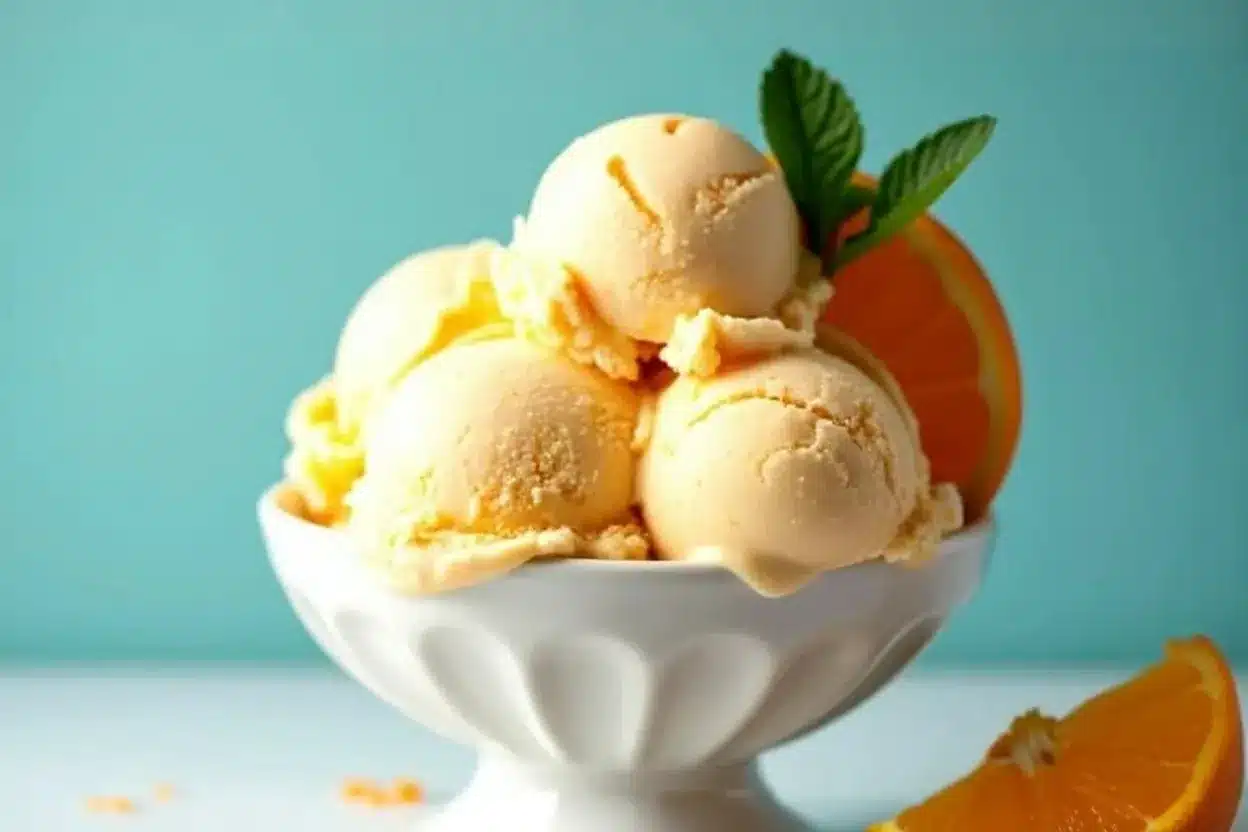
Nothing screams summer like the delightful taste of homemade ice cream! If you’ve ever enjoyed that classic orange creamsicle flavor during hot summer days, then this Amazing Orange Creamsicle Ice Cream Recipe is just for you. Picture this: a creamy, dreamy blend of sweet oranges and rich vanilla that dances on your tongue and brings back childhood memories with every bite. Honestly, it’s like a burst of sunshine in a bowl!
What makes this recipe truly special is its simplicity. You don’t need to be a culinary expert to whip up this delightful treat! With just a handful of ingredients, you can bring the joy of creamy orange goodness right to your home. Plus, it’s a fantastic way to beat the heat and impress your friends and family at summer gatherings. Let’s dive into the backstory of this nostalgic recipe!
Why You Will Love this Recipe
The origins of the orange creamsicle can be traced back to the early 20th century, a time when ice cream treats were becoming a beloved staple in American culture. This frozen delight combines the bright, zesty flavor of oranges with the smoothness of vanilla, making it a perfect summer indulgence. Personally, I remember my first bite of an orange creamsicle on a sweltering day at the beach, the sun sparkling on the waves while I savored the sweet, fruity taste. Those moments are what inspired me to recreate this creamy sensation at home.
Over the years, this recipe has evolved, and now it’s your turn to personalize it! Whether you want to use fresh oranges or opt for some convenient frozen juice, you can make this dessert your own. The beauty of homemade ice cream lies in its versatility, and this recipe allows for seasonal variations too. So, whether it’s a hot July afternoon or a cozy evening in, this Orange Creamsicle Ice Cream will surely brighten your day!
Ingredient Discussion
Let’s break down the ingredients you’ll need for this Amazing Orange Creamsicle Ice Cream. Each element plays a key role in crafting that perfect balance of flavor and creaminess.
- Fresh Oranges: The star of the show! Look for bright, firm oranges with smooth skin. Navel oranges are a great choice because they are sweet and easy to peel. If fresh oranges aren’t available, frozen orange juice works too, but nothing beats the freshness!
- Heavy Cream: This is what gives your ice cream that luscious texture. Choose high-quality cream, as it heavily influences the final result. You can also substitute with coconut cream for a dairy-free option.
- Sweetened Condensed Milk: This adds sweetness and creaminess, making the ice cream easy to scoop. If you prefer, you can use a homemade version or find a low-sugar alternative in stores.
- Vanilla Extract: Always opt for pure vanilla extract for the best flavor. It complements the orange beautifully and adds depth to the creaminess.
- Salt: Just a pinch! It enhances all the flavors and balances the sweetness.
When selecting your ingredients, freshness is key! For the best flavor, use in-season oranges. If you’re feeling adventurous, try adding a splash of orange liqueur for an adult version.
Equipment Needed
Before you start, gather these essential tools:
- Mixing Bowl: A large bowl for mixing your ingredients.
- Whisk: To blend everything together smoothly.
- Ice Cream Maker: If you have one, it makes the process easier and yields a creamier texture. If not, don’t worry; you can still make it by hand!
- Freezer-safe Container: For storing your ice cream once it’s churned.
If you don’t have an ice cream maker, you can use a simple method of stirring the mixture every 30 minutes as it freezes to create a soft, creamy texture. It’s a bit more work, but the results are worth it!
Preparation Method
Now, let’s get to the fun part – making your Amazing Orange Creamsicle Ice Cream! Follow these steps to create your frozen delight:
- Prepare the Oranges: Zest and juice 3-4 fresh oranges, making sure to remove any seeds. You should have about 1 cup of juice. Set the juice aside.
- Combine Ingredients: In a large mixing bowl, add the heavy cream, sweetened condensed milk, vanilla extract, and a pinch of salt. Whisk until the mixture is well-combined and smooth.
- Add Orange Juice: Slowly mix in the freshly squeezed orange juice and zest. Stir until everything is fully incorporated. The fragrance will be heavenly!
- Churn the Mixture: If you’re using an ice cream maker, pour the mixture into the machine and churn according to the manufacturer’s instructions, usually about 20-25 minutes.
- Transfer to Container: Once churned, transfer the ice cream to a freezer-safe container. Smooth the top with a spatula.
- Freeze: Cover the container and freeze for at least 4-6 hours, or until firm.
- Serve: When ready to enjoy, scoop out the ice cream and serve in bowls or cones. You can garnish with a slice of orange or some whipped cream for that extra touch!
Pro Tip: If you don’t have an ice cream maker, pour the mixture into a shallow dish and freeze. Stir every 30 minutes for the first 2 hours to break up ice crystals, then let it freeze until solid.
Cooking Tips & Techniques
Here are some handy tips to ensure your ice cream turns out perfectly:
- Room Temperature Ingredients: Allow your heavy cream and sweetened condensed milk to sit at room temperature for about 30 minutes before mixing. This helps them blend better.
- Chill Your Equipment: If using an ice cream maker, place the bowl in the freezer for a few hours before churning. A cold bowl helps achieve a smoother texture.
- Avoid Ice Crystals: For a super creamy texture, make sure to churn the mixture well and freeze it quickly. Ice crystals form when the mixture freezes too slowly.
- Mix-Ins: Feel free to add in chocolate chips or crushed cookies during the last few minutes of churning for an extra flavor twist!
Trust me, you don’t want to skip these tips. I’ve learned the hard way that letting my mixtures sit out too long or neglecting to chill my equipment can lead to a less-than-perfect scoop!
Variations & Adaptations
This recipe is super flexible! Here are some fun variations you can try:
- Berry Swirl: Add a swirl of raspberry or strawberry puree for a fruity twist. Just fold it in before freezing!
- Chocolate Orange: Stir in chocolate chips or chunks for a delicious contrast to the orange flavor.
- Non-Dairy Version: Substitute the heavy cream with coconut cream and the sweetened condensed milk with a non-dairy alternative to make it vegan.
Feel free to experiment – that’s part of the fun! One summer, I even tried adding a splash of coconut milk, and it was a hit.
Serving & Storage Suggestions
To enjoy your Amazing Orange Creamsicle Ice Cream at its best, serve it in chilled bowls or waffle cones. You could also pair it with a slice of pound cake or some fresh fruit for a lovely dessert presentation.
For storage, keep the ice cream in an airtight container in the freezer. It will last for about 1-2 weeks, but trust me, it won’t last that long! When you’re ready to enjoy it again, let it sit at room temperature for a few minutes before scooping to make it easier to serve.
As flavors develop over time, you might find that the orange taste intensifies, giving you even more joy with each scoop!
Nutritional Information & Benefits
This Amazing Orange Creamsicle Ice Cream is not just a treat; it offers some health benefits too! Oranges are a great source of vitamin C, which can boost your immune system. The heavy cream provides calcium and healthy fats, making this a satisfying dessert option.
However, keep in mind that it does contain sugar and calories, so moderation is key. This recipe is perfect for a summer treat, especially if you’ve been active outdoors!
Conclusion
With its sunny flavor and creamy texture, this Amazing Orange Creamsicle Ice Cream Recipe is a must-try for any ice cream lover. It’s an easy, fun dessert that you can customize to your heart’s content. I adore making this recipe during the summer, and it always brings a smile to my face, just like those childhood memories!
I encourage you to try this recipe and make it your own! Don’t hesitate to share your variations and experiences in the comments below. Let’s spread the joy of homemade ice cream together! Enjoy every scoop!
FAQs
- Can I use store-bought orange juice? Yes, but fresh juice gives the best flavor!
- How long does the ice cream last in the freezer? It will stay fresh for about 1-2 weeks.
- Can I make this ice cream without an ice cream maker? Absolutely! Just follow the stirring method mentioned above.
- What can I use instead of sweetened condensed milk? You can try using coconut cream mixed with a little sugar for a dairy-free alternative.
- Can I add alcohol to this recipe? Yes! A splash of orange liqueur can add an adult twist.

Amazing Orange Creamsicle Ice Cream Recipe for Easy Summer Joy
- Total Time: 4-6 hours
- Yield: 4-6 servings 1x
Description
This Amazing Orange Creamsicle Ice Cream Recipe captures the classic orange creamsicle flavor in a creamy, dreamy blend of sweet oranges and rich vanilla, perfect for summer enjoyment.
Ingredients
- 3–4 fresh oranges (zested and juiced)
- 2 cups heavy cream
- 1 cup sweetened condensed milk
- 1 teaspoon vanilla extract
- Pinch of salt
Instructions
- Zest and juice 3-4 fresh oranges, making sure to remove any seeds. Set the juice aside.
- In a large mixing bowl, add the heavy cream, sweetened condensed milk, vanilla extract, and a pinch of salt. Whisk until the mixture is well-combined and smooth.
- Slowly mix in the freshly squeezed orange juice and zest. Stir until everything is fully incorporated.
- If using an ice cream maker, pour the mixture into the machine and churn according to the manufacturer’s instructions, usually about 20-25 minutes.
- Once churned, transfer the ice cream to a freezer-safe container. Smooth the top with a spatula.
- Cover the container and freeze for at least 4-6 hours, or until firm.
- When ready to enjoy, scoop out the ice cream and serve in bowls or cones, garnished with a slice of orange or whipped cream if desired.
Notes
For a dairy-free option, substitute heavy cream with coconut cream and sweetened condensed milk with a non-dairy alternative.
- Prep Time: 15 minutes
- Cook Time: 0 minutes
- Category: Dessert
- Cuisine: American
Nutrition
- Serving Size: 1/2 cup
- Calories: 250
- Sugar: 25
- Sodium: 50
- Fat: 15
- Saturated Fat: 9
- Carbohydrates: 30
- Protein: 3
Keywords: orange, creamsicle, ice cream, summer dessert, homemade ice cream


")