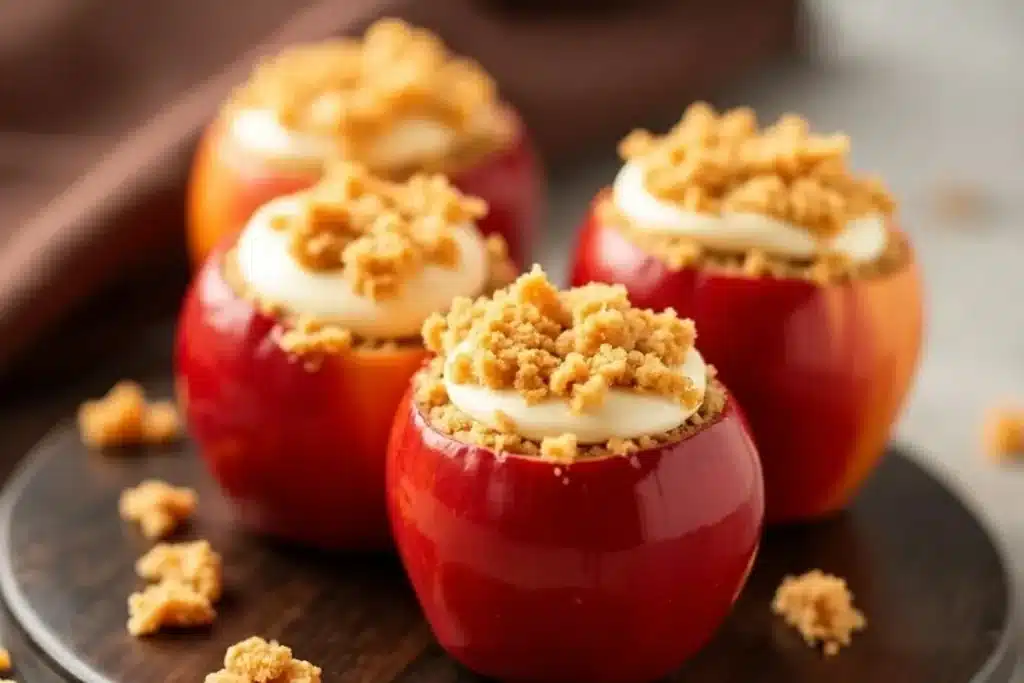
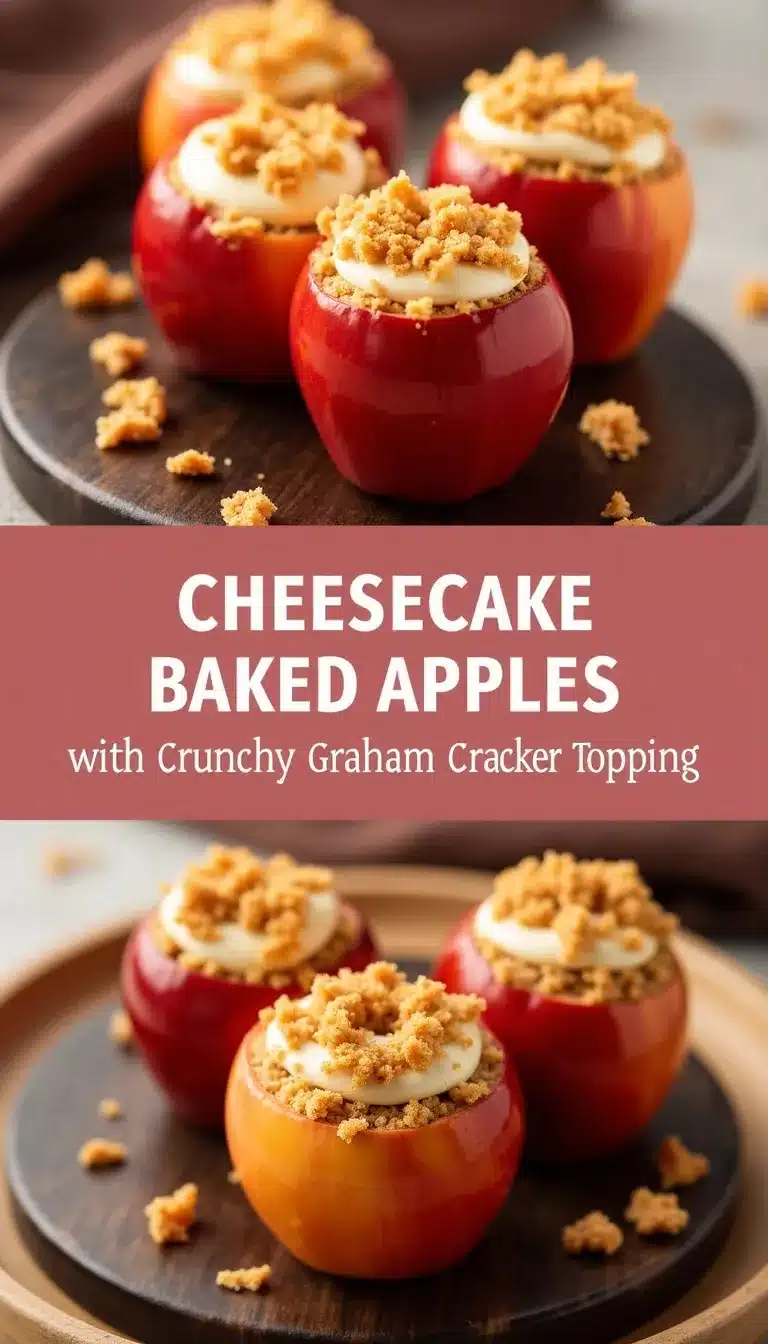
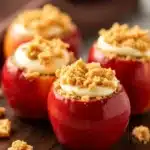
If you’re searching for that perfect autumn treat, look no further than this cheesecake-stuffed baked apples recipe. Imagine warm, tender apples filled with creamy cheesecake, all topped off with a buttery, crunchy graham cracker crumble. The scent alone makes your kitchen feel like a cozy bakery on a crisp fall day. I honestly can’t think of a more inviting dessert for sweater weather. This is one of those recipes that brings people running to the kitchen—kids, neighbors, you name it!
Why are these cheesecake-stuffed baked apples worth your time? Well, they’re easy enough for a weeknight, yet impressive enough for a holiday table. Plus, they combine two classic favorites: the comforting taste of baked apples and the creamy goodness of cheesecake. Whether you’re a longtime baker or just dipping your toes in, this recipe will guide you every step of the way. And let’s face it, any dessert that’s basically a cheesecake hug inside an apple is bound to be a hit.
Did you know the concept of stuffing fruit dates back centuries? People have been baking fruit with sweet fillings for generations—think stuffed peaches and baked pears. My family always looked forward to apple season, and this cheesecake-stuffed baked apples recipe brings back those nostalgic memories of brisk orchard trips and cinnamon-scented kitchens. Now, I pass the tradition on to you, with a little cheesecake twist!
Why You Will Love This Cheesecake-Stuffed Baked Apples Recipe
Apples and cheesecake each have their own rich food histories. Apples have been celebrated since ancient times; they were considered symbols of love and beauty in Greek mythology. Cheesecake, on the other hand, dates back to ancient Greece and was even served at the first Olympic Games (can you imagine a marathoner chowing down on cheesecake?). Combining these two classics feels like a delicious nod to history.
This recipe found its way into my kitchen during a particularly chilly October. I wanted something warm and comforting, but also a little fancy. My mom used to make baked apples stuffed with nuts and raisins, but I craved something creamier—cue the cheesecake filling! It was an instant hit, and now it’s a fall tradition in my house. I love how the apples soften just enough, while the cheesecake filling stays rich and velvety.
There’s something about the changing leaves and the smell of cinnamon that makes these cheesecake-stuffed baked apples the ultimate fall dessert. They’re wonderful for Thanksgiving, but honestly, I make them all season long. Over the years, I’ve tweaked the recipe—trying different apple varieties, swapping out toppings, and experimenting with spices. Each batch brings a new memory. I hope you find them just as special. If you’re lucky enough to pick your own apples, this recipe is the perfect way to show off your harvest!
Ingredient Discussion
Let’s talk about what you’ll need to make your cheesecake-stuffed baked apples truly shine!
- Apples: The star of the show! I recommend using medium-sized, firm apples like Honeycrisp, Fuji, or Granny Smith. Honeycrisp adds sweetness and holds its shape, while Granny Smith brings a tart bite. Avoid Red Delicious—they get mushy. If you’re at the orchard, pick apples that feel heavy and have no soft spots. Store apples in the fridge in a breathable bag for up to two weeks.
- Cream Cheese: For the cheesecake stuffing, full-fat cream cheese gives you that luscious, tangy flavor. If you’re avoiding dairy, try a plant-based cream cheese. Let it soften at room temperature for easy mixing. I usually stick with Philadelphia brand for consistency.
- Sugar: Granulated sugar sweetens the cheesecake filling, but you can use coconut sugar or a 1:1 sugar substitute for a lower-glycemic option. Brown sugar adds a caramel note to the graham cracker topping, but you could try maple sugar for extra autumn vibes.
- Egg: A single egg binds the cheesecake mixture. For an egg-free version, a tablespoon of cornstarch works in a pinch, though the texture is a bit different. Always use a room temperature egg for smoother mixing.
- Vanilla Extract: Don’t skip this! It adds warmth and depth. Pure vanilla is best, but vanilla bean paste is even dreamier if you have it.
- Graham Crackers: The topping’s secret weapon. Crush them fine for a classic crumble. Gluten-free graham crackers work well too—just check for crispness. I once tried gingersnaps, and the spicy kick was incredible!
- Butter: Melted butter binds the graham cracker topping and makes it toasty. Salted butter is my pick, but unsalted plus a pinch of salt works too. For a dairy-free version, coconut oil is a decent stand-in, but the flavor will shift slightly.
- Cinnamon & Nutmeg: Classic fall spices! A little goes a long way, so don’t overdo it. Freshly grated nutmeg takes things up a notch. You can add a pinch of cardamom if you’re feeling adventurous.
- Lemon Juice: Keeps the apples from browning and adds a bright kick to the filling. Fresh is best, but bottled works in a pinch.
Most of these ingredients are easy to find at any grocery store, but for specialty items (like gluten-free graham crackers or vegan cream cheese), check health food aisles or order online. If you’re baking in early fall, apples are at their juiciest and most flavorful—definitely worth the trip to a local orchard!
Equipment Needed
- Baking Dish: A 9×13-inch (23x33cm) ceramic or glass dish works great. It keeps the apples upright and catches any juicy drips. If you don’t have one, arrange the apples snugly in a deep roasting pan.
- Mixing Bowls: You’ll want at least two—one for the cheesecake filling and one for the topping. Stainless steel or glass are easiest to clean.
- Hand Mixer or Stand Mixer: Cream cheese can be stubborn, so an electric mixer saves your arm. If you’re old-school, a sturdy whisk and some elbow grease will do!
- Apple Corer/Spoon: An apple corer makes hollowing apples a breeze, but a small paring knife and teaspoon work just fine (just go slow to avoid tearing the apple).
- Measuring Cups and Spoons: Accuracy matters, especially for cheesecake. I prefer stainless steel sets—they last forever.
- Small Saucepan (Optional): If you want to melt butter on the stove, otherwise the microwave works.
I’ve used everything from fancy apple corers to simple spoons—sometimes the basics work just fine. Just be gentle with the apples so they don’t split. For easy cleanup, line your baking dish with parchment paper or foil. If you bake a lot, investing in a good mixer is totally worth it (mine’s been going strong for years!).
Preparation Method
- Preheat the Oven: Set your oven to 350°F (175°C). Give it a good 10 minutes to come up to temperature.
- Prepare the Apples: Wash and dry 6 medium apples (about 2 lbs/900g). Slice off the top 1/2 inch (1.25cm) of each apple. Use an apple corer or spoon to carefully hollow out the core and some flesh, leaving about 1/2 inch (1.25cm) thick walls. Drizzle the insides with 1 tablespoon (15ml) lemon juice to prevent browning.
- Make the Cheesecake Filling: In a medium bowl, beat together 8 oz (225g) softened cream cheese, 1/4 cup (50g) granulated sugar, 1 large egg (room temperature), and 1 teaspoon (5ml) vanilla extract. Mix until smooth and creamy—no lumps! This takes about 2-3 minutes. Scrape down the bowl as needed.
- Stuff the Apples: Spoon the cheesecake mixture evenly into the hollowed apples. Fill almost to the top, but not overflowing—leave about 1/4 inch (0.6cm) for the topping.
- Prepare the Graham Cracker Topping: In a separate bowl, combine 1 cup (100g) crushed graham crackers, 2 tablespoons (30g) brown sugar, 1/2 teaspoon (1g) ground cinnamon, 1/8 teaspoon (0.5g) nutmeg, and 3 tablespoons (42g) melted butter. Stir until the mixture is crumbly and evenly moistened.
- Top the Apples: Sprinkle the graham cracker mixture generously over each stuffed apple, pressing gently so it sticks.
- Bake: Arrange apples upright in your baking dish. Add about 1/4 inch (0.6cm) water to the bottom to keep them moist. Bake for 35-40 minutes, or until apples are tender when pierced with a knife and topping is golden brown. If the topping browns too quickly, cover loosely with foil for the last 10 minutes.
- Cool and Serve: Let the apples cool in the pan for 10 minutes—they’ll be hot! Serve warm or at room temperature. For extra flair, dust with powdered sugar or drizzle with caramel sauce.
Note: Don’t over-hollow the apples, or they might collapse. If your apples tip over, wedge them close together in the pan. If you’re making a bigger batch, rotate the pan halfway through for even baking. The smell in your kitchen will be unreal!
Cooking Tips & Techniques
A few tricks make these cheesecake-stuffed baked apples even better. First, don’t rush the softening of cream cheese—cold lumps make for a gritty filling (I learned that the hard way). Let it sit out for at least 30 minutes before mixing. For the best texture, use apples that are firm and not too ripe; softer apples can turn to mush before the cheesecake sets.
When hollowing apples, go slow and steady. If you accidentally poke through the bottom, patch it with a little piece of apple flesh—no one will notice! If your topping looks dry, add a touch more melted butter. If the apples are tipping over, slice a tiny bit off the base to steady them.
Timing is everything! If you’re multitasking (like prepping dinner), stuff the apples in advance and keep them in the fridge. Add the topping just before baking. If you’re baking at altitude, check for doneness after 30 minutes—sometimes things cook faster up in the mountains. For perfect cheesecake texture, don’t overbake; the filling should be just set, not dry.
I’ve had my share of toppled apples and undercooked centers, so trust me—checking with a thin knife is worth it. And if you want that bakery-style finish, broil the apples for 1-2 minutes at the end for extra crunch (just don’t walk away—the topping can burn fast!).
Variations & Adaptations
There are endless ways to make this cheesecake-stuffed baked apples recipe your own. Here are some favorites:
- Gluten-Free: Swap regular graham crackers for gluten-free ones (Schar and Pamela’s are solid choices). Double-check other ingredients for hidden gluten.
- Dairy-Free: Use plant-based cream cheese and coconut oil instead of butter. The flavor is a bit different, but still delicious.
- Flavor Twists: Try adding chopped pecans or walnuts to the topping for extra crunch. Swap cinnamon for pumpkin spice, or add orange zest to the cheesecake filling for brightness. I once added mini chocolate chips—total crowd-pleaser!
- Different Apples: Try Pink Lady or Jonagold for a new flavor spin. Pears work surprisingly well if you can’t find good apples.
- Cooking Methods: If you don’t have an oven, these can be made in a slow cooker on low for 2-3 hours (though the topping won’t get as crisp).
My personal favorite? A dash of cardamom in the cheesecake filling and a sprinkle of sea salt on top. It’s unexpected and so, so good. Don’t be afraid to play around—this recipe is forgiving and fun!
Serving & Storage Suggestions
Serve these cheesecake-stuffed baked apples warm, straight from the oven, for maximum comfort. They look gorgeous on a platter, especially with a dusting of powdered sugar or a drizzle of warm caramel sauce. Pair with vanilla ice cream or a dollop of whipped cream for true dessert bliss. Hot apple cider or coffee makes a cozy beverage match.
If you have leftovers (rare in my house!), store them in an airtight container in the refrigerator for up to 3 days. The flavors actually meld and get even better overnight. To reheat, pop an apple in the microwave for 30-40 seconds, or warm in a 300°F (150°C) oven for 10-15 minutes. You can also freeze stuffed apples (before baking) for up to a month—just thaw in the fridge before baking as usual.
The graham cracker topping stays pretty crisp if you reheat in the oven, but it might soften a bit in the microwave (still tasty though). Honestly, these are delicious at room temperature, too. If you like, add a fresh spoonful of topping before reheating for a little crunch boost!
Nutritional Information & Benefits
This cheesecake-stuffed baked apples recipe makes about 6 servings. Each serving has an estimated 320 calories, 18g fat, 38g carbohydrates, and 4g protein. If you use reduced-fat cream cheese or sugar substitutes, you can cut the calories down a bit.
Cheesecake-Stuffed Baked Apples
- Total Time: 1 hour
- Yield: 6 servings 1x
Description
Warm, tender apples are filled with creamy cheesecake and topped with a buttery, crunchy graham cracker crumble for the ultimate easy fall dessert. This cozy treat is perfect for weeknights or holiday gatherings and brings together the best of baked apples and cheesecake.
Ingredients
- 6 medium apples (Honeycrisp, Fuji, or Granny Smith recommended)
- 1 tablespoon lemon juice
- 8 oz (225g) cream cheese, softened
- 1/4 cup (50g) granulated sugar
- 1 large egg, room temperature
- 1 teaspoon vanilla extract
- 1 cup (100g) crushed graham crackers
- 2 tablespoons (30g) brown sugar
- 1/2 teaspoon ground cinnamon
- 1/8 teaspoon ground nutmeg
- 3 tablespoons (42g) melted butter
- Powdered sugar or caramel sauce for serving (optional)
- Water for baking dish
Instructions
- Preheat the oven to 350°F (175°C).
- Wash and dry the apples. Slice off the top 1/2 inch of each apple. Use an apple corer or spoon to carefully hollow out the core and some flesh, leaving about 1/2 inch thick walls.
- Drizzle the insides of the apples with lemon juice to prevent browning.
- In a medium bowl, beat together the softened cream cheese, granulated sugar, egg, and vanilla extract until smooth and creamy (about 2-3 minutes).
- Spoon the cheesecake mixture evenly into the hollowed apples, filling almost to the top but leaving about 1/4 inch for the topping.
- In a separate bowl, combine the crushed graham crackers, brown sugar, cinnamon, nutmeg, and melted butter. Stir until crumbly and evenly moistened.
- Sprinkle the graham cracker mixture generously over each stuffed apple, pressing gently so it sticks.
- Arrange the apples upright in a baking dish. Add about 1/4 inch of water to the bottom of the dish.
- Bake for 35-40 minutes, or until apples are tender when pierced with a knife and topping is golden brown. If the topping browns too quickly, cover loosely with foil for the last 10 minutes.
- Let the apples cool in the pan for 10 minutes before serving. Serve warm or at room temperature, optionally dusted with powdered sugar or drizzled with caramel sauce.
Notes
Let cream cheese soften at room temperature for a smooth filling. Use firm apples to prevent collapsing. If you accidentally poke through an apple, patch with a piece of apple flesh. For extra crunch, broil the apples for 1-2 minutes at the end, watching closely. Apples can be stuffed ahead and refrigerated before baking. For gluten-free, use gluten-free graham crackers; for dairy-free, use plant-based cream cheese and coconut oil.
- Prep Time: 20 minutes
- Cook Time: 40 minutes
- Category: Dessert
- Cuisine: American
Nutrition
- Serving Size: 1 stuffed apple
- Calories: 320
- Sugar: 28
- Sodium: 210
- Fat: 18
- Saturated Fat: 10
- Carbohydrates: 38
- Fiber: 4
- Protein: 4
Keywords: cheesecake stuffed apples, baked apples, fall dessert, easy dessert, apple cheesecake, Thanksgiving dessert, autumn recipe, graham cracker topping