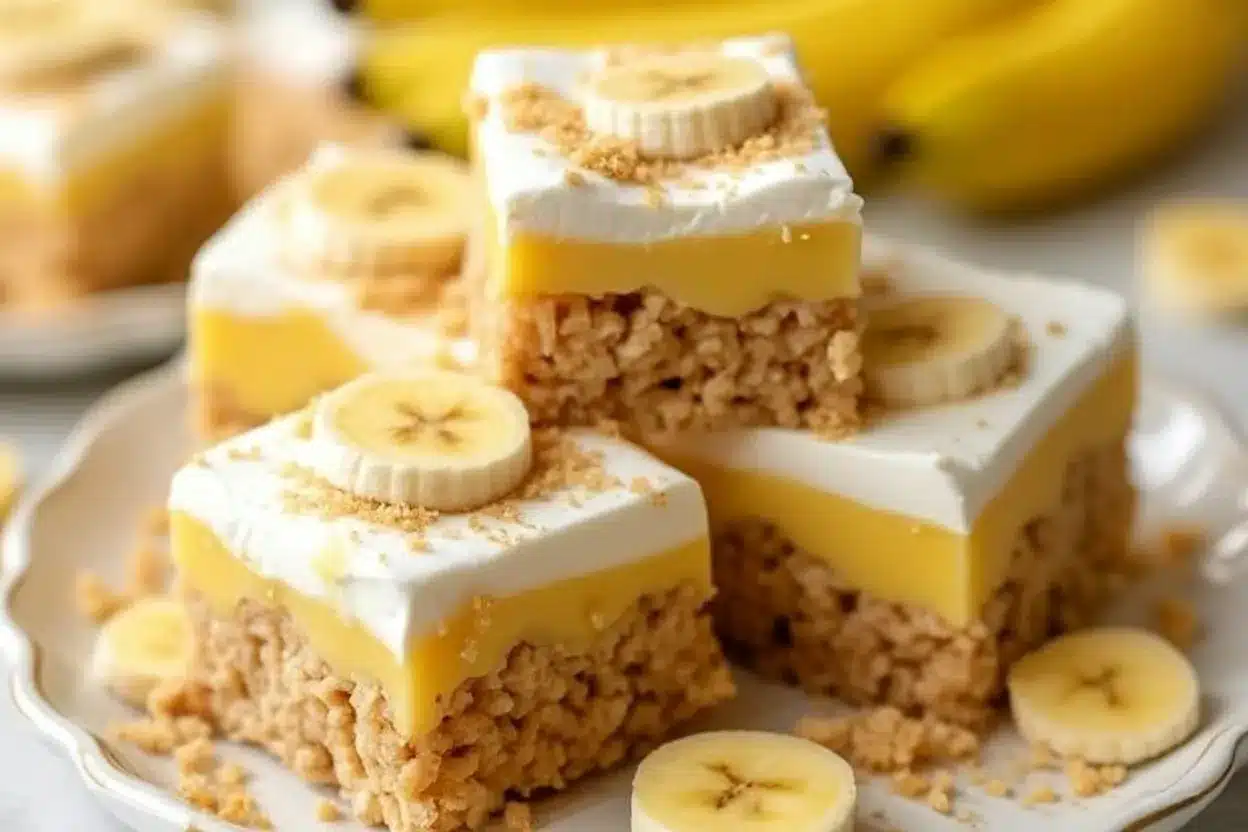
Looking for a dessert that combines the nostalgic crunch of Rice Krispie treats with the creamy goodness of banana pudding? You’re in the right place! These Amazing Banana Pudding Rice Krispie Treats are not only a delightful treat, but they also come together in just a few simple steps. Honestly, this dessert is like a little hug in a square, perfect for satisfying that sweet craving.
Let’s face it, we all have those days when we want something sweet but don’t have hours to spend in the kitchen. That’s where this recipe shines! It’s quick, easy, and kid-friendly, making it an ideal choice for family gatherings or a fun weekend project. Plus, who can resist the creamy flavor of banana pudding paired with crispy marshmallow goodness? Let’s dive into the delicious world of these treats!
Why You Will Love This Recipe
These Banana Pudding Rice Krispie Treats bring together two beloved classics. Originating from the South, banana pudding has been a staple in many households, often served at picnics and family reunions. I remember my grandma making a big bowl of it, and it was always the highlight of our gatherings. This recipe takes that nostalgic flavor and wraps it in a crispy, gooey treat!
Over the years, Rice Krispie treats have evolved, with endless variations popping up everywhere. But this version—ah, it’s something special! The banana pudding mixture adds a creamy texture that perfectly complements the crunch of the Rice Krispies. Plus, it’s a great way to use up those ripe bananas sitting on your counter, which is a win-win! With the warm weather approaching, this dessert also works wonderfully for summer barbecues or as a refreshing snack after a day in the sun.
Ingredient Discussion
Let’s break down the ingredients that make these treats so special:
- Rice Krispies: The base of our treats! They provide that classic crunch. When selecting, look for fresh, crispy cereal—this ensures a perfect texture.
- Marshmallows: Mini marshmallows work best for even melting. If you can find the colorful ones, they add a fun twist! Store any leftovers in an airtight container to keep them fresh and fluffy.
- Butter: Use unsalted butter for control over the sweetness. It adds richness to the treats. If you’re looking for a lighter option, you can substitute with coconut oil!
- Instant Banana Pudding Mix: This is the star ingredient! It infuses the treats with that unmistakable banana flavor. You can find it in the baking aisle. If bananas aren’t your thing, you can use vanilla or chocolate pudding mix instead.
- Ripe Bananas: Choose bananas that are spotty but not overripe. They add natural sweetness and moisture to the treats. If you have leftover bananas, you can freeze them for smoothies or baking later!
This combination of ingredients creates a flavor explosion that’s both nostalgic and refreshing. Feel free to get creative with your ingredient choices based on dietary needs. For instance, you could use gluten-free Rice Krispies or vegan marshmallows to accommodate different diets!
Equipment Needed
To whip up these treats, you’ll need just a few basic kitchen tools:
- Large Mixing Bowl: For combining all your ingredients.
- Microwave-Safe Bowl: For melting the marshmallows and butter. A glass bowl works great so you can see the melting process.
- Wooden Spoon or Spatula: For stirring. I prefer a spatula because it helps scrape down the sides of the bowl easily.
- 9×13-inch Baking Dish: This is where your treats will set. Line it with parchment paper for easy removal.
Don’t worry if you don’t have a specific item! You can usually find alternatives around the house. Just make sure to have some fun while you’re at it!
Preparation Method
- Prepare the Baking Dish: Start by lining a 9×13-inch baking dish with parchment paper. This will help you lift out the treats easily once they’ve set. Set it aside.
- Microwave the Butter and Marshmallows: In a microwave-safe bowl, combine 4 tablespoons of butter and 6 cups of mini marshmallows. Microwave on high for 1 minute, then stir. If the marshmallows aren’t fully melted, continue microwaving in 15-second intervals, stirring until smooth.
- Add Pudding Mix: Once melted, stir in the instant banana pudding mix until well combined. The mixture will thicken slightly, and the banana scent will fill your kitchen!
- Incorporate Rice Krispies: Gradually fold in 6 cups of Rice Krispies cereal. You want to ensure all the cereal is evenly coated with the marshmallow mixture. This step can be a bit sticky, so don’t be shy with your spatula!
- Add Bananas: Gently fold in 1 to 2 ripe bananas, sliced. Be careful not to mash them too much; you want some chunks for that fresh banana flavor.
- Transfer to Baking Dish: Pour the mixture into the prepared baking dish. Using a spatula, press it down evenly. You want it compact, but don’t squish it too hard—just enough to hold together!
- Cool and Set: Allow the treats to cool at room temperature for about 30 minutes. If you’re in a hurry, pop them in the fridge for about 15 minutes. Once set, lift them out of the dish using the parchment paper.
- Cut and Serve: Cut into squares or rectangles and serve immediately. These treats are best enjoyed fresh, but they can last a few days in an airtight container.
Cooking Tips & Techniques
Here are some handy tips to ensure your Banana Pudding Rice Krispie Treats turn out perfectly:
- Melt Marshmallows Slowly: If you rush the melting process, you might end up with a clumpy mess. Stir often and watch closely!
- Don’t Overmix: When adding the Rice Krispies and bananas, mix just until combined. Overmixing can lead to tough treats.
- Use Fresh Ingredients: Fresh marshmallows and Rice Krispies will yield the best texture. Stale ingredients can lead to a disappointing outcome.
- Try Different Flavor Combinations: If you’re feeling adventurous, experiment with different pudding flavors or add-ins like chocolate chips or nuts!
- Cut with a Warm Knife: To make cutting easier, run your knife under hot water, wipe it dry, and then slice through the treats.
Variations & Adaptations
This recipe is super adaptable! Here are a few variations to try:
- Chocolate Banana: Add a couple of tablespoons of cocoa powder to the marshmallow mixture for a chocolatey twist!
- Nutty Banana: Stir in some chopped nuts, like walnuts or pecans, for extra crunch and flavor.
- Vegan Version: Use vegan marshmallows and coconut oil instead of butter for a dairy-free treat.
Feel free to mix and match based on what you have on hand or your flavor preferences. The possibilities are endless!
Serving & Storage Suggestions
These Banana Pudding Rice Krispie Treats can be served at room temperature, and they pair wonderfully with a cold glass of milk or a scoop of vanilla ice cream for an extra indulgent experience! If you’re serving them at a party, consider arranging them on a colorful platter for a fun presentation.
For storage, keep the treats in an airtight container at room temperature for up to 3 days. If you want to keep them longer, you can refrigerate them for up to a week. Just know that refrigerating may change the texture slightly. For longer storage, you can freeze them. Wrap each square in plastic wrap and then place them in a freezer bag. Just thaw them at room temperature when you’re ready to enjoy!
Nutritional Information & Benefits
These treats are not just delicious, but they also offer some nutritional benefits! Each square contains a good dose of carbohydrates from the Rice Krispies and natural sugars from the bananas. Bananas are rich in potassium and vitamin C, making them a healthy addition to this dessert. However, keep in mind that they are still a treat, so moderation is key!
For an estimate, each square contains about 150 calories, depending on the size and specific ingredients used. If you’re watching your sugar intake, consider using a sugar substitute in the pudding mix.
Conclusion
In conclusion, these Amazing Banana Pudding Rice Krispie Treats are a delightful twist on two classic desserts that are sure to make your taste buds dance! They’re quick, easy, and a wonderful way to bring a bit of nostalgia to your table. I love making these for gatherings, and they never last long!
Feel free to customize this recipe to your liking, and don’t forget to share your variations in the comments! I’d love to hear what you think and any fun twists you’ve tried. Happy cooking!
FAQs
1. Can I use regular bananas instead of ripe ones?
Ripe bananas are preferred because they’re sweeter and easier to mash, but you can use regular bananas if needed—just make sure they’re not too firm!
2. How do I store leftovers?
Store them in an airtight container at room temperature for up to 3 days or refrigerate for up to a week.
3. Can I make these treats gluten-free?
Yes! Just use gluten-free Rice Krispies and ensure that the pudding mix is also gluten-free.
4. Can I freeze these Rice Krispie treats?
Absolutely! Wrap each square in plastic wrap and then place them in a freezer bag. They’ll last for about 2 months in the freezer.
5. What can I substitute for the pudding mix?
If you don’t have banana pudding mix, you can use vanilla or even chocolate pudding mix as a delicious alternative!
Print
Amazing Banana Pudding Rice Krispie Treats
- Total Time: 50 minutes
- Yield: 12 servings 1x
Description
These Amazing Banana Pudding Rice Krispie Treats combine the nostalgic crunch of Rice Krispie treats with the creamy goodness of banana pudding, making them a delightful and quick dessert.
Ingredients
- 6 cups mini marshmallows
- 4 tablespoons unsalted butter
- 1 package instant banana pudding mix
- 6 cups Rice Krispies cereal
- 1 to 2 ripe bananas, sliced
Instructions
- Prepare the Baking Dish: Start by lining a 9×13-inch baking dish with parchment paper. This will help you lift out the treats easily once they’ve set. Set it aside.
- Microwave the Butter and Marshmallows: In a microwave-safe bowl, combine 4 tablespoons of butter and 6 cups of mini marshmallows. Microwave on high for 1 minute, then stir. If the marshmallows aren’t fully melted, continue microwaving in 15-second intervals, stirring until smooth.
- Add Pudding Mix: Once melted, stir in the instant banana pudding mix until well combined. The mixture will thicken slightly, and the banana scent will fill your kitchen!
- Incorporate Rice Krispies: Gradually fold in 6 cups of Rice Krispies cereal. You want to ensure all the cereal is evenly coated with the marshmallow mixture.
- Add Bananas: Gently fold in 1 to 2 ripe bananas, sliced. Be careful not to mash them too much; you want some chunks for that fresh banana flavor.
- Transfer to Baking Dish: Pour the mixture into the prepared baking dish. Using a spatula, press it down evenly.
- Cool and Set: Allow the treats to cool at room temperature for about 30 minutes. If you’re in a hurry, pop them in the fridge for about 15 minutes.
- Cut and Serve: Cut into squares or rectangles and serve immediately.
Notes
For a lighter option, substitute butter with coconut oil. You can also use gluten-free Rice Krispies or vegan marshmallows to accommodate different diets.
- Prep Time: 15 minutes
- Cook Time: 5 minutes
- Category: Dessert
- Cuisine: American
Nutrition
- Serving Size: 1 square
- Calories: 150
- Sugar: 10
- Sodium: 50
- Fat: 5
- Saturated Fat: 3
- Carbohydrates: 25
- Fiber: 1
- Protein: 1
Keywords: banana pudding, rice krispie treats, dessert, quick dessert, easy recipe


")