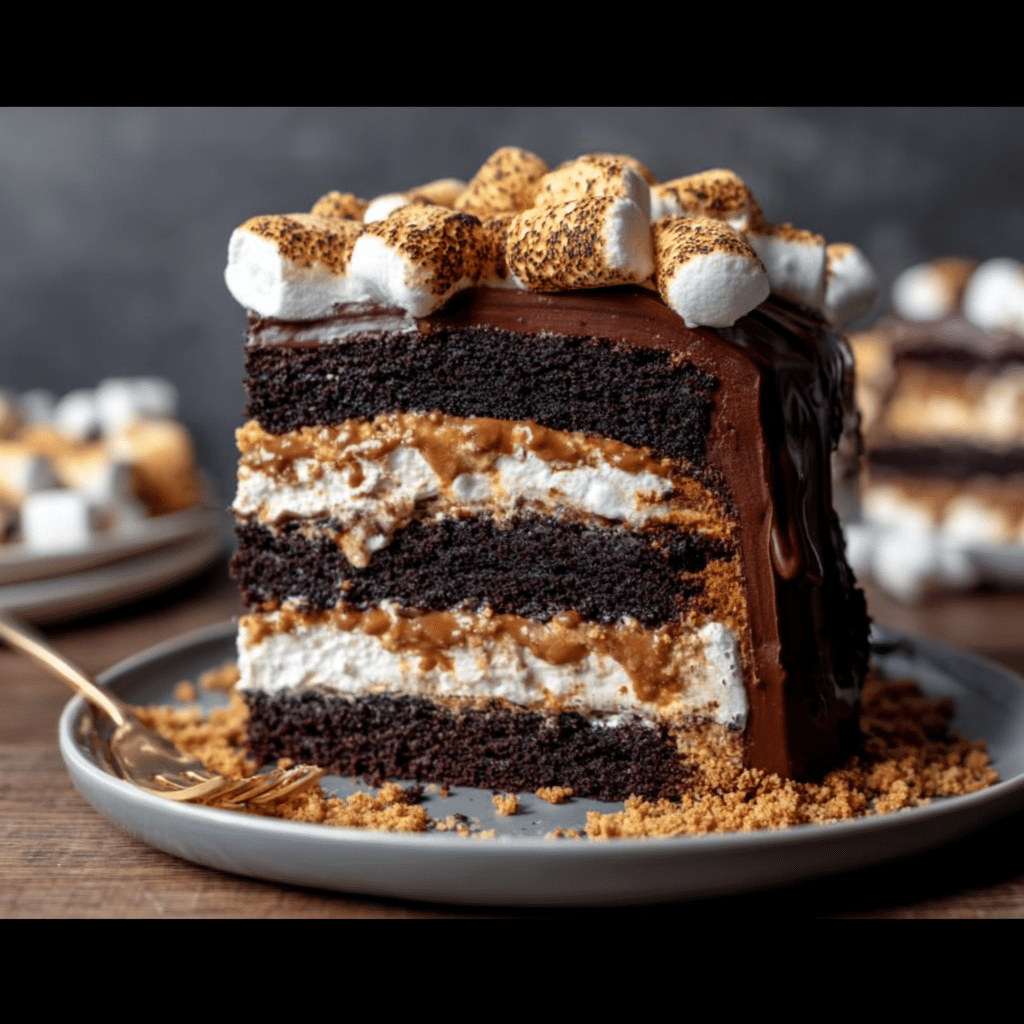
There’s something magical about s’mores, isn’t there? The gooey marshmallows, rich chocolate, and crunchy graham crackers combine to create a flavor explosion that takes you back to childhood campfire nights. But let’s face it, sometimes we crave that classic flavor in a more sophisticated package. Enter the delicious s’mores cake! This delightful dessert takes the beloved campfire treat and elevates it into a moist, chocolatey cake layered with all the s’mores goodness you love. Trust me when I say, it’s worth making this recipe!
This cake is a perfect way to relive your fondest campfire memories without needing to step outside. Whether it’s a summer gathering, a cozy winter evening, or just a sweet craving on a Tuesday night, this s’mores cake is a guaranteed crowd-pleaser. Plus, it’s a great opportunity to gather friends and family in the kitchen for some fun baking time! You’ll have everyone coming back for seconds (and thirds) – it’s that good!
Did you know that the first recorded s’mores recipe appeared in a Girl Scout handbook in the 1920s? Over the years, s’mores have become synonymous with camping and outdoor adventures. So, by making this cake, you’re not just creating a dessert; you’re also embracing a bit of history and nostalgia. Let’s dive into this tasty adventure together!
Why You Will Love this Recipe
The origins of s’mores can be traced back to the great outdoors, where cooking over an open flame brought people together. My first experience roasting marshmallows as a kid was unforgettable. The thrill of watching the marshmallows puff up and turn golden brown, followed by that first blissful bite of a warm s’more – it was pure magic! This cake captures that same joy but brings it right to your kitchen.
This recipe not only pays homage to that classic flavor combo, but it also lets you experiment a bit. You can mix and match flavors, try different types of chocolate, or even add a hint of peanut butter for a fun twist! Plus, it’s perfect for any season. In summer, you can top it with fresh berries, while in winter, a sprinkle of crushed peppermint can add a festive touch.
Over time, the humble s’more has evolved into various iterations, but this cake remains true to the essence of what makes s’mores special. It’s a dessert that brings people together, whether you’re gathering around a campfire or your dining table. And honestly, who wouldn’t love a slice of rich chocolate cake topped with gooey marshmallows and crunchy graham cracker crumbs? That’s what I call a win-win!
Ingredient Discussion
Let’s break down the key ingredients that make this s’mores cake so delicious:
- All-Purpose Flour: This is the foundation of our cake. Look for a good quality brand; it significantly impacts the texture. For a gluten-free option, almond flour or a gluten-free blend can work well.
- Cocoa Powder: Use unsweetened cocoa powder for a deep chocolate flavor. Dutch-processed cocoa adds a richer taste, but either will do. Make sure it’s fresh for the best results!
- Sugar: Granulated sugar sweetens the cake, while brown sugar adds moisture and a hint of caramel flavor. You can experiment with coconut sugar for a healthier twist.
- Eggs: Eggs bind the ingredients together and add moisture. Fresh eggs are essential; they should come from a reliable source.
- Butter: Unsalted butter gives the cake richness. If you need a dairy-free option, coconut oil or a vegan butter can be used.
- Marshmallows: Mini marshmallows are perfect for topping. They toast beautifully and add that gooey texture we love. For a twist, try flavored marshmallows!
- Graham Cracker Crumbs: These provide the crunchy base. You can make your own from whole graham crackers or buy pre-crushed crumbs. If gluten-free, opt for gluten-free graham crackers.
- Chocolate Chips: Semi-sweet chocolate chips are traditional, but dark chocolate or milk chocolate can be substituted based on your preference.
When selecting your ingredients, always opt for the freshest options available. It’s amazing how much quality can impact the final product. And don’t forget, seasonal variations can add an exciting twist! For instance, adding pumpkin spice in the fall can give a fun seasonal flair.
Equipment Needed
To whip up this delicious s’mores cake, you’ll need some essential kitchen tools:
- Mixing bowls: A set of various sizes will come in handy.
- Measuring cups and spoons: Accurate measurements are key for baking!
- Electric mixer: A stand mixer or hand mixer will make the mixing process a breeze.
- 9-inch round cake pans: Make sure to grease and line them with parchment paper.
- Cooling rack: This helps the cake cool evenly without getting soggy.
- Spatula: A rubber spatula is perfect for folding in ingredients.
If you don’t have a stand mixer, a whisk will do just fine – it just takes a bit more elbow grease! And if you’re on a budget, look for second-hand tools or ask friends if they have spare items you can borrow.
Preparation Method
- Preheat your oven: Set it to 350°F (175°C). Grease and line your 9-inch cake pans with parchment paper.
- Mix the dry ingredients: In a large bowl, whisk together 2 cups (250g) all-purpose flour, ¾ cup (65g) cocoa powder, 2 cups (400g) granulated sugar, 1 ½ teaspoons baking powder, 1 ½ teaspoons baking soda, and 1 teaspoon salt.
- Combine wet ingredients: In another bowl, mix 2 large eggs, 1 cup (240ml) milk, ½ cup (120ml) vegetable oil, and 2 teaspoons vanilla extract until well combined.
- Combine mixtures: Gradually add the wet mixture to the dry ingredients, mixing until just combined. Be careful not to overmix!
- Add hot water: Slowly stir in 1 cup (240ml) hot water until the batter is smooth. It will be thin, and that’s okay.
- Divide and bake: Pour the batter evenly into the prepared pans. Bake for 30-35 minutes or until a toothpick inserted in the center comes out clean.
- Cool the cakes: Once baked, remove from the oven and let cool in the pans for about 10 minutes, then transfer to a cooling rack to cool completely.
- Prepare frosting: For the frosting, beat 1 cup (230g) unsalted butter until light and fluffy. Gradually add 4 cups (480g) powdered sugar, ½ cup (120ml) milk, and 2 teaspoons vanilla, mixing until smooth.
- Layer the cake: Once cooled, place one cake layer on a serving plate. Spread a layer of frosting on top, sprinkle with 1 cup (150g) mini marshmallows, and ½ cup (90g) chocolate chips.
- Add the second layer: Place the second layer on top and frost the top and sides of the cake with the remaining frosting.
- Toast the marshmallows: For that campfire effect, use a kitchen torch to lightly toast the mini marshmallows on top of the cake. Be careful not to burn them!
- Finish with graham cracker crumbs: Sprinkle graham cracker crumbs on top for that final touch!
As you prepare this cake, remember that baking is an art. If things don’t go exactly to plan, don’t sweat it! Sometimes a little imperfection makes it even more special. Just trust your instincts, and you’ll create something wonderful!
Cooking Tips & Techniques
Baking can be tricky, but I’ve got some tips to help you achieve that perfect s’mores cake:
- Room temperature ingredients: Make sure your eggs and butter are at room temperature for better mixing and a fluffier texture.
- Don’t overmix: Once you combine the wet and dry ingredients, mix until just combined. Overmixing can lead to a dense cake.
- Check for doneness: Use a toothpick to test for doneness. If it comes out with a few moist crumbs, you’re good to go!
- Let it cool: Cooling the cake completely before frosting is essential to prevent melting and sliding.
- Use a torch: If you don’t have a kitchen torch, you can broil the marshmallows in the oven for a minute or two. Just watch them closely!
Remember, even seasoned bakers have mishaps. I once forgot to add sugar to my cake batter – talk about a learning experience! Don’t be afraid to experiment and make it your own.
Variations & Adaptations
This s’mores cake is incredibly versatile! Here are some fun variations you can try:
- Chocolate Variations: Swap out the semi-sweet chocolate chips for dark chocolate or even white chocolate for a unique flavor.
- Nutty Twist: Add chopped nuts like pecans or walnuts to the batter for a crunchy texture.
- Fruit Add-ins: Try adding mashed bananas or pureed pumpkin for added moisture and flavor.
- Different Frosting: Consider using a cream cheese frosting instead of buttercream for a tangy twist.
- Allergen Substitutions: Use nut butter instead of butter for a dairy-free version, and opt for gluten-free flour for a gluten-free cake.
Don’t hesitate to get creative! This cake is just a canvas waiting for your personal touch.
Serving & Storage Suggestions
When it comes to serving, this s’mores cake is best enjoyed at room temperature. It looks stunning on a cake stand, and you can garnish it with extra marshmallows and chocolate drizzle for an eye-catching presentation. Pair it with a scoop of vanilla ice cream or a dollop of whipped cream for a truly indulgent experience.
For storage, keep the cake in an airtight container at room temperature for up to three days. If you need to store it longer, consider refrigerating it, but be aware that the marshmallows may lose their fluffiness. You can also freeze slices wrapped tightly in plastic wrap for up to a month. Just remember to thaw in the fridge before enjoying!
Nutritional Information & Benefits
This s’mores cake is a treat, so it’s best enjoyed in moderation. Each slice will provide a delightful combination of carbohydrates, fats, and sugars. Here’s a rough estimate of the nutritional values per slice:
- Calories: 350-400
- Protein: 4g
- Fat: 15g
- Carbohydrates: 55g
- Sugar: 30g
The ingredients like cocoa powder and marshmallows may contain antioxidant properties, and the enjoyment of baking can provide a lovely boost to your mood. Just remember to savor each bite, and maybe share a slice or two with loved ones for added joy!
Conclusion
In conclusion, this delicious s’mores cake is not just a dessert; it’s an experience filled with nostalgia, flavor, and creativity. It’s perfect for any occasion, and I encourage you to make it your own. Whether you swap ingredients or add your unique twist, I promise you’ll love the outcome!
I cherish the memories of baking this cake with my family, and I hope it brings you as much joy as it has brought me. So go ahead, gather your ingredients, and get baking! Please share your thoughts, variations, or any fun stories in the comments below. Happy baking!
FAQs
1. Can I make this cake ahead of time?
Absolutely! You can bake the cake a day in advance and store it covered at room temperature. Just frost it right before serving for the freshest taste.
2. Can I use different types of chocolate?
Yes! Feel free to experiment with milk chocolate, dark chocolate, or even flavored chocolate chips for a unique twist.
3. How do I store leftovers?
Keep any leftover cake in an airtight container at room temperature for up to 3 days, or refrigerate for up to a week.
4. Can I freeze this cake?
Yes! Wrap individual slices tightly in plastic wrap and freeze for up to a month. Thaw in the fridge before enjoying.
5. Can I make this cake gluten-free?
Definitely! Substitute all-purpose flour with a gluten-free flour blend, and ensure your graham crackers are gluten-free as well.
Print
Delicious Smores Cake – Easy Recipe for the Best Campfire Dessert
- Total Time: 45-50 minutes
- Yield: 12 servings 1x
Description
This delightful s’mores cake takes the beloved campfire treat and elevates it into a moist, chocolatey cake layered with all the s’mores goodness you love. It’s a guaranteed crowd-pleaser for any occasion!
Ingredients
- 2 cups all-purpose flour
- 3/4 cup cocoa powder
- 2 cups granulated sugar
- 1 1/2 teaspoons baking powder
- 1 1/2 teaspoons baking soda
- 1 teaspoon salt
- 2 large eggs
- 1 cup milk
- 1/2 cup vegetable oil
- 2 teaspoons vanilla extract
- 1 cup hot water
- 1 cup unsalted butter
- 4 cups powdered sugar
- 1/2 cup milk
- 1 cup mini marshmallows
- 1/2 cup chocolate chips
- Graham cracker crumbs
Instructions
- Preheat your oven to 350°F (175°C). Grease and line your 9-inch cake pans with parchment paper.
- In a large bowl, whisk together the dry ingredients: flour, cocoa powder, sugar, baking powder, baking soda, and salt.
- In another bowl, mix the wet ingredients: eggs, milk, vegetable oil, and vanilla extract until well combined.
- Gradually add the wet mixture to the dry ingredients, mixing until just combined. Be careful not to overmix!
- Slowly stir in hot water until the batter is smooth.
- Pour the batter evenly into the prepared pans. Bake for 30-35 minutes or until a toothpick inserted in the center comes out clean.
- Once baked, remove from the oven and let cool in the pans for about 10 minutes, then transfer to a cooling rack to cool completely.
- For the frosting, beat the unsalted butter until light and fluffy. Gradually add powdered sugar, milk, and vanilla, mixing until smooth.
- Once cooled, place one cake layer on a serving plate. Spread a layer of frosting on top, sprinkle with mini marshmallows and chocolate chips.
- Place the second layer on top and frost the top and sides of the cake with the remaining frosting.
- Use a kitchen torch to lightly toast the mini marshmallows on top of the cake. Be careful not to burn them!
- Sprinkle graham cracker crumbs on top for that final touch!
Notes
For a gluten-free option, substitute all-purpose flour with a gluten-free blend and ensure graham crackers are gluten-free.
- Prep Time: 15 minutes
- Cook Time: 30-35 minutes
- Category: Dessert
- Cuisine: American
Nutrition
- Serving Size: 1 slice
- Calories: 350400
- Sugar: 30
- Fat: 15
- Carbohydrates: 55
- Protein: 4
Keywords: s'mores, cake, dessert, chocolate, campfire
")