Who has time to preheat an oven for frozen garlic bread? Certainly not me! Instead, if you’re craving crispy, golden garlic bread with no hassle, the air fryer is your new best friend. Not only is it fast and easy, but it also delivers perfectly toasted edges with a soft, buttery centre every single time.
Moreover, air fryers are a total game-changer for frozen garlic bread. They not only cook faster than a conventional oven but also save energy and deliver restaurant-quality results in minutes. As a result, there’s no more waiting around or worrying about soggy bread—it’s all about crisp perfection.
In this guide, I’ll walk you through the simple steps to cook frozen garlic bread in an air fryer. Additionally, you’ll get pro tips for the best results, answers to common questions, and even some creative hacks to take your garlic bread game to the next level. Ready? Let’s do this!
Main Headings
What is the reason of using an Air Fryer for Frozen Garlic Bread?
Let’s face it: when it comes to cooking frozen garlic bread, the air fryer is the MVP. But why exactly? It’s all about speed, texture, and convenience.
To begin with, air fryers cook way faster than a conventional oven. Unlike traditional methods, you don’t have to wait ages for preheating or deal with that “is it done yet?” anticipation. In fact, frozen garlic bread is ready in an air fryer in just 5–8 minutes! That’s practically instant gratification.
Next, let’s talk about texture. The air fryer works its magic by circulating hot air, giving you that perfect crispy crust on the outside while keeping the centre soft and buttery. As a result, you can say goodbye to soggy bottoms—seriously, nobody likes those.
And finally, there’s efficiency. An air fryer uses less energy than an oven and doesn’t heat your entire kitchen (because, let’s be honest, who wants that when it’s already warm?). Whether you’re making a quick snack for yourself or whipping up sides for dinner, it’s the easiest way to get delicious results without the hassle.
In summary, the air fryer is your secret weapon for frozen garlic bread that’s fast, crispy, and oh-so-satisfying.
Step-by-Step Guide to Cooking Frozen Garlic Bread in an Air Fryer
Cooking frozen garlic bread in an air fryer is ridiculously simple. Even if you’ve never used an air fryer, you’ll nail this quickly. Here’s precisely how to do it:
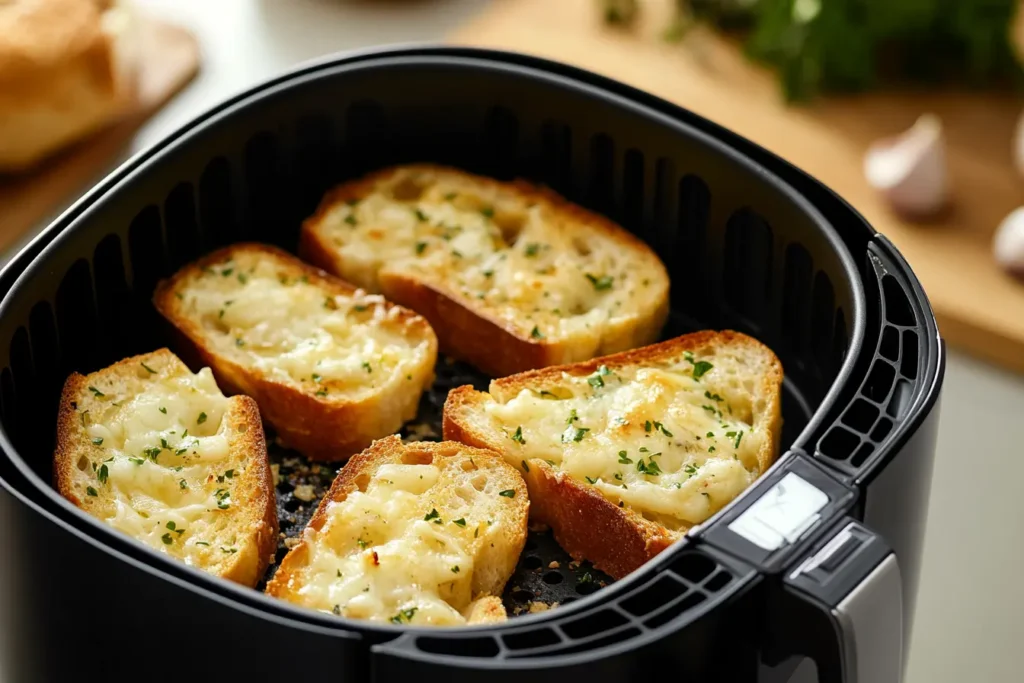
1. Preheat Your Air Fryer (Optional)
While it’s true that not all air fryers need preheating, if yours does, set it to 350–400°F. By doing so, the garlic bread cooks evenly right from the start. That said, if you’re in a hurry, skipping this step usually won’t ruin things—so no need to stress!
2. Arrange the Garlic Bread
To begin, put the frozen slices of garlic bread in the air fryer basket in one layer, leaving a little space around each piece. Additionally, be careful not to overcrowd the basket, as this will result in uneven cooking. By the way, do you have those thick Texas Toast slices? If so, don’t worry—they fit perfectly, too!
3. Set the Temperature and Timer
For most frozen garlic bread, starting with a temperature of 350°F is a safe bet. Next, cook it for 5–8 minutes, adjusting the time depending on your air fryer model and the thickness of the bread. Finally, be sure to watch it closely during the last few minutes, as that golden-brown perfection can sneak up fast!
4. Flip (Optional)
About halfway through cooking, flip the slices for even browning. If you’re in a lazy mood (been there!), you can skip this, but flipping helps with that crisp texture.
5. Check for Doneness
Your garlic bread is good to go when the edges turn golden and crispy. If you like your extra crispy, leave it in for a minute—but watch closely to avoid burning.
6. Serve and Enjoy
Take the garlic bread out carefully (it’s hot!) and let it cool for a minute. Pair it with your favourite pasta, soup, or salad—or eat it straight out of the air fryer.
Tips for the Best Results
But getting that perfect garlic bread out of your air fryer is not just about following the steps; it’s about a few sneaky little tricks that make all the difference. Here are top tips to take your frozen garlic bread game to the next level:
1. Use Parchment Liners for Easy Cleanup
Garlic butter can get messy, especially if it melts and drips in the basket. Parchment liners are a lifesaver here—they catch all the drips, making cleanup a breeze. Just make sure they’re air fryer-safe so they don’t burn.
2. Adjust Time and Temperature by Brand
Not all air fryers are created equal. Some run hotter, while others cook a bit slower. If it’s your first time, start on the lower end of the cooking range (about 5 minutes) and add time as needed. Once you’ve found the sweet spot for your air fryer, stick with it.
3. Don’t Overcrowd the Basket
As tempting as it is to cook a whole box of garlic bread at once, resist the urge. Overcrowding blocks the hot air from circulating correctly, leaving you with unevenly cooked bread. For the best results, cook in batches if needed.
4. Watch Closely to Avoid Burning
Air fryers are fast—sometimes too fast! Keep an eye on your bread during the last few minutes of cooking. Garlic bread goes from perfect to burnt quicker than you think.
5. Know Your Bread Type
It largely depends on the thickness and butter content, whether you’re using slices, Texas Toast, or breadsticks. For instance, thicker bread (like Texas Toast) may require an extra minute or two to cook, whereas very thin slices could be ready in as little as 5 minutes.
6. Add a Little Extra Flavor
Want to take it up a notch? Sprinkle some shredded cheese or a dash of parsley on top of the bread in the last minute of cooking. That’s a little trick that makes all the difference.
7. Let It Cool Before Serving
It’s hard to wait, but letting the garlic bread cool for just a minute after cooking prevents that scorching hot butter from burning your mouth. Worth it.
For more creative ways to upgrade your air fryer game, visit 10 Creative Sourdough Toast Breakfast Ideas.
Frequently Asked Questions
Do you have questions about cooking frozen garlic bread in an air fryer? I’ve got the answers! Here are some common concerns and tips to help you master this quick and tasty snack.
1. Can I Air Fry Frozen Texas Toast Garlic Bread?
Absolutely! Texas Toast works wonderfully in the air fryer. Its thicker slices might need a little extra time—about 6–8 minutes at 350°F. Keep an eye on it during the last few minutes to avoid burning.
2. Should I Thaw Frozen Garlic Bread Before Air Frying?
Nope! Frozen garlic bread should go straight from the freezer into the air fryer without thawing. In fact, thawing it beforehand can make the bread soggy and negatively affect how well it crisps. Instead, air frying from frozen Affirms the texture stays spot-on.
3. How Do I Prevent Garlic Butter from Dripping?
You’re not alone if you’ve ever opened your air fryer to find melted butter pooling at the bottom. To avoid this:
- Use parchment liners to catch drips.
- Keep the air fryer basket clean between batches.
- If your bread is extra buttery, lower the temperature slightly (to around 325°F) to prevent the butter from melting too quickly.
4. What If My Garlic Bread Is Too Crispy or Burnt?
This indicates that the air fryer is running too hot or the bread was cooked too long. Next time, lower the temperature by 10–20 degrees or reduce the cooking time by a minute or two. Also, remember to check your garlic bread during the last few minutes—it’s the easiest way to catch it before it overcooks.
5. Can I Reheat Garlic Bread in the Air Fryer?
Totally! To reheat the leftover garlic bread, place it in the air fryer at 300°F for 2–3 minutes. It’ll crisp back up without getting too dry—perfect for enjoying the next day.
6. Is Homemade Garlic Bread Air Fryer-Friendly?
Yes, and it’s fantastic! Spread butter and garlic on your favourite bread, then air fry at 350°F for 5–6 minutes. You can even add Cheese or herbs for a custom twist.
Other Air Fryer Hacks for Garlic Bread Lovers
If you’re already in love with air-fried garlic bread (and honestly, who isn’t?), these hacks will take your obsession to the next level. From cheesy upgrades to homemade masterpieces, here’s how to up your garlic bread game:
1. Add Cheese for a Gooey Twist
Want to make your garlic bread extra indulgent? Sprinkle shredded mozzarella, Parmesan, or even a mix of cheeses on top during the last minute of air frying. The heat from the air fryer melts it perfectly and turns your snack into cheesy, garlicky heaven.
2. Try Homemade Garlic Bread in the Air Fryer
Frozen garlic bread is convenient, but making it from scratch is surprisingly easy and worth it. Here’s a quick how-to:
- Slice up your favourite bread (French, Italian, or even sandwich bread).
- Mix softened butter with minced garlic, parsley, and a pinch of salt.
- Spread generously on the slices and air fry at 350°F for 5–6 minutes.
- The result? Fresh, warm garlic bread that tastes like it came from a restaurant.
3. Experiment with Toppings
Get creative with your garlic bread by adding toppings like:
- Crushed red pepper flakes for an ultimate spicy kick.
- Chopped basil or oregano for a herby flavour boost.
- Sliced olives or sundried tomatoes for a Mediterranean vibe.
4. Reheat Leftover Garlic Bread (and Make It Better)
Don’t settle for soggy microwaved slices if you’ve got leftover garlic bread. Reheat them in the air fryer at 300°F for 2–3 minutes. They’ll come out hot, crispy, and almost better than the first time.
5. Use Garlic Bread as a Base
Think outside the box—garlic bread can be more than just a side dish! Try these ideas:
- Garlic Bread Pizza: Add marinara, Cheese, and toppings, then air fry for 2–3 extra minutes.
- Open-Faced Sandwiches: Top garlic bread with deli meat, veggies, or eggs for a quick and tasty meal.
- Croutons: Cube leftover garlic bread and toss it in the air fryer for a few minutes to make crispy croutons for salads or soups.
6. Upgrade Breadsticks to Garlic Breadsticks
But getting that ideal garlic bread from your air fryer isn’t just about following the steps; it’s about some sneaky little hints that make all of the distinction. Here are pinnacle recommendations to take your frozen garlic bread recreation to the following stage:
Conclusion
Frozen garlic bread in the air fryer is one of those life hacks that feels like a total win—fast, easy, and satisfying. With just a few minutes of cooking, you can enjoy perfectly crispy, golden garlic bread with a soft, buttery centre. Best of all, there’s no need to preheat the oven or wait forever—it’s all about instant gratification (and let’s face it, we all need that sometimes).
No matter your preference, whether you enjoy classic slices, indulgent Texas Toast, or even garlic breadsticks, the air fryer is your best friend. Furthermore, with a few of the tips and hacks we’ve shared—like adding cheese, experimenting with toppings, or turning leftovers into croutons—you’ll never run out of ways to enjoy this garlicky goodness.
So next time, when you crave garlic bread, ditch the oven and fire up your air fryer. Trust me, once you try it, you’ll never look back. Got any air fryer tips or tricks? Drop them in the comments—I’d love to hear how you’re levelling up your garlic bread game!








9 thoughts on “How to Cook Frozen Garlic Bread in an Air Fryer for Perfect Results Every Time”