The holidays are here, and I think we can all agree—desserts just hit differently this time of year. There’s something about a sweet treat that’s equal parts festive and fun that makes the season feel extra magical.
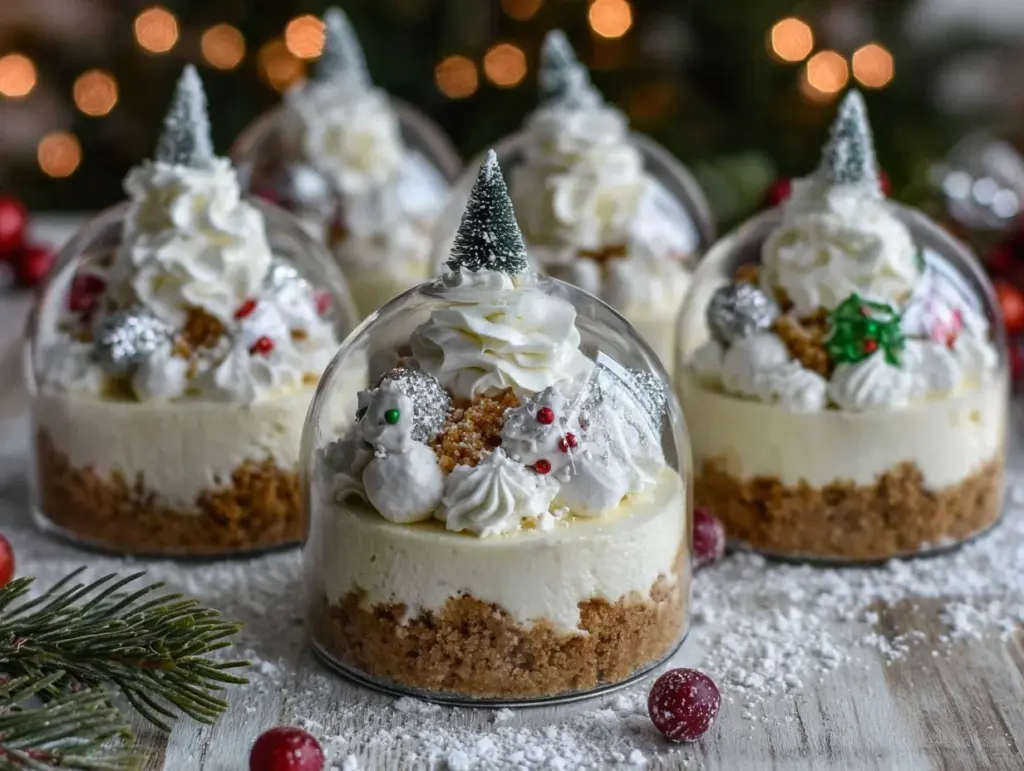
Enter my irresistible no-bake mini snow globe cheesecakes. Picture this: creamy, dreamy cheesecakes nestled in buttery graham cracker crusts, topped with delicate little snow globes (yes, edible ones!) that look straight off a Hallmark movie set. And here’s the best part—they’re easy. Like make-them-in-your-pajamas easy.
I’ve made these for holiday parties, cookie exchanges, and even as gifts for neighbors. They’re always a showstopper, and people freak out when they realize they didn’t even require an oven. Ready to bring some edible holiday magic to the table? Let’s get into it.
Why You’ll Love This Recipe
Okay, let’s talk about why these mini snow globe cheesecakes are my absolute holiday go-to:
- No baking required: No oven, no stress. Perfect for last-minute holiday plans or when your oven is already busy with other dishes.
- Adorable and festive: These look like something you’d find in a fancy bakery, but you can make them at home with minimal effort.
- Customizable: You can swap out flavors, colors, and decorations to match your holiday vibe.
- Make-ahead friendly: Prep them the night before, and they’re ready to dazzle when you need them.
- Kid-friendly fun: Little ones love helping with the decorations (and eating the results, of course).
Trust me when I say these mini cheesecakes are the kind of dessert people remember long after the holiday season ends. They’re festive, delicious, and almost too pretty to eat. Almost.
What Ingredients You’ll Need
Here’s everything you’ll need to create these magical snow globe cheesecakes. The best part? Most of it is super simple and easy to find.
- Graham crackers (1 ½ cups, crushed / ~150g) — If you don’t have graham crackers, digestive biscuits or gingersnaps work too.
- Unsalted butter (6 tbsp, melted / ~85g) — This is what holds the crust together. Don’t skimp!
- Cream cheese (16 oz / ~450g, softened) — Full-fat works best for that rich, classic cheesecake flavor.
- Powdered sugar (¾ cup / ~90g) — Sweetens the filling without making it grainy.
- Vanilla extract (2 tsp) — Adds that cozy, holiday flavor. Use the real stuff if you can.
- Heavy whipping cream (1 cup / ~240ml) — Whipped to perfection for a light, airy texture.
- Gelatin (1 packet) — The magic ingredient for making the edible snow globes.
- Sugar (¼ cup / ~50g) — Helps form the snowy dome.
- Water (½ cup / ~120ml) — For dissolving the gelatin.
- Mini decorations — Think edible sprinkles, candy trees, or tiny figurines. This is where you get to be creative!
Quick note: If you’re making these for someone with dietary restrictions, you can swap out the cream cheese for a dairy-free alternative and use gluten-free cookies for the crust.
Equipment Needed
You don’t need fancy tools to whip up these adorable cheesecakes. Here’s what I use:
- Muffin tin — For perfect mini cheesecakes. Silicone molds work great too.
- <strongcupcake liners — Keeps everything neat and makes it easier to pop them out.
- Mixing bowls — One for the crust and one for the filling.
- Electric mixer or hand whisk — To whip the cream and blend the filling.
- Small saucepan — For dissolving the gelatin.
- Plastic molds or balloons — To create the snow globe domes.
- Spatula — For scraping every last bit of filling (because waste is not festive).
If you’re a minimalist baker, don’t worry. You can improvise with what you have—just get creative!
How to Make It: Step-by-Step

Alright, let’s make some holiday magic! Follow these steps and you’ll have mini snow globe cheesecakes that are almost too cute to eat.
- Prep the crust (10 minutes): Crush your graham crackers into fine crumbs (I use a food processor, but a rolling pin works too). Mix the crumbs with melted butter until evenly coated. Press the mixture firmly into the bottom of cupcake liners in a muffin tin. Chill in the fridge while you prep the filling.
- Make the cheesecake filling (15 minutes): In a large bowl, beat the cream cheese, powdered sugar, and vanilla extract until smooth. In a separate bowl, whip the heavy cream until stiff peaks form, then gently fold it into the cream cheese mixture. Spoon the filling onto the chilled crusts, smoothing the tops. Chill again for at least 4 hours.
- Create the snow globe domes (20 minutes, plus setting time): Dissolve the gelatin and sugar in water over low heat. Once clear, pour the mixture into plastic molds (or coat small balloons with the gelatin). Let them set completely, then carefully pop the balloons or unmold.
- Decorate (15 minutes): Add your edible decorations to the top of each cheesecake—tiny candy trees, edible glitter, or mini figurines. Carefully place the gelatin dome over the decorations to create the snow globe effect.
- Serve and enjoy! (2 minutes): Gently remove the cupcake liners and display your gorgeous creations. Watch your guests’ faces light up!
Pro tip: If your domes aren’t crystal clear, don’t stress—they’re still charming and delicious.
My Best Tips & Techniques
Here’s everything I’ve learned from making these cheesecakes over and over:
- Use room temperature cream cheese: It blends smoother and avoids lumps in the filling.
- Don’t rush the chilling time: The filling needs time to set or it’ll collapse when you add the dome.
- Test your gelatin domes: If you’re using balloons, try one first to get the hang of it before making the rest.
- Decorate with care: The snow globe effect works best when the decorations are small and lightweight.
- Make ahead: These keep beautifully in the fridge for 2-3 days, so you can prep them early.
Trust me, these little tweaks make all the difference!
Ways to Mix It Up
Once you’ve nailed the basic recipe, here are some fun ways to change things up:
- Chocolate version: Add 2 tablespoons cocoa powder to the cheesecake filling and sprinkle crushed chocolate cookies into the crust.
- Fruit-topped: Add a dollop of fruit preserves under the snow globe for a pop of flavor.
- Nutty twist: Stir chopped pecans or almonds into the crust for extra texture.
- Dairy-free: Use coconut cream and dairy-free cream cheese for the filling—it’s just as rich!
- Kid-friendly: Skip the domes and let kids decorate the tops with sprinkles and candy.
This is your chance to get creative and make them truly yours!
Serving Ideas & Storage
These cheesecakes are as versatile as they are adorable. Here’s how I serve and store them:
How to Serve
- On a festive platter with twinkling lights for a holiday party.
- As individual desserts at a family dinner—no slicing required.
- Wrapped individually in clear gift boxes for neighbors or coworkers.
Storage Tips
- Fridge: Store covered for up to 3 days. The domes may lose some clarity after day 2, but they’ll still taste amazing.
- Freezer: Freeze the cheesecakes (without domes) for up to 1 month. Add the domes fresh before serving.
Pro tip: If you’re making these ahead for a party, assemble the domes the day of for the best presentation.
Nutritional Info & Health Benefits
While these cheesecakes are definitely a treat, here’s why you can feel good about serving them:
| Nutritional Info (per cheesecake) | |
|---|---|
| Calories | ~250 |
| Protein | 3g |
| Fat | 16g |
| Carbs | 20g |
The no-bake nature of this recipe keeps things simple, while the individual portions make it easy to enjoy without overindulging. Plus, the kids will love the edible snow globes!
Final Thoughts
So there you have it—my irresistible no-bake mini snow globe cheesecakes for the holidays! They’re festive, fun, and totally doable for bakers of any skill level.
I hope these little cheesecakes bring some extra sparkle to your holiday season. They’re more than just desserts—they’re edible magic that’ll have everyone smiling.
If you make these, I’d love to hear how they turn out! Drop a comment below or tag me on Instagram @yourhandle. Let’s spread some holiday cheer together!
Happy holidays and happy baking!
FAQs
Q: Can I use a different type of cookie for the crust?
A: Absolutely! Gingersnaps, Oreos, or shortbread would all work perfectly. Just crush them into fine crumbs and mix with butter.
Q: My dome isn’t clear—what went wrong?
A: It’s usually a sign the gelatin wasn’t fully dissolved. Make sure you heat it gently and stir until completely clear before pouring.
Q: Can I make these in larger sizes?
A: Definitely! Use small springform pans for a slightly bigger cheesecake. Just add larger decorations under the dome to match.
Q: Can I skip the snow globes?
A: Of course! The cheesecakes are delicious on their own. Decorate the tops with whipped cream, sprinkles, or fruit instead.
Q: How far in advance can I make these?
A: You can make the cheesecakes up to 3 days ahead. Just add the domes and decorations closer to serving for the best look.
Pin This Recipe!


Irresistible No-Bake Mini Cheesecakes for Perfect Holidays
- Total Time: 4 hours 47 minutes
- Yield: 12 mini cheesecakes 1x
Description
Festive and fun no-bake mini cheesecakes with edible snow globes, perfect for holiday parties and gifts.
Ingredients
- 1 ½ cups graham crackers, crushed (~150g)
- 6 tbsp unsalted butter, melted (~85g)
- 16 oz cream cheese, softened (~450g)
- ¾ cup powdered sugar (~90g)
- 2 tsp vanilla extract
- 1 cup heavy whipping cream (~240ml)
- 1 packet gelatin
- ¼ cup sugar (~50g)
- ½ cup water (~120ml)
- Mini decorations (edible sprinkles, candy trees, or tiny figurines)
Instructions
- Crush graham crackers into fine crumbs and mix with melted butter until evenly coated. Press the mixture firmly into the bottom of cupcake liners in a muffin tin. Chill in the fridge while preparing the filling.
- In a large bowl, beat cream cheese, powdered sugar, and vanilla extract until smooth. In a separate bowl, whip heavy cream until stiff peaks form, then gently fold it into the cream cheese mixture. Spoon the filling onto the chilled crusts, smoothing the tops. Chill for at least 4 hours.
- Dissolve gelatin and sugar in water over low heat until clear. Pour the mixture into plastic molds or coat small balloons with the gelatin. Let them set completely, then carefully pop the balloons or unmold.
- Add edible decorations to the top of each cheesecake. Carefully place the gelatin dome over the decorations to create the snow globe effect.
- Gently remove the cupcake liners and serve.
Notes
[‘Use room temperature cream cheese for smoother blending.’, ‘Allow sufficient chilling time for the filling to set properly.’, ‘Test gelatin domes with one balloon first to perfect the technique.’, ‘Decorate with small, lightweight items for the best snow globe effect.’, ‘Cheesecakes can be stored in the fridge for up to 3 days or frozen without domes for up to 1 month.’]
- Prep Time: 15 minutes
- Cook Time: 20 minutes
- Category: Dessert
- Cuisine: American
Nutrition
- Serving Size: 1 mini cheesecake
- Calories: 250
- Fat: 16
- Carbohydrates: 20
- Protein: 3
Keywords: no-bake, mini cheesecakes, holiday dessert, snow globe cheesecakes, festive dessert