One late summer afternoon a few years ago, I found myself elbow-deep in cucumbers, jars, and garlic bulbs, determined to finally master canning dill pickles with garlic. My grandmother’s old pickle recipe was scribbled on a faded index card, but every time I tried, my pickles ended up soggy or lacking that perfect crunch. I was about ready to give up and just buy jars from the store—until I stumbled on a few simple tweaks that changed everything.
Now, after dozens of batches, I’ve nailed the technique for canning dill pickles with garlic that come out irresistibly crispy and bursting with homemade flavor. It’s become a late summer ritual for me, the kind of kitchen project that fills the house with that unmistakable vinegar-and-garlic aroma and leaves me with a pantry stocked full of tangy jars to enjoy all year round. If you’ve ever been frustrated by limp pickles or bland brine, I’m here to tell you—this recipe works. And I’m sharing all the secrets I wish I’d known from the start.
Whether you’re a seasoned canner or a curious beginner, canning dill pickles with garlic is one of those rewarding kitchen adventures that feels like a little magic in a jar. Plus, once you’ve made your own, you’ll never want to settle for store-bought again.
Why You’ll Love This Recipe
This recipe has completely changed how I approach homemade pickles. Here are a few reasons I keep coming back to it:
- Crisp and Crunchy Every Time — After countless experiments, this method guarantees pickles that snap with every bite. No mushy disappointments here.
- Bold Garlic Flavor — I’m not shy with the garlic—fresh cloves packed into every jar infuse the brine with a punchy, savory depth that’s addictive.
- Simple Ingredients, Big Impact — You don’t need fancy spices or preservatives. Just fresh cucumbers, garlic, dill, and a few pantry staples.
- Perfect for Beginners — I walk you through the canning process step-by-step, including safety tips, so you feel confident every step of the way.
- Year-Round Enjoyment — These pickles keep for months in your pantry, so you get a taste of summer whenever you want it.
Honestly, this recipe has become a favorite gift to share with friends and family, and I love seeing their faces light up when they taste that perfect balance of tang, garlic, and dill. If you’ve ever thought about trying your hand at pickling, this is the one to start with.
Ingredients You’ll Need
Here’s the best part: almost all of these ingredients are probably sitting in your kitchen already, or easy to find at any grocery store or farmer’s market. I’m picky about a few key ones and will explain why.
- Fresh Cucumbers (about 6 pounds / 2.7 kg) — Pick firm, small-to-medium cucumbers labeled “pickling cucumbers” if you can. Their thin skin and dense flesh hold up best in the jar.
- Fresh Garlic Cloves (10-12 cloves) — Don’t skimp here. Fresh garlic gives the pickles that unmistakable punch. I peel and lightly crush them to release more flavor.
- Fresh Dill (about 4-5 sprigs per jar) — Use fresh heads or fronds for that authentic dill pickle aroma. Dried dill just doesn’t compare.
- White Vinegar (5 cups / 1.2 liters) — Use 5% acidity vinegar for safe canning. Distilled white vinegar keeps the flavor bright and clean.
- Water (5 cups / 1.2 liters) — Filtered or tap, just make sure it’s chlorine-free if possible to avoid off-flavors.
- Kosher Salt (3 tablespoons / 45 g) — No iodized salt here; kosher salt dissolves beautifully and won’t cloud your brine.
- Pickling Spices (2 tablespoons / 30 g) — I use a mix of mustard seeds, peppercorns, coriander seeds, and a few bay leaves. Optional but worth it.
- Optional Add-ins:
- Horseradish leaf or grape leaf — Helps keep pickles crisp by inhibiting enzymes.
- Red pepper flakes — For a subtle heat kick.
Quick note: I’ve tried using bottled garlic and dried dill before, but fresh ingredients are the game changer here. Also, if you want to explore more homemade pantry staples, you might enjoy my dense bean salad with feta, which pairs beautifully with these tangy pickles.
Equipment Needed
You don’t need fancy gear to make these pickles, but a few basics will make your life easier and keep everything safe.
- Large Canning Pot — Big enough to hold jars in boiling water. I use a 16-quart stockpot; it’s an investment but lasts forever.
- Glass Mason Jars (quart or pint size) — Clean and sterilized. I prefer quart jars for more pickles, but pints work too.
- Jar Lifter — For safely lowering and lifting hot jars from boiling water. You can’t safely skip this.
- Wide Mouth Funnel — Makes filling jars with brine and cucumbers much less messy.
- Sharp Knife — For trimming cucumbers and slicing garlic if you want.
- Cutting Board — Any sturdy board works.
- Large Bowl — To soak cucumbers before packing.
- Measuring Cups and Spoons — For exact brine ratios.
- Timer — You’ll want to track your processing time carefully.
If you’re new to canning, I recommend grabbing a beginner’s guide or watching a quick video on proper jar sterilization and water bath canning. It makes a huge difference for safety and success. I’ve found my slow cooker creamy tomato basil gnocchi soup recipe also uses some of this equipment, so it pays off to keep it handy in the kitchen.
How to Make It: Step-by-Step

Alright, let’s get into the nitty-gritty of canning dill pickles with garlic. I’m breaking it down exactly how I do it, including the little details that make all the difference.
Step 1: Prepare Your Cucumbers (10 minutes)
Rinse your cucumbers thoroughly to remove any dirt. Trim off the blossom ends—this part contains enzymes that can soften pickles. If your cucumbers are large, slice them into spears or rounds, but smaller ones can go in whole. Place them in a large bowl filled with cold water to keep them crisp while you prep the jars and brine.
Step 2: Sterilize Jars and Lids (10 minutes)
While cucumbers soak, wash your jars, lids, and bands in hot soapy water. Rinse well. Place jars in the canning pot filled with water and bring to a boil for 10 minutes to sterilize. Keep them hot until ready to fill. Simmer lids in a separate small pot to soften the sealing compound.
Step 3: Make the Brine (5 minutes)
In a large pot, combine vinegar, water, kosher salt, and pickling spices. Bring to a boil, stirring until salt dissolves. Once boiling, reduce heat to a simmer while you pack the jars.
Step 4: Pack Jars with Cucumbers, Garlic, and Dill (10 minutes)
Using your funnel, pack cucumbers tightly into each hot jar, leaving about ½ inch headspace. Add 2-3 garlic cloves and 4-5 sprigs of fresh dill per jar. If you’re using horseradish or grape leaves, tuck one leaf into each jar for extra crispness. This step is where the magic happens—pack snug but don’t crush the cucumbers.
Step 5: Add Hot Brine and Remove Air Bubbles (5 minutes)
Pour the hot brine over the cucumbers, covering them completely and maintaining the ½ inch headspace. Use a non-metallic spatula or chopstick to gently release any trapped air bubbles by sliding it along the jar’s interior. Wipe the rims with a clean damp cloth to ensure a good seal.
Step 6: Seal and Process Jars (10 minutes)
Place the lids and screw bands on finger-tight. Carefully lower jars into the boiling water bath using your jar lifter. The water should cover the jars by at least 1 inch. Process for 10 minutes (adjust time for altitude if needed).
Step 7: Cool and Store (12-24 hours +)
Remove jars and place on a towel or cooling rack, undisturbed, for 12-24 hours. You’ll hear satisfying pops as the lids seal. After cooling, check seals by pressing the center of each lid—it shouldn’t flex. Store sealed jars in a cool, dark place for at least 3 weeks before opening to develop flavor.
Pro tip: I like to label the jars with the date and batch number so I can track freshness. If you want to try your hand at other homemade pantry treats, my no bake almond butter chocolate fudge bars are a sweet way to balance out all that garlic goodness.
Expert Tips & Tricks
- Pick the Right Cucumbers — The smaller, firmer, and fresher, the better. I avoid waxed cucumbers—they don’t absorb brine well.
- Use Cold Water for Soaking — Soaking cucumbers in cold water before packing keeps them crisp and hydrated.
- Don’t Skip the Horseradish or Grape Leaves — These natural crispers really do help pickles stay crunchy.
- Keep Everything Hot — Hot jars, hot brine, and processing in boiling water prevent spoilage and ensure a safe seal.
- Don’t Overfill Jars — Leave that ½ inch headspace for proper sealing and to avoid overflow during processing.
- Store in a Dark, Cool Place — Sunlight and heat can degrade flavor and color over time.
- Be Patient — The pickles develop their best flavor after at least 3 weeks. I know it’s hard to wait, but it’s worth it.
Variations & Substitutions
Once you’ve mastered the classic garlic dill pickles, feel free to play around with these delicious twists I’ve tested:
- Spicy Garlic Pickles — Add ½ teaspoon red pepper flakes or a sliced jalapeño to each jar for heat that builds with time.
- Sweet & Tangy — Add 1 tablespoon sugar to the brine. Balances the vinegar with a touch of sweetness.
- Herb-Enhanced — Toss in fresh tarragon or thyme sprigs alongside the dill for a unique flavor profile.
- Low Sodium — Reduce salt by half and increase vinegar slightly. Keep in mind this may affect crispness and preservation time.
- Vegan-Friendly Variations — This recipe is naturally vegan, but swapping out fresh garlic for smoked garlic powder adds smoky depth.
For a fresh dinner idea that pairs wonderfully with homemade pickles, I often make everything bagel chicken sheet pan dinner. The pickles add that perfect tangy crunch alongside the savory chicken.
Serving & Storage
These pickles are best enjoyed cold straight from the jar or sliced up on sandwiches, burgers, or alongside a charcuterie board. They add a bright, garlicky crunch to nearly any meal.
Serving Suggestions:
- Slice and add to your favorite sandwiches or wraps for a zesty twist.
- Serve alongside smoky grilled meats or homemade burgers.
- Chop and mix into potato or egg salad for extra tang.
- Pair with creamy dishes like my slow cooker creamy tomato basil gnocchi soup to cut through richness.
Storage Instructions:
- Pantry: Unopened jars last up to 1 year stored in a cool, dark place.
- Refrigerator: Once opened, store pickles in the fridge and consume within 1 month for best flavor and crunch.
- Freezing: Not recommended due to texture changes.
Nutrition Information
I’m not a nutritionist, but here’s a rough breakdown if you’re tracking your intake, based on 1 medium pickle spear (about 30g):
| Calories | 5 |
|---|---|
| Protein | 0.2g |
| Carbohydrates | 1g |
| Fiber | 0.3g |
| Sugar | 0.5g |
| Fat | 0g |
| Sodium | 250mg |
These pickles are low calorie and fat-free, but keep in mind the sodium is higher due to the salt and vinegar. If you’re watching sodium, try rinsing slices before eating or opt for the low-sodium variation. Overall, they’re a flavorful, crunchy snack that beats store-bought in freshness and taste.
Final Thoughts
So that’s my tried-and-true method for canning dill pickles with garlic that stay crispy and full of bold flavor. I’ve probably rattled on enough, but when you’ve spent years perfecting a recipe that turns out just right every time, you can’t help but share all the little tips and tricks.
This recipe has saved me from the “what’s for snack?” panic on more than one occasion, and it’s become a staple in my pantry and my gift basket rotation. Plus, there’s something deeply satisfying about opening a jar you canned yourself and knowing exactly what’s inside.
Make it yours—add more garlic, toss in a spicy kick, or experiment with herbs. That’s the fun of homemade pickling. If you do try this canning dill pickles with garlic recipe, leave a comment below and tell me how they turned out! I’m always curious to hear your tweaks and stories (and happy to help if something doesn’t go quite right).
Happy canning! And may your kitchen smell as amazing as mine does right now.
Frequently Asked Questions
Q: Can I use regular cucumbers instead of pickling cucumbers?
A: You can, but pickling cucumbers tend to be smaller and firmer, which helps them stay crispy during canning. Regular slicing cucumbers have more water and bigger seeds, which can lead to softer pickles.
Q: How long do I have to wait before eating my canned pickles?
A: For the best flavor, wait at least 3 weeks after processing to let the garlic and dill infuse the cucumbers. I know it’s tempting, but the wait is worth it.
Q: Why did my pickles turn out soft or mushy?
A: Soft pickles usually mean the cucumbers were overripe, left too long before canning, or the jars weren’t processed properly. Using fresh, firm cucumbers and following the water bath timing carefully helps prevent this.
Q: Can I add other spices besides the pickling mix you recommend?
A: Absolutely! Feel free to add mustard seeds, coriander, or even a cinnamon stick for a unique twist. Just be mindful that too many spices can overpower the garlic and dill.
Q: How do I know if my jars sealed properly?
A: After cooling, press the center of each lid. It should be concave and not pop back. If the lid flexes or pops, it’s not sealed and should be refrigerated and eaten first.
Q: Can I reuse jars and lids from previous batches?
A: You can reuse glass jars as long as they aren’t chipped or cracked. However, always use new lids designed for canning because the sealing compound wears out and won’t seal properly.
Q: Is it safe to can pickles without vinegar?
A: No. Vinegar’s acidity is crucial for safe preservation when canning pickles. Never skip or substitute vinegar with lemon juice or other acids for canning purposes.
Pin This Recipe!


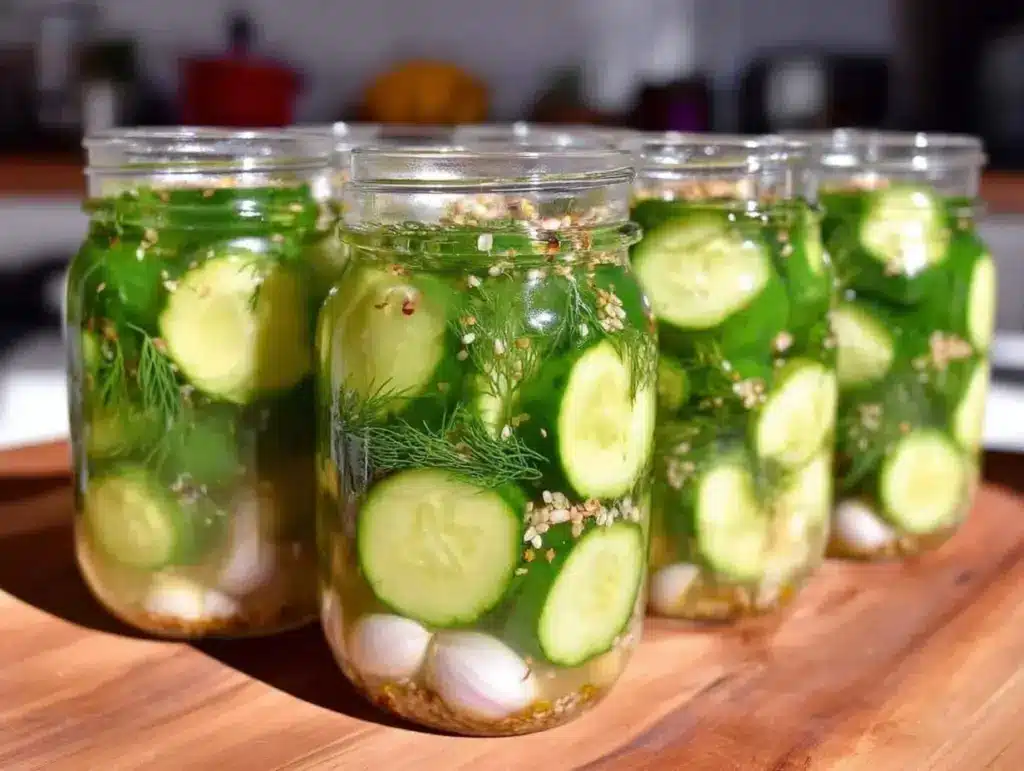
Canning Dill Pickles with Garlic Easy Recipe for Crispy Homemade Flavor
- Total Time: 35 minutes plus 12-24 hours cooling and 3 weeks flavor development
- Yield: About 6 quart jars 1x
Description
A tried-and-true method for canning dill pickles with garlic that stay crispy and full of bold flavor, perfect for beginners and seasoned canners alike.
Ingredients
- 6 pounds fresh pickling cucumbers (small to medium, firm)
- 10–12 fresh garlic cloves, peeled and lightly crushed
- 4–5 sprigs fresh dill per jar
- 5 cups white vinegar (5% acidity, distilled)
- 5 cups water (filtered or chlorine-free tap)
- 3 tablespoons kosher salt
- 2 tablespoons pickling spices (mustard seeds, peppercorns, coriander seeds, bay leaves)
- Optional: horseradish leaf or grape leaf (for crispness)
- Optional: red pepper flakes (for heat)
Instructions
- Rinse cucumbers thoroughly and trim off blossom ends. Slice large cucumbers into spears or rounds; smaller ones can be left whole. Soak in cold water to keep crisp.
- Wash jars, lids, and bands in hot soapy water. Rinse well. Sterilize jars by boiling in a large canning pot for 10 minutes. Keep jars hot. Simmer lids separately to soften sealing compound.
- In a large pot, combine vinegar, water, kosher salt, and pickling spices. Bring to a boil, stirring until salt dissolves. Reduce heat to simmer.
- Pack cucumbers tightly into hot jars using a funnel, leaving ½ inch headspace. Add 2-3 garlic cloves and 4-5 sprigs of dill per jar. Tuck in horseradish or grape leaf if using.
- Pour hot brine over cucumbers, covering completely and maintaining ½ inch headspace. Use a non-metallic spatula or chopstick to release air bubbles. Wipe rims clean.
- Place lids and screw bands on jars finger-tight. Lower jars into boiling water bath ensuring water covers jars by at least 1 inch. Process for 10 minutes (adjust for altitude).
- Remove jars and place on towel or cooling rack undisturbed for 12-24 hours. Check seals by pressing lid centers; lids should not flex. Store sealed jars in a cool, dark place for at least 3 weeks before opening.
Notes
[‘Use fresh, firm pickling cucumbers for best crispness.’, ‘Trim blossom ends to prevent soft pickles.’, ‘Keep jars and brine hot to ensure safe sealing.’, ‘Leave ½ inch headspace in jars for proper sealing.’, ‘Store unopened jars in a cool, dark place for up to 1 year.’, ‘Once opened, refrigerate and consume within 1 month.’, ‘Do not freeze pickles as texture will degrade.’, ‘Wait at least 3 weeks before eating for best flavor.’, ‘Optional horseradish or grape leaves help maintain crispness.’, ‘Adjust processing time for altitude if necessary.’]
- Prep Time: 25 minutes
- Cook Time: 10 minutes
- Category: Preserves
- Cuisine: American
Nutrition
- Serving Size: 1 medium pickle spea
- Calories: 5
- Sugar: 0.5
- Sodium: 250
- Carbohydrates: 1
- Fiber: 0.3
- Protein: 0.2
Keywords: canning dill pickles, garlic pickles, homemade pickles, crispy pickles, pickling recipe, water bath canning, easy pickles