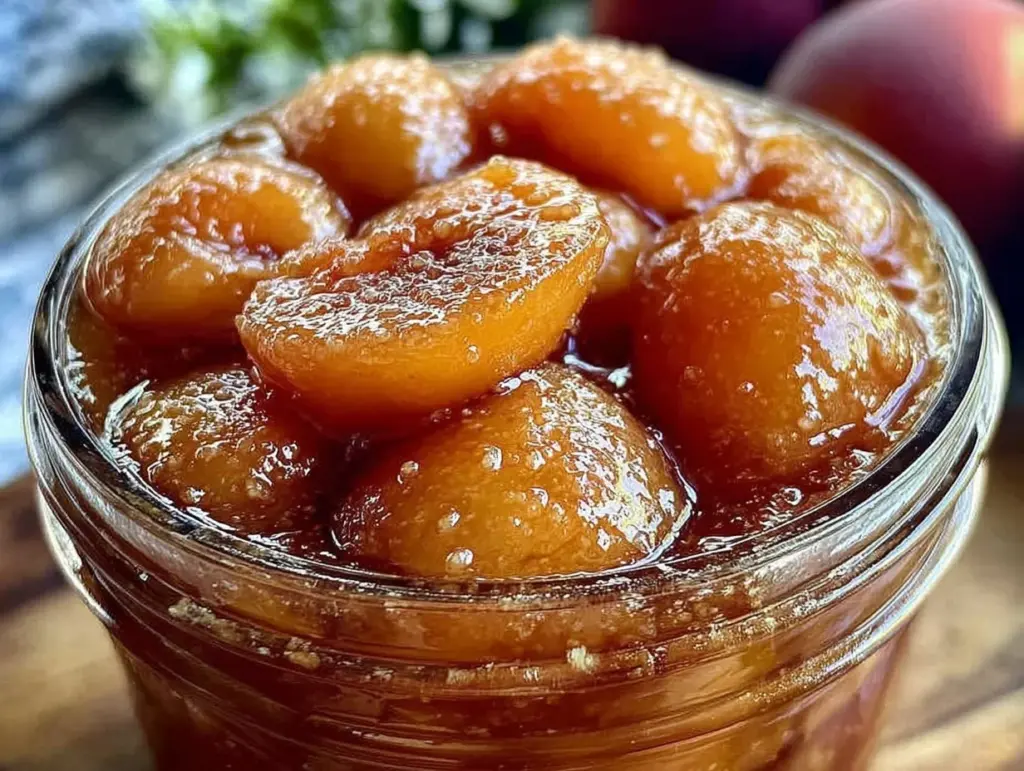
One late summer afternoon, my kitchen smelled like a sweet daydream—ripe peaches simmering gently in a delicate vanilla syrup. That moment hit me: why not capture this fleeting season in a jar? Canning peaches in light vanilla syrup became my way of bottling summer’s best flavors, so I could enjoy them long after the last peach had been picked. I’ve canned peaches plenty of ways over the years, but this recipe—infused with just the right touch of vanilla—has become my absolute favorite for homemade preserves.
It’s not just about preservation; it’s about savoring that perfect bite of peach, silky and fragrant, whenever I want. Whether spooned over morning yogurt, stirred into oatmeal, or simply eaten straight from the jar, these easy homemade peach preserves remind me why I fell in love with canning in the first place. After testing this recipe over a dozen times (yes, I’m that serious about my peaches), I’m excited to share all the tips and tricks that make it foolproof and delicious every single time.
Why You’ll Love This Recipe
This recipe has completely changed my approach to canning peaches and homemade preserves. Here’s why it’s become a staple in my kitchen:
- Simple Ingredients, Big Flavor — Just peaches, sugar, water, and a splash of pure vanilla extract. No complicated syrups or preservatives—just pure, natural taste.
- Light Vanilla Syrup — The syrup is sweet but not heavy, letting the peaches’ natural flavor shine while adding a subtle warmth from vanilla. It’s a game-changer for breakfast toppings and desserts.
- Reliable and Tested — After more than a dozen batches, I’ve nailed the timing and technique. This recipe works whether you’re a beginner or a canning pro.
- Perfect Texture — The peaches hold their shape beautifully without becoming mushy. You’ll get tender slices that still look stunning in the jar.
- Versatile Uses — Use these preserves on toast, swirl into creamy gnocchi soup for a fruity twist, or as a topping for ice cream and pancakes.
- Long-Lasting — Properly canned and sealed, these jars keep well for up to a year, so you can enjoy summer peaches even in the dead of winter.
This recipe isn’t just about making preserves—it’s about creating a little jar of sunshine you can reach for any day. If you’ve ever struggled with soggy peaches or overly sweet preserves, this light vanilla syrup method will be your new best friend.
Ingredients You’ll Need
Here’s the best part: these ingredients are straightforward and likely already in your kitchen or easily found at your local market. I’m picky about three of these, and I’ll tell you why as we go.
- Freestone peaches (about 4 pounds / 1.8 kg) — Freestone varieties are best because the pits slip out easily. Look for peaches that are ripe but still firm, so they hold up well during canning.
- Granulated sugar (2 cups / 400g) — This sweetens the syrup. You can reduce slightly if you prefer less sweet preserves, but sugar also helps preserve and maintain color.
- Water (4 cups / 960ml) — The base for your syrup. Use filtered water if your tap water is heavily chlorinated.
- Pure vanilla extract (1 tablespoon / 15ml) — This is the secret weapon. Real vanilla adds a warm, floral note that turns simple peaches into something special. Avoid imitation vanilla here.
- Lemon juice (2 tablespoons / 30ml) — Fresh lemon juice brightens the peaches and helps prevent browning during prep.
- Canning salt (1 teaspoon / 5g, optional) — Helps balance flavor and is safe for canning. You can skip if you prefer.
Personal tips: I always buy organic vanilla extract because it makes a noticeable difference in flavor. For peaches, if you can’t find freestone, clingstone will work; just be prepared for more peeling effort. And if you want to try a different syrup base, I’ve had good results swapping half the sugar for honey, but the flavor changes quite a bit.
Equipment Needed
You don’t need fancy gear for canning peaches in light vanilla syrup, just the basics I’ve collected over years of home preserving.
- Large pot or canner — I use a 16-quart water bath canner, but any large pot with a lid that can hold your jars upright works.
- Quart or pint canning jars — I prefer quart jars for peaches because they hold more, but pints work if you want smaller portions.
- Lid lifter and jar lifter — These make handling hot jars easy and safe. I can’t recommend these enough.
- Wide-mouth funnel — Helps fill jars without spilling syrup or peaches all over your counter.
- Large bowl — For holding peeled peaches in lemon water to prevent browning.
- Sharp paring knife — Essential for peeling and slicing peaches.
- Measuring cups and spoons — For precise syrup-making and lemon juice.
Quick note: If you’re new to canning, it’s worth investing in a good-quality canner and jar lifter. They make the process safer and less stressful. I started with a big stockpot and tongs, but upgrading made a huge difference.
How to Make It: Step-by-Step

Alright, let’s get those peaches canned! I’m breaking down every step so you won’t miss a beat—trust me, this recipe loves a little patience.
Step 1: Prepare Your Peaches (20 minutes)
Bring a large pot of water to a boil. Meanwhile, prepare a large bowl of ice water. Score a small “X” at the bottom of each peach with your paring knife. Drop peaches into boiling water for 30-60 seconds—just until skins start to loosen. Scoop them out and plunge immediately into the ice water to stop cooking. The skins should slip right off now. Peel, halve, and remove pits. Toss peeled peaches gently into the lemon water to keep them from browning.
Step 2: Make the Light Vanilla Syrup (10 minutes)
In a large saucepan, combine the sugar, water, and canning salt. Bring the mixture to a boil, stirring until sugar dissolves completely. Remove from heat and stir in the vanilla extract. Set aside but keep warm.
Step 3: Pack Jars with Peaches (15 minutes)
Using your wide-mouth funnel, pack the peach halves into sterilized jars. Don’t pack too tightly—give them a little room so syrup can flow around each piece. Leave about ½-inch headspace at the top.
Step 4: Add Syrup to Jars (5 minutes)
Ladle the warm vanilla syrup over the peaches, covering them completely while maintaining the ½-inch headspace. Use a clean utensil to remove any air bubbles by gently sliding it around the jar’s inside. Wipe rims clean with a damp cloth to ensure a good seal.
Step 5: Seal and Process Jars (45 minutes)
Place lids and screw bands on jars fingertip tight. Lower jars into your boiling water canner, ensuring they’re covered by at least 1-2 inches of water. Process quarts for 25 minutes, pints for 20 minutes (adjust times for altitude as needed). Remove jars carefully and let sit undisturbed on a towel to cool for 12-24 hours.
Step 6: Check Seals and Store (5 minutes)
After cooling, test seals by pressing the center of each lid. If sealed properly, it won’t pop up and down. Store sealed jars in a cool, dark place. Refrigerate any jars that didn’t seal properly and use within a week.
Expert Tips & Tricks
- Don’t skip the lemon water bath: This simple step prevents your peaches from turning brown and keeps their bright color.
- Use fresh vanilla extract: It makes a noticeable difference in the syrup’s flavor. I learned this the hard way after using imitation vanilla once—the flavor was flat.
- Leave the right headspace: Too little and the jars won’t seal properly; too much and peaches won’t be covered. Half an inch is perfect.
- Warm syrup is your friend: Pouring warm syrup over peaches helps them retain texture and flavor during processing.
- Process jars immediately: Don’t let jars sit filled and unprocessed—start the water bath canner right away to keep everything safe.
- Watch your processing times carefully: Undercooking risks spoilage; overcooking can make peaches mushy.
One mistake I made once was rushing the peeling step and letting peaches sit too long uncovered. They turned a bit brown and softer than I liked. Lesson learned: prep in small batches and keep peaches submerged in lemon water.
Variations & Substitutions
Once you master this base recipe, there are so many ways to make it your own:
- Spiced Vanilla Syrup — Add a cinnamon stick and a few whole cloves to the syrup while it simmers for a warm, cozy flavor that’s perfect for fall.
- Honey-Sweetened Version — Swap half the sugar for honey for a floral sweetness. Reduce simmer time slightly as honey can caramelize.
- Fresh Herb Infusion — Add a sprig of fresh rosemary or thyme to the syrup while it’s hot, then remove before pouring. The subtle herb notes add complexity.
- Use Nectarines — They work beautifully in this recipe if you prefer a slightly firmer texture.
- Lightly Spiced Peach Jam — Use this canned peach base as a starting point, then blend some peaches and simmer with extra sugar to thicken for homemade jam.
For those looking to try a savory twist, these peaches pair surprisingly well with dishes like everything bagel chicken. The sweet vanilla notes beautifully complement the savory spices.
Serving & Storage
How to enjoy your homemade peach preserves? The possibilities are endless.
- Breakfast — Spoon over pancakes, waffles, or swirl into plain yogurt for an easy, elegant start.
- Dessert — Serve warm over vanilla ice cream or mix into your favorite cobbler recipe for added depth.
- Snacking — Spread on toast or biscuits with a pat of butter.
- Gifting — Beautiful jars of these preserves make thoughtful homemade gifts that friends and family will love.
For storage, keep sealed jars in a cool, dark place. Once opened, refrigerate and use within 2 weeks. I store mine in the pantry and pull out a jar during winter for a little summer nostalgia.
Reheating gently in a saucepan revives the syrup’s silky texture if it thickens in the fridge. Just add a splash of water if needed.
Nutrition Information
I’m not a nutritionist, but here’s a rough breakdown based on 8 servings (1/2 cup each):
| Nutrient | Amount per Serving |
|---|---|
| Calories | 120 |
| Protein | 1g |
| Carbohydrates | 30g |
| Fiber | 2g |
| Sugar | 28g |
| Fat | 0g |
| Sodium | 45mg |
What’s good here? Peaches provide fiber and vitamins, and you’re in control of the sugar amount. This is a sweet preserve, so enjoy it as a treat or condiment rather than a staple.
Final Thoughts
So that’s my tried-and-true method for canning peaches in light vanilla syrup. I’ve probably shared more than you expected, but when a recipe becomes part of your family’s tradition, you want to get it right—and keep sharing it.
This easy homemade peach preserves recipe has saved me from winter dessert despair more times than I can count. It’s simple enough for beginners but yields jars of pure joy that taste like summer sunshine. Customize it, tweak it, and make it yours—add a cinnamon stick if you want some cozy vibes or go classic with just vanilla.
If you try this, drop a comment below and tell me how it turns out! And if you hit any bumps, I’m here to help troubleshoot. Happy canning—and may your kitchen smell like peaches and vanilla all season long.
Frequently Asked Questions
Q: Can I use frozen peaches for this recipe?
A: Fresh peaches give the best texture and flavor for canning. Frozen peaches tend to be mushier and may not hold their shape as well, leading to softer preserves. If you only have frozen peaches, consider making a peach jam or sauce instead.
Q: How long do canned peaches last?
A: Properly processed and sealed jars can last up to one year stored in a cool, dark place. After opening, refrigerate and use within two weeks for best quality.
Q: Why are my peaches turning brown despite the lemon water?
A: Browning usually happens if peaches are left too long before canning or not fully submerged in lemon water. Work in small batches and keep peaches covered in lemon water until you’re ready to pack jars.
Q: Can I reduce the sugar in the syrup?
A: Yes, but sugar helps preserve color, texture, and shelf life. Reducing sugar too much might lead to softer peaches and less sweet preserves. Try lowering by ¼ cup increments and see how you like it.
Q: What if my jars don’t seal properly?
A: Refrigerate those jars and use them first. Check your jar rims for cracks or nicks before canning, and make sure lids are clean and undamaged. Tighten bands fingertip tight only—too tight can prevent seals.
Q: Can I add other fruits to this preserve?
A: Definitely! Peaches pair well with berries, plums, or apricots. Just be mindful of different cooking times and textures. You might want to check out my no-bake almond butter chocolate fudge bars for a sweet treat that also features fruit layers.
Q: Is water bath canning safe for this recipe?
A: Yes, water bath canning is safe and recommended for high-acid foods like peaches in syrup. Just follow processing times carefully to ensure safety.
Pin This Recipe!


Canning Peaches in Light Vanilla Syrup Easy Homemade Peach Preserves Recipe
- Total Time: 1 hour 5 minutes
- Yield: 8 servings 1x
Description
This recipe captures the sweet flavor of ripe peaches simmered in a delicate vanilla syrup, perfect for homemade preserves that last up to a year. Ideal for beginners and pros alike, it yields tender peach slices with a subtle vanilla warmth.
Ingredients
- 4 pounds freestone peaches (about 1.8 kg)
- 2 cups granulated sugar (400 g)
- 4 cups water (960 ml)
- 1 tablespoon pure vanilla extract (15 ml)
- 2 tablespoons fresh lemon juice (30 ml)
- 1 teaspoon canning salt (5 g, optional)
Instructions
- Bring a large pot of water to a boil and prepare a large bowl of ice water.
- Score a small “X” at the bottom of each peach with a paring knife.
- Drop peaches into boiling water for 30-60 seconds until skins loosen.
- Remove peaches and plunge immediately into ice water to stop cooking.
- Peel, halve, and remove pits from peaches.
- Toss peeled peaches gently into lemon water to prevent browning.
- In a large saucepan, combine sugar, water, and canning salt; bring to a boil, stirring until sugar dissolves.
- Remove from heat and stir in vanilla extract; keep syrup warm.
- Pack peach halves into sterilized jars using a wide-mouth funnel, leaving ½-inch headspace.
- Ladle warm vanilla syrup over peaches, covering completely and maintaining ½-inch headspace.
- Remove air bubbles by sliding a clean utensil around the jar’s inside.
- Wipe jar rims clean with a damp cloth.
- Place lids and screw bands on jars fingertip tight.
- Lower jars into boiling water canner, ensuring jars are covered by 1-2 inches of water.
- Process quarts for 25 minutes, pints for 20 minutes (adjust for altitude if needed).
- Remove jars carefully and let cool undisturbed on a towel for 12-24 hours.
- After cooling, test seals by pressing the center of each lid; if sealed, lid won’t pop up and down.
- Store sealed jars in a cool, dark place; refrigerate any unsealed jars and use within a week.
Notes
Use fresh vanilla extract for best flavor; keep peaches submerged in lemon water to prevent browning; maintain ½-inch headspace for proper sealing; process jars immediately after filling; adjust processing time for altitude; refrigerate unsealed jars and use within a week.
- Prep Time: 20 minutes
- Cook Time: 45 minutes
- Category: Preserves
- Cuisine: American
Nutrition
- Serving Size: 1/2 cup
- Calories: 120
- Sugar: 28
- Sodium: 45
- Carbohydrates: 30
- Fiber: 2
- Protein: 1
Keywords: canning peaches, peach preserves, vanilla syrup, homemade preserves, water bath canning, summer fruit, peach recipe