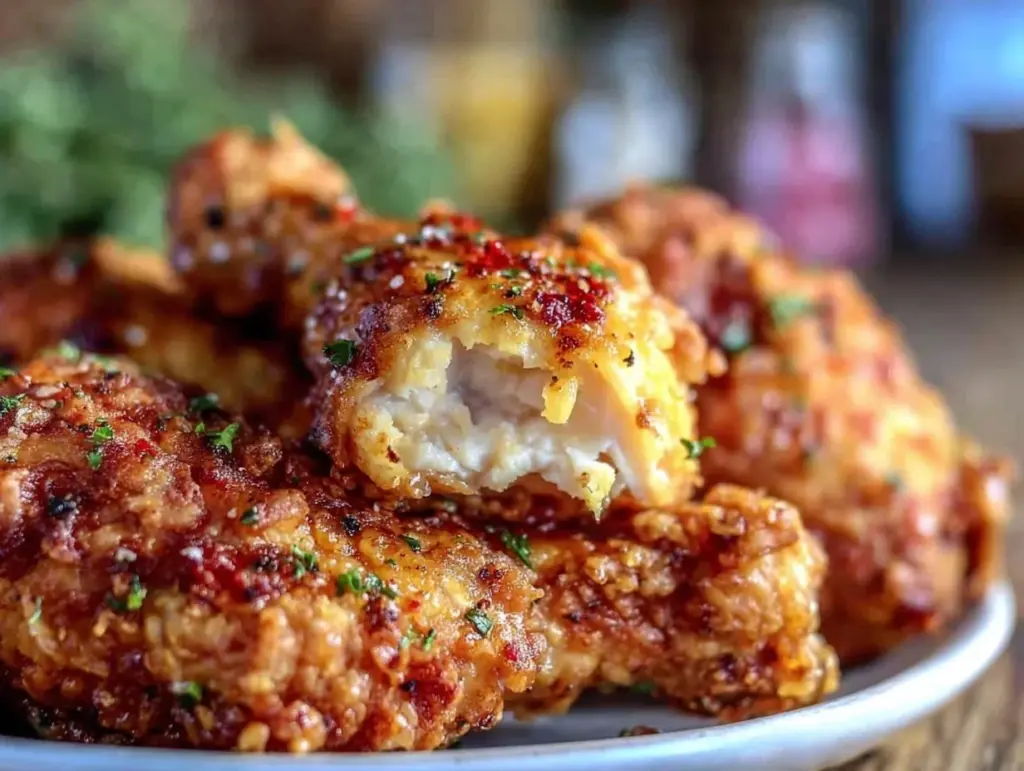
One chilly Friday evening, I found myself staring at a fridge half-full of buttermilk and a pack of chicken drumsticks, wondering how to turn these simple ingredients into something my family would rave about. Fried chicken was calling my name, but the thought of standing over a greasy deep fryer made me want to run the other way. That’s when I remembered a trick I learned from a friend: oven-frying with buttermilk for that crispy, golden crust—without the mess or the guilt.
After testing this crispy buttermilk oven-fried chicken drumsticks recipe more than a dozen times (and yes, burning a batch or two in the process), I finally nailed the perfect balance of crunchy coating and juicy meat—all ready in just 30 minutes. The best part? This recipe uses the oven, so cleanup is a breeze, and you get that fried chicken magic without standing over a fryer. It’s become our quick weeknight go-to and a guaranteed crowd-pleaser whenever we have friends over.
So basically, if you’ve been craving crispy chicken but don’t want the hassle of frying, this recipe will change your life. And yes, it’s just as good as the real deal (maybe better because no splattered oil!).
Why You’ll Love This Recipe
There are about a million reasons I keep making this crispy buttermilk oven-fried chicken drumsticks, but here are the top few that make it a staple in my kitchen:
- Hands-Off Cooking — Once the chicken is coated and in the oven, you can get started on sides, check your emails, or even sneak in a quick scroll through social media. No standing by the stove.
- Ridiculously Crispy — The buttermilk marinade tenderizes the chicken, while the seasoned coating bakes up golden and crunchy, just like classic fried chicken. No soggy spots here.
- Ready in 30 Minutes — From start to finish, including marinating time (if you skip it, it’s still great), it’s a speedy meal. Perfect for busy weeknights when you want comfort food but don’t have hours.
- Family Favorite — I’ve served this to picky kids, my husband’s friends, and even my in-laws who usually prefer “fancier” meals—and everyone wants seconds. It’s a universal crowd-pleaser.
- No Deep Fryer Needed — If you don’t own a fryer or just don’t want to use one, this method gives you that crispy fried texture without the oil mess or health guilt.
- Budget-Friendly — Chicken drumsticks are affordable, and the pantry staples for the coating are things you probably already have on hand. Feeds a family of four without breaking the bank.
This recipe has seriously saved me on more than one hectic night, and it’s one I know I can count on to deliver crispy, juicy chicken that never disappoints.
Ingredients You’ll Need
Here’s the best part: you probably have most of these ingredients already. I’m a stickler for three things in this recipe, and I’ll tell you exactly why when we get there.
- Chicken drumsticks (8 pieces / about 2 pounds / 900g) — Drumsticks are juicy and forgiving, which makes them perfect for oven-frying. You can also use thighs if you prefer.
- Buttermilk (1 cup / 240ml) — This is the secret weapon. It tenderizes the chicken and adds tangy flavor. No buttermilk? Mix 1 cup milk with 1 tablespoon lemon juice or vinegar and let it sit for 5 minutes.
- All-purpose flour (1 ½ cups / 190g) — The base for the crispy coating. I always sift mine to avoid clumps.
- Panko breadcrumbs (1 cup / 100g) — Adds extra crunch and flaky texture. Don’t skip this if you want maximum crispiness.
- Salt (1 ½ teaspoons) — Essential for seasoning both the chicken and the coating. I use kosher salt because it sticks better.
- Black pepper (1 teaspoon, freshly ground) — Adds a mild heat and depth to the coating.
- Garlic powder (1 teaspoon) — Gives that subtle savory punch that makes fried chicken so addictive.
- Onion powder (1 teaspoon) — Rounds out the flavor with a hint of sweetness.
- Smoked paprika (1 teaspoon) — Adds a smoky warmth and beautiful color.
- Cooking spray or vegetable oil — For lightly coating the chicken before baking to help crisp the coating.
Optional add-ins:
- Cayenne pepper (¼ teaspoon) — For a spicy kick, add if you like heat.
- Fresh herbs (like thyme or rosemary) — Chop finely and add to the flour mixture for a fresh herbal note.
Pro tip: I always keep panko and buttermilk stocked because they’re magic for so many recipes, including my crispy oven-fried chicken tenders. Similar technique but different cut, equally delicious.
Equipment Needed
You don’t need fancy equipment for this. Here’s what I actually use:
- Large mixing bowl — For marinating the chicken in buttermilk. Plastic or glass works fine.
- Baking sheet — A rimmed sheet pan is best to catch any drips. I line mine with parchment paper for easier cleanup.
- Wire rack — Placed on the baking sheet to elevate the chicken so air circulates and crisps all sides. Don’t skip this; it’s the key to getting that even crunch.
- Shallow bowls or plates — For the flour and panko dredging station.
- Tongs — Makes flipping and coating the chicken easier and less messy.
- Cooking spray — I swear by olive oil spray or avocado oil spray to lightly coat the chicken before baking.
- Oven thermometer (optional) — If your oven runs hot or cold, this helps keep things accurate.
Quick note: No wire rack? Use a cooling rack that fits inside a baking sheet, or just bake directly on a parchment-lined sheet, but flip halfway through to crisp both sides.
How to Make It: Step-by-Step

Alright, let’s make this crispy buttermilk oven-fried chicken drumsticks! I’m walking you through exactly how I do it, including little tips that save me from soggy or burnt chicken.
Step 1: Marinate the Chicken (10 minutes, or up to overnight)
Place the drumsticks in a large bowl and pour the buttermilk over them, making sure each piece is coated. Cover and refrigerate for at least 10 minutes—yes, that’s enough if you’re short on time, but if you can, marinate for a few hours or overnight for maximum tenderness. I’ve done both, and honestly, even a quick soak works wonders.
Step 2: Preheat Your Oven and Prepare the Coating (5 minutes)
Preheat your oven to 425°F (220°C). Meanwhile, in one shallow bowl, mix the flour, salt, black pepper, garlic powder, onion powder, smoked paprika, and cayenne if using. In another bowl, place the panko breadcrumbs.
Step 3: Dredge the Chicken (5 minutes)
Remove the drumsticks from the buttermilk one at a time, letting excess drip off. First, coat each piece evenly in the seasoned flour mixture, then dip it back briefly in the buttermilk to moisten, and finally roll it in the panko breadcrumbs until fully covered. The double dip with flour and panko creates that unbeatable crust.
Step 4: Arrange and Spray (2 minutes)
Place the coated drumsticks on the wire rack set over your baking sheet. Spray each piece lightly with cooking spray or brush with a little oil. This helps them brown and crisp up in the oven.
Step 5: Bake and Flip (15-18 minutes)
Bake the chicken for 7-9 minutes, then use tongs to flip each drumstick and spray the other side. Bake for another 7-9 minutes until the coating is golden brown and crispy and the internal temperature reaches 165°F (74°C). If you don’t have a meat thermometer, cut into one piece to check that the juices run clear.
Step 6: Rest and Serve (2 minutes)
Let the drumsticks rest for a few minutes before serving—this helps the juices redistribute and keeps the meat juicy. I like to serve mine with a side of low-carb cauliflower mac and cheese or a crisp green salad.
Expert Tips & Tricks
Here’s everything I’ve learned from making this dozens of times. These tips will save you from my mistakes:
- Don’t Skip the Wire Rack: Elevating the chicken lets the hot air circulate, so the coating crisps evenly on all sides instead of steaming on the bottom.
- Double Dredge for Crunch: Flour, then buttermilk, then panko gives you a thicker, crunchier crust than just flour or breadcrumbs alone.
- Use Fresh Spices: Old garlic powder or paprika can taste flat. Fresh spices punch up the flavor big time.
- High Heat is Key: Baking at 425°F crisps the crust without drying out the chicken. Lower temps make the coating soggy.
- Let the Buttermilk Work Its Magic: Even a short soak makes the chicken juicier and adds a gentle tang that brightens the whole dish.
- Spray or Brush Lightly with Oil: Don’t skip this or your crust won’t get that golden crunch. I use an avocado oil spray for a neutral flavor and high smoke point.
- Rest Before Serving: Letting the chicken rest a few minutes keeps the meat moist and the crust intact.
Common Mistakes to Avoid: If your coating falls off, you probably didn’t press it firmly enough when dredging or skipped the second buttermilk dip. Too dark or burnt crust? Oven too hot or chicken too close to the heat source.
Variations & Substitutions
Once you’ve nailed the basic version, here’s how you can mix it up. I’ve tried all of these and they work great:
- Spicy Buffalo Style — Toss the baked drumsticks in buffalo sauce and serve with blue cheese dressing. Instant game day hit.
- Herb-Crusted — Add chopped fresh rosemary and thyme to the flour mixture for an herby twist.
- Gluten-Free — Swap the all-purpose flour and panko for gluten-free flour and gluten-free breadcrumbs. Works well, just watch the baking time.
- Buttermilk Ranch Coating — Add 2 tablespoons of ranch seasoning mix to the flour blend for a tangy flavor boost.
- Miso Glaze Finish — Brush the drumsticks with a mixture of miso paste, honey, and soy sauce after baking for a savory-sweet glaze (inspired by my miso glazed salmon recipe).
Substitutions: No buttermilk? Use regular milk with a tablespoon of vinegar or lemon juice. No panko? Regular breadcrumbs work but the texture won’t be quite as crispy.
Serving & Storage
How to Serve: I usually serve these drumsticks hot and crispy right from the oven. They pair brilliantly with creamy sides like creamy chicken and rice casserole or a fresh green salad to balance the richness.
For casual dinners, I set out extra hot sauce, ranch dressing, and lemon wedges so everyone can customize their plate. Leftover crispy chicken even shines cold in sandwiches or chopped into salads.
Storage: Store leftovers in an airtight container in the fridge for up to 3 days. To reheat without losing crispiness, pop the drumsticks in a 400°F (200°C) oven for 8-10 minutes until heated through. Avoid microwaving if you want to keep the crust crispy.
Freezing: You can freeze cooked drumsticks for up to 2 months. Thaw overnight in the fridge and reheat in the oven as above.
Nutrition Information
I’m not a nutritionist, but here’s a rough breakdown per serving (based on 8 drumsticks, 2 per person):
| Nutrient | Amount |
|---|---|
| Calories | 320 |
| Protein | 28g |
| Carbohydrates | 12g |
| Fiber | 1g |
| Fat | 18g |
| Saturated Fat | 5g |
| Cholesterol | 90mg |
| Sodium | 450mg |
What’s good? The chicken provides solid protein, and this recipe uses less oil than deep frying, so it’s lighter but still satisfying. You can always add veggies on the side for a balanced meal.
My take? This is comfort food that fits in a balanced week when enjoyed with a variety of sides. It’s way better than takeout and you know exactly what’s going in.
Final Thoughts
So that’s my go-to crispy buttermilk oven-fried chicken drumsticks. I’ve probably talked your ear off by now, but when you make a recipe this often, you get a lot of thoughts! It’s saved me on busy weeknights when I want something delicious, crunchy, and satisfying without the stress or mess of frying.
My kids love it, my husband requests it, and I love that I can make it quickly with ingredients I always have on hand. Plus, it pairs beautifully with so many sides, like the low-carb cauliflower mac and cheese or a crisp salad when I want something lighter.
Make it yours—play with the spices, add your favorite herbs, or toss it in a sauce to switch things up. The best recipes are the ones you customize to fit your family’s tastes.
If you make this, drop a comment and let me know how it turned out! I love hearing your tweaks and tips, and if something doesn’t work, I’m here to help troubleshoot.
Happy cooking! And may your kitchen soon smell as amazing as mine does right now.
Frequently Asked Questions
Q: Can I marinate the chicken overnight?
A: Absolutely! Marinating overnight actually makes the chicken more tender and flavorful. Just make sure to cover and refrigerate it. If you’re short on time, even 10 minutes in buttermilk helps.
Q: Can I use chicken thighs or breasts instead of drumsticks?
A: Yes! Thighs are great and stay juicy with this method. Breasts can dry out more easily, so be sure to watch the baking time closely and consider pounding them to even thickness.
Q: Why is the wire rack important?
A: The wire rack lets hot air circulate around the chicken, so the coating crisps up evenly on all sides instead of getting soggy on the bottom. If you don’t have one, flipping halfway through helps but isn’t quite the same.
Q: Can I make this recipe gluten-free?
A: Yes! Use gluten-free flour and gluten-free breadcrumbs or crushed cornflakes for the coating. Baking time stays about the same—just watch for doneness.
Q: How do I know when the chicken is done?
A: The safest bet is using a meat thermometer—it should read 165°F (74°C) in the thickest part of the drumstick. If you don’t have one, cut into a piece and check that the juices run clear, not pink.
Q: Can I reheat leftovers in the microwave?
A: You can, but the crust may get soggy. I prefer reheating leftovers in a 400°F oven for 8-10 minutes to bring back the crispiness. If you microwave, add a splash of water or cover with a damp paper towel to avoid drying out.
Q: Can I double the recipe?
A: Definitely! Just make sure you have enough space on your baking sheet and consider using two racks or pans so the chicken isn’t crowded. Crowding causes steaming instead of crisping.
Pin This Recipe!


Crispy Buttermilk Oven-Fried Chicken Drumsticks
- Total Time: 30 minutes
- Yield: 4 servings (2 drumsticks per person) 1x
Description
A quick and easy 30-minute recipe for crispy, juicy oven-fried chicken drumsticks marinated in buttermilk and coated with a seasoned flour and panko crust. Perfect for a hands-off, healthier alternative to deep frying.
Ingredients
- 8 chicken drumsticks (about 2 pounds / 900g)
- 1 cup buttermilk (240ml) or 1 cup milk + 1 tablespoon lemon juice/vinegar
- 1 ½ cups all-purpose flour (190g), sifted
- 1 cup panko breadcrumbs (100g)
- 1 ½ teaspoons kosher salt
- 1 teaspoon freshly ground black pepper
- 1 teaspoon garlic powder
- 1 teaspoon onion powder
- 1 teaspoon smoked paprika
- Cooking spray or vegetable oil for coating
- Optional: ¼ teaspoon cayenne pepper
- Optional: Fresh herbs like thyme or rosemary, finely chopped
Instructions
- Place the drumsticks in a large bowl and pour the buttermilk over them, coating each piece. Cover and refrigerate for at least 10 minutes or up to overnight.
- Preheat oven to 425°F (220°C). In one shallow bowl, mix flour, salt, black pepper, garlic powder, onion powder, smoked paprika, and cayenne if using. In another bowl, place the panko breadcrumbs.
- Remove drumsticks from buttermilk one at a time, letting excess drip off. Coat each piece evenly in the seasoned flour mixture, dip briefly back in buttermilk to moisten, then roll in panko breadcrumbs until fully covered.
- Place coated drumsticks on a wire rack set over a rimmed baking sheet. Lightly spray or brush each piece with cooking spray or oil.
- Bake for 7-9 minutes, then flip each drumstick and spray the other side. Bake another 7-9 minutes until golden brown, crispy, and internal temperature reaches 165°F (74°C).
- Let the drumsticks rest for a few minutes before serving to allow juices to redistribute.
Notes
Use a wire rack to ensure even crisping. Double dredge with flour and panko for a thicker crust. Fresh spices improve flavor. Spray or brush lightly with oil before baking for best crispiness. Rest chicken before serving. For gluten-free, substitute flour and panko with gluten-free alternatives.
- Prep Time: 15 minutes
- Cook Time: 15-18 minutes
- Category: Main Course
- Cuisine: American
Nutrition
- Serving Size: 2 drumsticks
- Calories: 320
- Sodium: 450
- Fat: 18
- Saturated Fat: 5
- Carbohydrates: 12
- Fiber: 1
- Protein: 28
Keywords: oven-fried chicken, crispy chicken drumsticks, buttermilk chicken, healthy fried chicken, easy chicken recipe, weeknight dinner