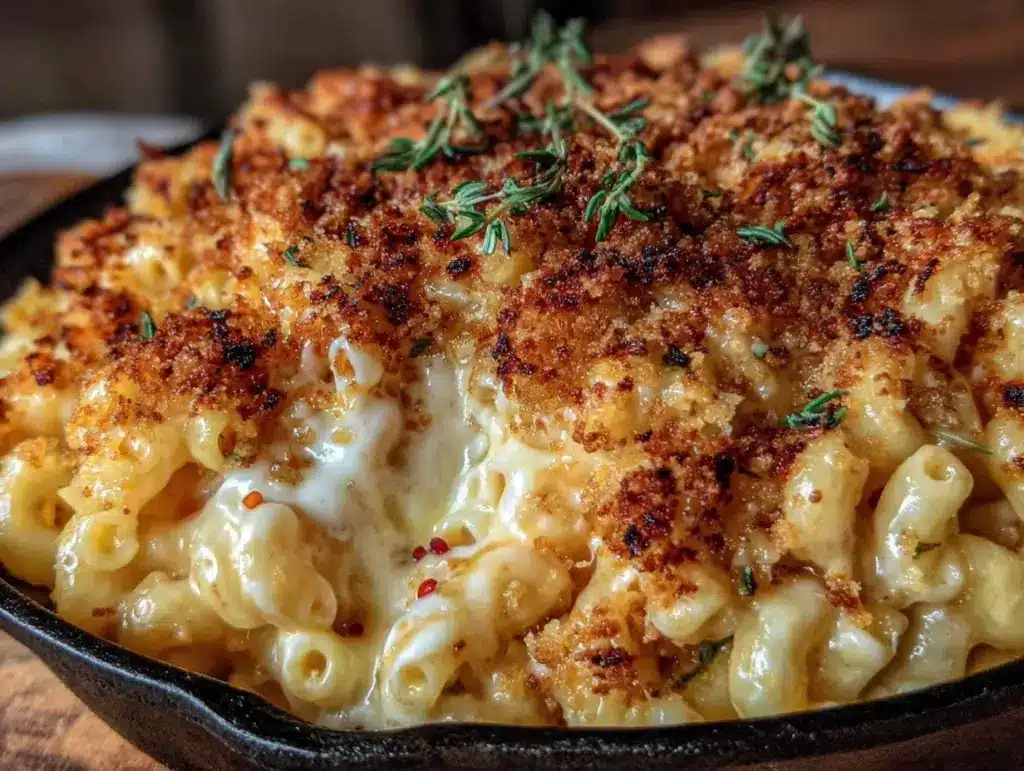
I still remember the first time I made this cast iron skillet mac and cheese with crispy topping. It was one of those evenings where I had zero plans, a craving for comfort food, and about 30 minutes before my family’s dinner meltdown kicked in. I’d been through so many mac and cheese versions—some too runny, others too bland, and a few disasters where the topping turned into a burnt mess. But this recipe? It clicked immediately. The cast iron skillet gave it this rustic charm and the kind of crispy, golden crust that makes you want to dive right in. After testing it over a dozen times, I finally nailed the timing and the flavors so it’s always perfectly creamy inside with just the right crunch on top.
Here’s the thing: this is not your average mac and cheese. It’s got that unbeatable crispy topping that crackles under your fork and a sauce so velvety, it almost feels indulgent without being fussy. I love that it’s ready in 30 minutes flat, making it my secret weapon for hectic weeknights. Plus, the cast iron skillet means fewer dishes and a gorgeous presentation straight from oven to table.
After years of tweaking, I’ve turned this into a recipe I can trust to please a crowd or just satisfy my own cheesy cravings. If you’re ready for mac and cheese that’s easy, quick, and downright delicious, keep reading. I’ll guide you through every step so you get that crispy topping just right every time.
Why You’ll Love This Recipe
This cast iron skillet mac and cheese with crispy topping has completely changed how I think about weeknight dinners. Here’s why I keep making it:
- Ready in 30 minutes — Perfect for those nights when you want comfort food but don’t want to spend hours in the kitchen. I’ve made this after a long day at work when I just wanted to relax.
- Unbeatable crispy topping — The first time I got that golden, crunchy crust, my family was hooked. It adds a texture contrast that makes every bite exciting.
- One-pan wonder — Cooking and baking all happen in the same cast iron skillet, which means less cleanup. I’m all about that life.
- Super creamy inside — Thanks to the blend of cheeses and a little bit of milk, the sauce is rich and smooth, not gluey or dry.
- Kid-approved — I’ve served this to picky eaters and even my youngest who usually avoids anything with a crispy topping. They couldn’t get enough.
- Easy to customize — Add bacon, veggies, or swap cheeses to your heart’s content. It’s a flexible base for whatever you have on hand.
Honestly, this mac and cheese feels like a warm hug on a plate. It’s my go-to when I need something comforting but don’t have the patience for complicated recipes. Seriously, once you try this, you’ll wonder how you ever made mac and cheese any other way.
Ingredients You’ll Need
Here’s the best part: you probably have most of these ingredients already. I’m picky about a few things here, and I’ll tell you why as we go.
- Elbow macaroni (1 pound / 450g) — I stick to elbow macaroni because it holds the cheese sauce perfectly. You can use shells or cavatappi for a twist, but don’t go too big or the sauce won’t coat evenly.
- Unsalted butter (4 tablespoons / 56g) — Butter is the base of the roux. Using unsalted lets me control the salt in the dish better. Plus, it browns beautifully for that toasty flavor.
- All-purpose flour (¼ cup / 30g) — This thickens the sauce. Don’t skip or substitute with cornstarch here—it’s not the same.
- Whole milk (3 cups / 720ml) — Full fat gives the sauce the creamy texture I love. You can mix in half-and-half if you want it richer.
- Sharp cheddar cheese (3 cups shredded / 340g) — The star of the show. I buy a block and shred it myself because pre-shredded has anti-caking agents that mess with melting.
- Gruyère cheese (1 cup shredded / 115g) — Adds a nutty, sophisticated flavor and helps the sauce get super creamy.
- Garlic powder (1 teaspoon) — Just a little kick without overpowering the cheese.
- Onion powder (1 teaspoon) — Delivers subtle depth.
- Salt (1 teaspoon) — I go light here and adjust at the end.
- Black pepper (½ teaspoon) — Freshly cracked if possible. It wakes up the flavors.
- Panko breadcrumbs (1 cup / 100g) — This is the secret to the crunchy topping. I toast them lightly in butter before topping the mac and cheese.
- Olive oil or melted butter (2 tablespoons / 30ml) — To toss with the breadcrumbs for extra crispiness.
Optional add-ins I love for variety:
- Bacon bits — Crispy and smoky, I sprinkle these on before the breadcrumbs for an extra layer of flavor.
- Diced jalapeños — For a little heat.
- Fresh herbs like thyme or parsley — Adds brightness at the end.
Pro tip: I once swapped the Gruyère for smoked mozzarella and it turned out amazing—try it if you want a smoky twist.
Equipment Needed
You don’t need fancy equipment for this. Here’s what I actually use:
- 12-inch cast iron skillet — This is non-negotiable for me. The skillet gives you that perfect even heat and crispy edges. Don’t have cast iron? Use a heavy oven-safe skillet or a casserole dish, but the crust won’t be the same.
- Medium saucepan — For cooking the pasta. I use my trusty old stainless steel one.
- Mixing bowls — For tossing breadcrumbs and mixing cheeses.
- Wooden spoon or silicone spatula — For stirring the roux and cheese sauce.
- Whisk — Helps get the roux smooth without lumps.
- Measuring cups and spoons — Standard kitchen tools.
- Box grater — Grating cheese fresh is a game changer.
Optional but handy:
- Oven mitts — Cast iron gets hot, so protect those hands!
- Cooling rack — For resting the skillet after baking.
How to Make It: Step-by-Step

Alright, let’s make this cast iron skillet mac and cheese with crispy topping! I’m walking you through exactly how I do it, including the little tricks I’ve picked up.
Step 1: Cook the Pasta (8-10 minutes)
Bring a large pot of salted water to a boil—it should taste like the ocean. Add the elbow macaroni and cook until just al dente, about 8 minutes (check the package). Don’t overcook because it will keep cooking in the oven. Drain the pasta and set it aside.
Step 2: Make the Roux (5 minutes)
In your cast iron skillet over medium heat, melt the butter. Once melted, sprinkle in the flour and whisk constantly for about 2 minutes. You want to cook off the raw flour taste but not brown it. This step is crucial for a silky sauce that clings to every noodle.
Step 3: Add the Milk and Seasonings (5 minutes)
Slowly pour in the whole milk while whisking vigorously to prevent lumps. Keep stirring until the mixture thickens and coats the back of a spoon, about 3-4 minutes. Stir in garlic powder, onion powder, salt, and pepper.
Step 4: Add the Cheese (3 minutes)
Remove the skillet from heat and stir in the shredded cheddar and Gruyère cheeses gradually until melted and smooth. If the sauce feels too thick, add a splash more milk. Taste and adjust seasoning.
Step 5: Combine Pasta and Sauce (2 minutes)
Add the drained pasta to the cheese sauce and stir gently to coat every noodle. Spread it evenly in the skillet.
Step 6: Prepare the Crispy Topping (5 minutes)
In a small bowl, toss the panko breadcrumbs with melted butter or olive oil until evenly coated. If you want to add bacon bits or herbs, mix them in here. Sprinkle the breadcrumb mixture evenly over the pasta.
Step 7: Bake to Perfection (10 minutes)
Preheat your oven to 375°F (190°C). Bake the skillet mac and cheese for 10-12 minutes or until the topping is golden brown and crispy. If you want extra crunch, place it under the broiler for 1-2 minutes—just watch closely so it doesn’t burn.
Step 8: Serve Immediately
Let it cool for a few minutes before digging in. The crispy topping will crackle with every bite, and the sauce inside will be lusciously creamy.
Quick tip: The key to that perfect crust is toasting the breadcrumbs in butter before adding them on top. It makes all the difference.
Expert Tips & Tricks
Here’s everything I’ve learned from making this dozens of times. These tips will save you from my early mistakes.
- Don’t overcook the pasta — It should be just shy of fully cooked because it will bake more in the oven. Mushy pasta ruins the texture.
- Grate cheeses fresh — Pre-shredded can make your sauce grainy or oily. It’s worth the extra 2 minutes.
- Use whole milk or a mix of milk and half-and-half — Skipping cream keeps it lighter but still creamy. Cold milk can cause lumps, so let it come to room temperature if you can.
- Butter your breadcrumbs generously — This is what makes them golden and crunchy instead of dry and dull.
- Cast iron is your best friend here — It heats evenly and crisps up the edges beautifully. If you don’t have one, a heavy oven-safe skillet or baking dish works but expect less crunch.
- Make sure to rest before serving — The sauce thickens slightly as it cools and the flavors meld.
Common mistake I made: I once skipped the roux and tried to melt cheese directly into milk—it curdled and looked awful. Don’t do that. The roux is crucial for smooth sauce.
Pro trick: If you want a restaurant-level glossy finish, swirl in a tablespoon of cold butter right after baking.
Variations & Substitutions
Once you’ve nailed the basics, here’s how to mix it up. I’ve tried all of these:
- Bacon Mac and Cheese — Add 6 strips of crispy cooked bacon, chopped, mixed into the pasta before topping. It adds smoky, salty goodness.
- Veggie Boost — Stir in steamed broccoli florets or sautéed mushrooms before baking. It’s a sneaky way to add nutrition.
- Spicy Jalapeño — Add diced jalapeños to the cheese sauce for a kick. I like to balance the heat with a squeeze of lime on top.
- Gluten-Free — Use gluten-free pasta and gluten-free breadcrumbs. I’ve had great results with chickpea-based pasta.
- Dairy-Free — Try a cashew cream sauce and dairy-free cheese shreds. It’s a bit different but still satisfying.
- Cheese Swap — Substitute Gruyère with smoked mozzarella or fontina for different flavors.
This recipe also pairs amazingly well with easy weeknight sides like grilled street corn with Cotija cheese or a fresh green salad like my grilled chicken Caesar salad. It’s all about balance!
Serving & Storage
How to Serve: I usually serve this mac and cheese straight from the skillet—it looks rustic and keeps warm longer. I like topping it with freshly cracked black pepper and a sprinkle of chopped parsley for color.
For sides, garlic bread is a no-brainer, but roasted green beans or a crisp salad offer a nice contrast to the richness.
Storage: Store leftovers in an airtight container in the fridge for up to 3 days. The sauce thickens in the fridge, so when reheating, add a splash of milk and warm gently on the stove while stirring. Microwave works too but can dry it out if you’re not careful.
Freezing: I don’t recommend freezing because the creamy sauce can separate and get grainy. This is best enjoyed fresh or within a few days.
Meal Prep Tip: You can make the cheese sauce ahead and keep it in the fridge for up to 2 days. Cook the pasta fresh, then combine and bake. Saves time on busy evenings.
Nutrition Information
I’m not a nutritionist, but here’s the rough breakdown per serving (based on 6 servings):
| Nutrient | Amount |
|---|---|
| Calories | 520 |
| Protein | 22g |
| Carbohydrates | 46g |
| Fiber | 2g |
| Sugar | 6g |
| Fat | 30g |
| Saturated Fat | 18g |
| Cholesterol | 90mg |
| Sodium | 500mg |
| Calcium | 350mg |
What’s Good: Great protein from cheese and milk, calcium-packed, and quite filling. You can always add veggies to boost nutrition.
Heads up: This is a rich dish with butter and cheese, so it’s definitely comfort food, not a diet meal. If you want lighter, try swapping some milk for half-and-half or check out my low-carb cauliflower mac and cheese for a different take.
Final Thoughts
So that’s my cast iron skillet mac and cheese with crispy topping recipe! I’ve probably talked your ear off, but when you make a recipe this often, you have a lot to say about it. It’s saved me on more weeknights than I can count—when I’m tired, short on time, but still want something that feels like a treat.
My family loves it, guests always ask for the recipe, and I love how easy it is to customize. Whether you add bacon, veggies, or just keep it classic, this mac and cheese is a winner.
Make it yours! Try different cheeses, play with the topping, or add your favorite spices. The best recipes are the ones you adapt and make part of your kitchen story.
If you make this, drop a comment and let me know how it turned out! I’m here for all the questions and troubleshooting. Happy cooking, and I hope your kitchen smells half as amazing as mine does right now.
Frequently Asked Questions
Can I use a different type of cheese instead of cheddar and Gruyère?
Absolutely! Cheddar and Gruyère are my favorites for flavor and melt, but you can use fontina, mozzarella, or even smoked gouda for a twist. Just remember some cheeses melt differently, so start with smaller amounts to avoid clumping.
What if my sauce turns out too runny?
This usually means the roux wasn’t cooked long enough or the sauce didn’t thicken before adding cheese. Next time, cook the flour and butter for a full 2 minutes and be patient letting the milk thicken. If it’s already runny, try adding a little more cheese or simmering gently longer.
Can I make this without a cast iron skillet?
You can, but the crispy edges won’t be quite the same. Use an oven-safe heavy skillet or a casserole dish. Just keep an eye on the topping and bake a little longer if needed to get crunch.
How do I reheat leftovers without losing the crispy topping?
Reheating in a skillet on low heat with a splash of milk helps keep it creamy. The topping won’t be as crispy as fresh, but you can pop it under the broiler for a minute if you want to revive some crunch.
Can I prepare this in advance?
You can make the cheese sauce up to 2 days ahead and keep it refrigerated. Cook the pasta fresh before baking. This saves time and keeps the dish tasting fresh.
Is there a way to make this recipe lower in carbs?
Definitely! Try swapping the elbow macaroni for a vegetable-based pasta or check out my low-carb cauliflower mac and cheese recipe for a delicious alternative.
Can I add protein like chicken or bacon?
Yes! Bacon is great mixed in before adding breadcrumbs. Diced cooked chicken also works well stirred into the cheese sauce. I sometimes add leftover rotisserie chicken for a heartier meal.
Pin This Recipe!


Cast Iron Skillet Mac and Cheese with Crispy Topping
- Total Time: 30 minutes
- Yield: 6 servings 1x
Description
A quick and easy mac and cheese recipe cooked in a cast iron skillet, featuring a creamy cheese sauce and an unbeatable crispy breadcrumb topping. Ready in 30 minutes, perfect for weeknight comfort food.
Ingredients
- 1 pound elbow macaroni
- 4 tablespoons unsalted butter
- 1/4 cup all-purpose flour
- 3 cups whole milk
- 3 cups shredded sharp cheddar cheese
- 1 cup shredded Gruyère cheese
- 1 teaspoon garlic powder
- 1 teaspoon onion powder
- 1 teaspoon salt
- 1/2 teaspoon black pepper
- 1 cup panko breadcrumbs
- 2 tablespoons olive oil or melted butter
Instructions
- Bring a large pot of salted water to a boil. Add elbow macaroni and cook until just al dente, about 8 minutes. Drain and set aside.
- In a 12-inch cast iron skillet over medium heat, melt the butter. Sprinkle in the flour and whisk constantly for about 2 minutes to cook off the raw flour taste without browning.
- Slowly pour in the whole milk while whisking vigorously to prevent lumps. Stir until the mixture thickens and coats the back of a spoon, about 3-4 minutes. Stir in garlic powder, onion powder, salt, and black pepper.
- Remove skillet from heat and gradually stir in shredded cheddar and Gruyère cheeses until melted and smooth. Add a splash more milk if sauce is too thick. Taste and adjust seasoning.
- Add the drained pasta to the cheese sauce and stir gently to coat every noodle. Spread evenly in the skillet.
- In a small bowl, toss panko breadcrumbs with melted butter or olive oil until evenly coated. Add optional bacon bits or herbs if desired. Sprinkle breadcrumb mixture evenly over pasta.
- Preheat oven to 375°F (190°C). Bake skillet mac and cheese for 10-12 minutes or until topping is golden brown and crispy. For extra crunch, broil for 1-2 minutes watching closely to avoid burning.
- Let cool for a few minutes before serving to allow sauce to thicken slightly.
Notes
Do not overcook pasta; it should be just shy of fully cooked as it will bake further in the oven. Grate cheeses fresh for best melting and texture. Toast breadcrumbs in butter before topping for best crispy crust. Cast iron skillet is preferred for even heat and crispy edges. Let the dish rest a few minutes before serving to thicken the sauce. For a glossy finish, swirl in a tablespoon of cold butter after baking.
- Prep Time: 15 minutes
- Cook Time: 15 minutes
- Category: Main Course
- Cuisine: American
Nutrition
- Serving Size: 1/6 of recipe
- Calories: 520
- Sugar: 6
- Sodium: 500
- Fat: 30
- Saturated Fat: 18
- Carbohydrates: 46
- Fiber: 2
- Protein: 22
Keywords: mac and cheese, cast iron skillet, crispy topping, comfort food, quick dinner, cheesy pasta