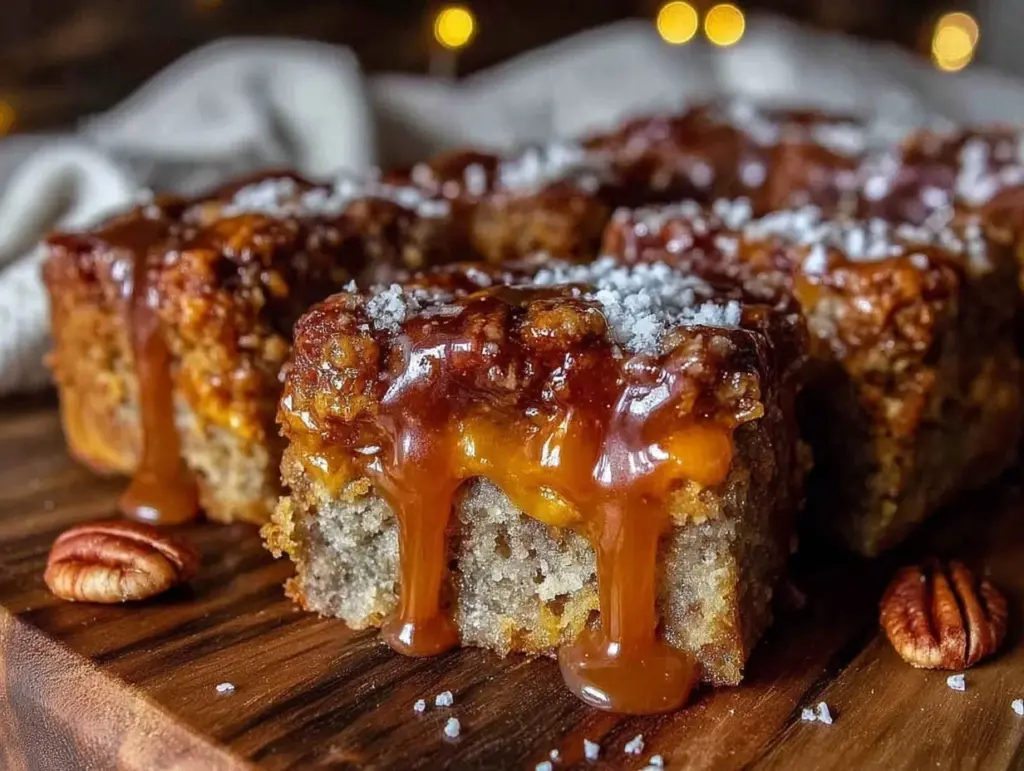
I still remember the first time I made these soft baked maple donut bars. It was a chilly Sunday morning, and I was craving something sweet but not too heavy—something cozy, like the kind of treat your grandma might pull out when guests arrive. I didn’t want to fuss with deep frying or complicated dough, so I set out to create a baked version that still had that tender crumb and unmistakable maple flavor. After a few attempts (and one seriously sticky kitchen mishap), I landed on this recipe that’s now a staple in my house every fall and winter.
What makes these bars special isn’t just the maple glaze that drizzles over the top like liquid gold, but the way the crumb practically melts in your mouth. I’ve made these maple donut bars more times than I can count, perfecting the balance between soft and slightly chewy, with just the right touch of sweetness. Plus, they’re baked—not fried—so you get all the flavor with way less mess.
If you love the idea of classic donut flavors without the hassle of frying, these bars are going to become your new favorite. They’re perfect for breakfast, an afternoon pick-me-up, or even a casual dessert. I’ve tested this recipe so many times, tweaking it to get that perfect tender crumb and shiny maple glaze that’s just begging to be licked off your fingers.
Why You’ll Love This Recipe
This soft baked maple donut bars recipe has become a crowd favorite in my family and friends’ circle for plenty of reasons. Here’s why I keep baking it over and over:
- Easy to Make — No yeast, no frying, no complicated steps. I can whip these up in under 40 minutes, making them my go-to for last-minute brunches or cozy weekends.
- Tender Crumb — The texture is soft, light, and fluffy, with just enough chewiness to remind you of a classic donut. I burned a few batches before I nailed this—trust me, the crumb here is worth the effort.
- Maple Glaze Magic — The glaze isn’t just a sweet topping; it soaks in slightly, giving each bite that signature maple punch. You’ll want to drizzle extra on top, and I won’t judge.
- Great for Sharing — These bars bake in a rectangular pan and slice beautifully, which means no fighting over donuts. Perfect for potlucks, family breakfasts, or gifting to neighbors (if you’re feeling generous).
- Pantry-Friendly Ingredients — I bet you already have most of what you need. Maple syrup, flour, baking powder, and a few basics, and you’re all set.
For me, these bars aren’t just a recipe—they’re comfort food in bar form. They hit the spot when I want to impress without stress, and they’ve even converted my maple-skeptical husband into a fan. I know once you try this recipe, it’ll become your cozy kitchen secret too.
Ingredients You’ll Need
Here’s the best part: the ingredient list looks fancy, but most of it is simple pantry staples with a few maple-focused highlights. I’m pretty picky about a couple things here, so I’ll tell you why each ingredient matters.
- All-purpose flour (2 cups / 250g) — The base of the bars. Make sure it’s fresh for the best rise and texture.
- Baking powder (2 teaspoons) — This gives the bars their lift and tender crumb. Don’t swap this for baking soda unless you adjust other ingredients.
- Salt (½ teaspoon) — Balances the sweetness and enhances flavor. I always use fine sea salt here.
- Ground cinnamon (1 teaspoon) — Adds warmth and depth that pairs perfectly with maple. I like freshly ground when possible.
- Unsalted butter (½ cup / 115g, melted) — Full flavor without extra salt. Melted butter keeps the crumb tender and moist.
- Granulated sugar (¾ cup / 150g) — Sweetness that isn’t overpowering. You can swap half for brown sugar for a richer flavor, but I prefer all white for a cleaner maple taste.
- Eggs (2 large) — Binds everything together and adds richness. Room temperature eggs work best.
- Pure maple syrup (⅓ cup / 80ml, plus ¼ cup for glaze) — The star of the show. Use real maple syrup, not maple-flavored syrup. It makes all the difference.
- Vanilla extract (1 teaspoon) — Enhances the maple flavor and rounds out the sweetness with a subtle floral note.
- Milk (¾ cup / 180ml) — I use whole milk for creaminess, but 2% works fine too. Helps create the tender crumb.
- Powdered sugar (1 cup / 120g) — For the maple glaze. Sifted for a smooth finish.
Optional but worth it:
- Maple extract (½ teaspoon) — If you want an extra maple punch, add this to the glaze. I use it sparingly because the real syrup should shine.
Quick note: I always recommend buying real maple syrup, even if it costs a bit more. Fake maple syrup just doesn’t have that rich, complex flavor that makes these bars so special.
Equipment Needed
You don’t need any fancy kitchen gadgets for these maple donut bars. Here’s what I actually use:
- 9×13-inch baking pan — This size is perfect for baking the bars evenly. I line mine with parchment paper for easy lifting.
- Mixing bowls — One for dry ingredients, one for wet. Nothing fancy, just sturdy and easy to mix in.
- Whisk and spatula — For combining ingredients smoothly. I prefer a silicone spatula for scraping every bit of batter.
- Measuring cups and spoons — Accuracy here makes a big difference in texture and flavor.
- Cooling rack — To let your bars cool completely before glazing.
- Small bowl and spoon — For mixing and drizzling the maple glaze.
Optional but nice to have:
- Electric mixer — I usually mix by hand, but a hand mixer speeds things up if you’re in a rush.
- Offset spatula — Helps spread the glaze evenly without making a mess.
How to Make Soft Baked Maple Donut Bars: Step-by-Step

Alright, let’s get these bars baking! I’m going to walk you through every step I take, including those little tricks that make a big difference in texture and flavor.
Step 1: Prep Your Pan and Ingredients (5 minutes)
Preheat your oven to 350°F (175°C). Line a 9×13-inch pan with parchment paper, leaving some overhang on the sides—this makes it easy to lift out the bars later. Measure out all your ingredients before you start mixing. Having everything ready keeps the process smooth.
Step 2: Mix Dry Ingredients (3 minutes)
In a large bowl, whisk together the flour, baking powder, salt, and cinnamon until evenly combined. This ensures your bars will have a consistent crumb and even rise.
Step 3: Combine Wet Ingredients (5 minutes)
In a separate bowl, whisk the melted butter and sugar until combined. Add the eggs one at a time, whisking well after each addition. Stir in the maple syrup and vanilla extract. Finally, whisk in the milk until smooth. The batter might look a bit thin, but that’s exactly what you want for a moist crumb.
Step 4: Combine Wet and Dry (2 minutes)
Pour the wet ingredients into the dry, and gently fold with a spatula until just combined. Don’t overmix—stop as soon as you don’t see dry flour. Overmixing will make the bars dense.
Step 5: Bake (25-30 minutes)
Pour the batter into your prepared pan and smooth the top with a spatula. Bake for 25 to 30 minutes, or until a toothpick inserted in the center comes out clean or with just a few moist crumbs. The top should be lightly golden and spring back when pressed. I’ve learned that opening the oven too early makes the bars sink, so be patient!
Step 6: Cool Completely (at least 30 minutes)
Remove the pan from the oven and place it on a wire rack. Let the bars cool completely before glazing. If you try to glaze warm bars, the glaze will melt right off.
Step 7: Make the Maple Glaze (5 minutes)
In a small bowl, whisk powdered sugar, ¼ cup pure maple syrup, and maple extract (if using) until smooth and pourable. If it’s too thick, add a teaspoon of milk at a time until it reaches drizzling consistency.
Step 8: Glaze and Serve (5 minutes)
Drizzle the maple glaze evenly over the cooled bars using a spoon or an offset spatula. Let the glaze set for about 10 minutes before slicing into squares. This glaze isn’t just for looks—it adds a sticky, sweet finish that takes these bars from good to unforgettable.
Expert Tips & Tricks
After making these bars dozens of times, here’s what I’ve learned to guarantee success:
- Use real maple syrup — It’s the heart of the flavor. I’ve tried maple-flavored syrups, and it’s just not the same.
- Don’t overmix the batter — Gently fold wet and dry ingredients to keep the crumb light and tender.
- Let bars cool completely — Otherwise, the glaze will slide right off or get too runny.
- Line the pan with parchment — This makes lifting the bars out a breeze and keeps the edges from sticking too much.
- Watch your baking time closely — Ovens vary, so start checking at 25 minutes. Underbaking leads to a gooey center; overbaking dries them out.
- Make the glaze just before using — Powdered sugar can clump if left too long, so whisk it fresh for the best texture.
- Store bars in an airtight container — They keep well at room temperature for 2 days, or in the fridge for up to 5.
Here’s a quick troubleshooting tip: if your bars come out dense or dry, try reducing the flour by a tablespoon next time and be extra gentle when mixing. For a glossier glaze, add a tablespoon of melted butter at the end of mixing.
Variations & Substitutions
Once you’ve nailed the basic recipe, you can switch things up in fun ways. I’ve tried all of these and loved how they each bring something new to the table.
- Maple Pecan Bars: Stir ½ cup chopped pecans into the batter before baking. The crunch pairs beautifully with the soft crumb.
- Apple Cinnamon: Fold in 1 cup peeled, diced apples and increase cinnamon to 1½ teaspoons for a cozy fall twist.
- Gluten-Free: Use a 1:1 gluten-free flour blend. The texture is slightly different but still delicious.
- Vegan: Swap eggs for flax eggs (2 tablespoons flaxseed meal + 6 tablespoons water) and use a plant-based milk and vegan butter.
- Chocolate Maple: Add ¼ cup cocoa powder to the dry ingredients and sprinkle mini chocolate chips on top before baking.
- Lemon Maple Glaze: Add 1 teaspoon lemon zest and a tablespoon lemon juice to the glaze for a bright finish.
If you’re curious about other cozy baked treats, you might enjoy my easy cinnamon donut bread recipe or, for savory inspiration, my creamy crockpot chicken tortellini soup—both are crowd-pleasers for different reasons.
Serving & Storage
These soft baked maple donut bars are perfect served fresh and slightly warm, but they also hold up beautifully for a day or two.
How to Serve
- Enjoy them as a breakfast treat with your morning coffee or tea.
- Serve as a sweet snack alongside a bowl of fresh fruit or yogurt.
- Bring them to brunch or a potluck for an easy-to-share dessert option.
- Top with chopped nuts or a sprinkle of flaky sea salt for a bit of texture contrast.
Storage Tips
- Room Temperature: Store in an airtight container for up to 2 days. Keep them covered to prevent drying out.
- Refrigerator: Can be stored for up to 5 days. Bring to room temperature or warm slightly before serving.
- Freezing: I don’t recommend freezing glazed bars because the texture and glaze suffer. You can freeze unglazed bars wrapped tightly for up to 2 months and glaze after thawing.
For reheating, a quick 15-second zap in the microwave or a few minutes in a low oven works wonders to bring back that soft, tender crumb.
Nutrition Information
I’m not a nutritionist, but here’s a rough breakdown per serving (assuming 12 bars):
| Calories | 220 |
|---|---|
| Protein | 3g |
| Carbohydrates | 32g |
| Fiber | 1g |
| Sugar | 15g |
| Fat | 8g |
| Saturated Fat | 5g |
| Cholesterol | 40mg |
| Sodium | 180mg |
What’s good here? You get a decent hit of energy from carbs and sugar, plus a little protein from eggs and butter. The fat mostly comes from butter, which adds flavor and that tender texture. If you want to lighten up, try using less sugar or swapping half the butter for applesauce (though the texture will change). Just remember—this is a treat worth savoring.
Final Thoughts
So that’s my go-to recipe for soft baked maple donut bars with a tender crumb and irresistible maple glaze. I know I’ve probably rambled on, but when you bake this many batches, there’s a lot of love and little secrets to share.
This recipe has saved my weekends more times than I can count, especially when I want that cozy, homemade vibe without spending hours in the kitchen. It’s easy enough for beginners but special enough to impress guests or make any morning feel indulgent.
Feel free to experiment! Try adding your favorite nuts, spices, or even a splash of bourbon in the glaze if you’re feeling adventurous. If you make these bars, please drop a comment and tell me how they turned out (or if you had any kitchen mishaps—I’ve been there!). There’s nothing better than swapping stories and tips.
Happy baking, and I hope your kitchen smells as amazing as mine does right now.
Frequently Asked Questions
Q: Can I use pancake syrup instead of real maple syrup?
A: I get it—sometimes you’re in a pinch. Pancake syrup can work in a bind, but it lacks the depth and richness of real maple syrup, which is why I always recommend using pure maple syrup if you can. The flavor difference is noticeable, especially in the glaze.
Q: My bars came out dry—what went wrong?
A: Dry bars usually mean overbaking or overmixing. Make sure to check for doneness starting at 25 minutes, and fold the batter gently to avoid toughening the crumb. Also, measuring flour correctly (spoon and level) helps prevent too much flour, which dries things out.
Q: Can I freeze these bars?
A: You can freeze the bars without glaze, tightly wrapped, for up to 2 months. Freeze them in a single layer, then add the glaze after thawing for the best texture and flavor. Freezing glazed bars often leads to a messy glaze that separates.
Q: How do I make the glaze thicker or thinner?
A: If your glaze is too thick, add milk a teaspoon at a time until it reaches a drizzle-able consistency. If it’s too thin, add a little more powdered sugar and whisk until smooth.
Q: Can I make these bars dairy-free?
A: Yes! Use a plant-based butter substitute and almond or oat milk in place of dairy milk. For the glaze, use powdered sugar and a little plant-based milk with pure maple syrup. The texture will be slightly different but still delicious.
Q: Do I have to use cinnamon?
A: Cinnamon adds warmth and pairs wonderfully with maple, but if you’re not a fan, you can omit it or replace it with a pinch of nutmeg or pumpkin pie spice for a different flavor profile.
Q: Can I double the recipe?
A: Absolutely! Just use a larger baking pan or two pans. Baking time stays roughly the same, but keep an eye on doneness with a toothpick test. Double batches are great for parties or meal prep.
Pin This Recipe!


Soft Baked Maple Donut Bars
- Total Time: 40-45 minutes
- Yield: 12 bars 1x
Description
These soft baked maple donut bars offer a tender crumb and a shiny maple glaze, delivering classic donut flavors without frying. Perfect for breakfast, snacks, or dessert, they are easy to make and bake in under 40 minutes.
Ingredients
- 2 cups (250g) all-purpose flour
- 2 teaspoons baking powder
- ½ teaspoon fine sea salt
- 1 teaspoon ground cinnamon
- ½ cup (115g) unsalted butter, melted
- ¾ cup (150g) granulated sugar
- 2 large eggs, room temperature
- ⅓ cup (80ml) pure maple syrup
- 1 teaspoon vanilla extract
- ¾ cup (180ml) whole milk or 2%
- 1 cup (120g) powdered sugar, sifted (for glaze)
- ¼ cup pure maple syrup (for glaze)
- ½ teaspoon maple extract (optional, for glaze)
Instructions
- Preheat oven to 350°F (175°C). Line a 9×13-inch baking pan with parchment paper, leaving overhang for easy lifting.
- In a large bowl, whisk together flour, baking powder, salt, and cinnamon until evenly combined.
- In a separate bowl, whisk melted butter and granulated sugar until combined. Add eggs one at a time, whisking well after each addition.
- Stir in maple syrup and vanilla extract, then whisk in milk until smooth.
- Pour wet ingredients into dry ingredients and gently fold with a spatula until just combined. Do not overmix.
- Pour batter into prepared pan and smooth the top with a spatula.
- Bake for 25 to 30 minutes, or until a toothpick inserted in the center comes out clean or with a few moist crumbs. The top should be lightly golden and spring back when pressed.
- Remove from oven and place pan on a wire rack. Let bars cool completely (at least 30 minutes) before glazing.
- In a small bowl, whisk powdered sugar, ¼ cup maple syrup, and maple extract (if using) until smooth and pourable. Add milk teaspoon by teaspoon if glaze is too thick.
- Drizzle glaze evenly over cooled bars using a spoon or offset spatula. Let glaze set for about 10 minutes before slicing into squares.
Notes
Use real pure maple syrup for best flavor. Do not overmix batter to keep crumb tender. Let bars cool completely before glazing to prevent glaze from melting off. Store bars in an airtight container at room temperature for up to 2 days or in the refrigerator for up to 5 days. Freeze unglazed bars for up to 2 months and glaze after thawing.
- Prep Time: 15 minutes
- Cook Time: 25-30 minutes
- Category: Dessert
- Cuisine: American
Nutrition
- Serving Size: 1 bar
- Calories: 220
- Sugar: 15
- Sodium: 180
- Fat: 8
- Saturated Fat: 5
- Carbohydrates: 32
- Fiber: 1
- Protein: 3
Keywords: maple donut bars, baked donut bars, soft donut bars, maple glaze, easy breakfast bars, tender crumb bars