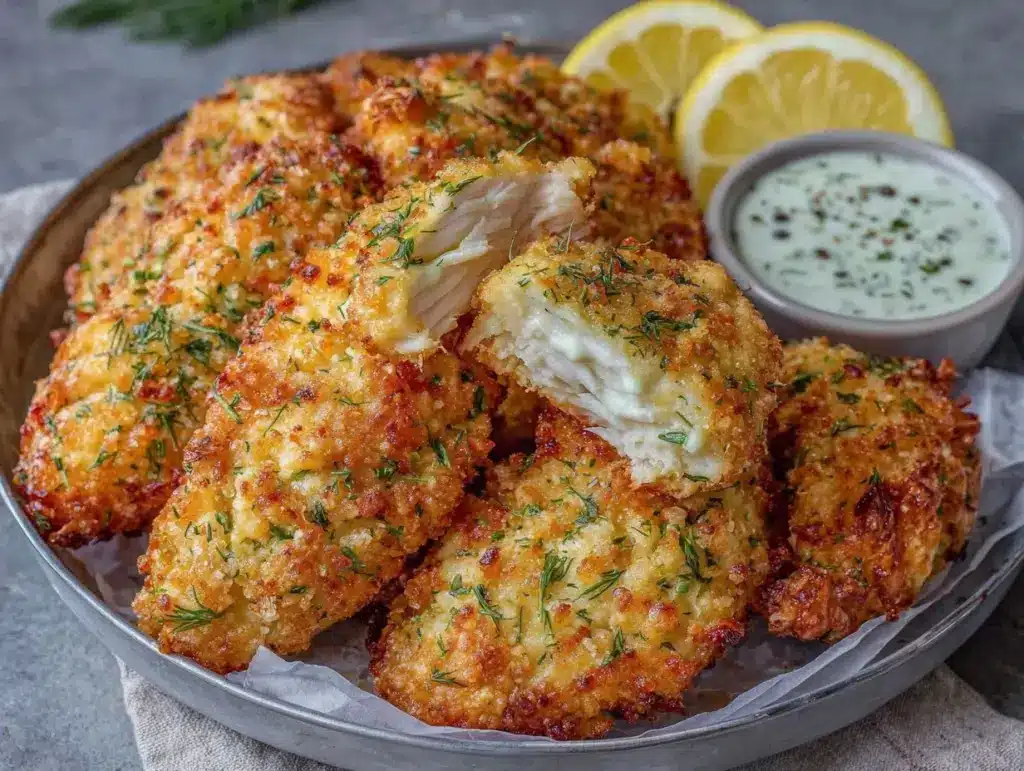
One night last month, I was scrambling to get dinner ready after a long day, and all I had was some chicken breasts and a craving for something crispy and comforting. I didn’t want the hassle of frying or the mess of too many dishes. So, I threw together this crispy oven baked chicken tenders recipe, thinking it might be just okay. Spoiler alert: it ended up being a total game-changer. Crispy on the outside, juicy on the inside, and hands-down perfect for busy weeknights when you want tasty food without spending hours in the kitchen.
After testing this recipe at least a dozen times (because you know I’m picky about my chicken tenders), I nailed the perfect balance of crunch and flavor—all from the oven. No deep fryer, no oil splatters, no guilt. It’s become our family’s go-to, especially on those nights when I want something easy but still crave that satisfying crunch. If you’ve been avoiding oven-baked chicken tenders because you think they’ll be soggy or bland, trust me, this one will change your mind.
Plus, it’s flexible enough to dress up or keep simple depending on what you have in the pantry. I’ll walk you through all the tips and tricks to get that perfect crisp every time, and a few ways to customize it too. Ready to make your weeknight dinners way easier? Let’s dive into this crispy oven baked chicken tenders recipe that’s simple, delicious, and just plain fun to eat.
Why You’ll Love This Recipe
This crispy oven baked chicken tenders recipe has totally simplified my weeknight cooking, and here’s why it’s probably going to be your new favorite too.
- Super Crispy Without Frying — Oven baking means less mess, less oil, and still that crave-worthy crunch. I’ve tested frying, air frying, and baking, and this method gives the best crisp texture without the hassle.
- Juicy and Tender Inside — The coating keeps the chicken juicy while crisping up outside. I’ve made this with both chicken breasts and tenders, and the results are consistently juicy.
- Easy Weeknight Winner — Takes about 30 minutes from start to finish, with only 10 minutes of hands-on prep. Perfect when you’re juggling work, homework, and everything else.
- Kid-Approved (and Adult-Approved!) — My picky eaters devour these tenders, and my husband requests them regularly. Bonus: they’re great for dipping in all your favorite sauces.
- Pantry Staples — Most of the ingredients are probably already in your kitchen. I always have panko, eggs, and basic spices on hand just for this.
- Customizable — Want spicy? Toss in some cayenne. Need gluten-free? Swap the panko for almond flour. I’ll share my favorite variations below.
This recipe has saved me more than once when dinner felt overwhelming. It’s reliable, straightforward, and delivers that crispy, comforting bite we all crave on busy nights.
Ingredients You’ll Need
Here’s the thing: this list might look a little long, but it’s mostly pantry basics you probably already have. I’m pretty particular about a few key ingredients that really make the coating crisp and flavorful, and I’ll point those out as we go.
- Chicken tenders (1.5 pounds / about 680g) — You can use chicken breast strips if you don’t find tenders. Just slice breasts into 1-inch strips.
- Panko breadcrumbs (1.5 cups / 150g) — This is the secret to that extra crunch. Regular breadcrumbs work but don’t get quite as crispy.
- All-purpose flour (½ cup / 60g) — Helps the coating stick. You can substitute gluten-free flour if needed.
- Parmesan cheese (¼ cup / 25g, finely grated) — Adds a savory depth and helps with crispiness. Freshly grated is best.
- Garlic powder (1 teaspoon) — For that subtle garlicky flavor without overpowering.
- Onion powder (1 teaspoon) — Balances the garlic and adds sweetness.
- Smoked paprika (1 teaspoon) — Adds mild smoky warmth. You can swap for regular paprika if you prefer.
- Salt (1 teaspoon) — Essential for flavor. Adjust to taste.
- Black pepper (½ teaspoon) — Freshly cracked if possible.
- Eggs (2 large) — Acts as the glue for the coating. I always beat them well before dipping.
- Olive oil or melted butter (2 tablespoons / 30ml) — Drizzled over the tenders before baking to encourage browning and crispiness.
Optional add-ins:
- Cayenne pepper (½ teaspoon) — For a little heat.
- Dijon mustard (1 tablespoon) — Mix into eggs for tangy flavor.
- Fresh herbs (1 tablespoon chopped parsley or thyme) — Adds freshness.
Quick note: I keep a pack of Parmesan cheese in the fridge just for recipes like this. It melts beautifully and adds so much flavor.
Equipment Needed
You don’t need anything fancy for these crispy oven baked chicken tenders. Here’s what I use every time:
- Baking sheet — A rimmed sheet pan works best to catch drips. I line mine with parchment paper for easy cleanup.
- Wire rack — Placing the tenders on a wire rack on top of the baking sheet lets air circulate underneath, so they crisp all over instead of steaming on the bottom. If you don’t have one, just use the baking sheet but flip halfway through baking.
- Three shallow bowls or plates — For your flour, egg wash, and breadcrumb mix. Makes the dredging process a breeze.
- Whisk or fork — To beat the eggs and mix the coatings.
- Tongs — Helpful for dipping and turning the tenders without making a mess.
- Measuring cups and spoons — For precise seasoning and coating ratios.
If you don’t have a wire rack, no worries. I’ve baked tenders directly on parchment-lined pans and just flipped them halfway through. It’s not quite as crispy underneath, but still delicious.
How to Make It: Step-by-Step

Alright, here’s the full breakdown of making these crispy oven baked chicken tenders. I’m sharing every little trick that helped me perfect this recipe.
Step 1: Prep Your Ingredients (10 minutes)
Start by preheating your oven to 425°F (220°C). Line a baking sheet with parchment paper and set a wire rack on top if you have one. This combo is key for that crispy finish.
Pat your chicken tenders dry with paper towels—dry chicken means better coating adhesion. Set up your dredging station: one bowl with flour (seasoned lightly with salt and pepper if you want), one with beaten eggs (add Dijon mustard here if using), and one with the panko, Parmesan, garlic powder, onion powder, smoked paprika, salt, and pepper mixed together.
Step 2: Coat the Chicken (8-10 minutes)
Working one at a time, dredge each tender in the flour, shaking off excess, then dip into the egg, letting the excess drip off. Finally, press the tender into the panko mixture, making sure it’s fully coated and pressing gently so the crumbs stick well.
Place the coated tenders on the wire rack or directly on the parchment-lined sheet, spacing them out so they don’t touch. This helps them crisp evenly.
Step 3: Drizzle with Oil and Bake (15-18 minutes)
Drizzle olive oil or melted butter evenly over the tenders. This little step helps the coating brown and crisp up in the oven.
Bake in the preheated oven for 15 minutes, then flip each tender carefully and bake another 5-8 minutes until golden brown and cooked through. The internal temperature should reach 165°F (74°C).
You’ll know they’re done when they’re beautifully golden with a firm, crispy crust and the chicken is juicy inside. If you don’t have a wire rack, flip halfway through for even browning.
Step 4: Serve Immediately
Serve hot with your favorite dipping sauces. I’m obsessed with honey mustard and classic ranch, but barbecue or even a spicy aioli work great too.
These tenders pair wonderfully with a simple green salad or some crunchy cucumber salad for freshness.
Expert Tips & Tricks
- Dry chicken is your friend. Patting the tenders dry before coating helps the flour and crumbs stick better, which means crispier results.
- Use panko breadcrumbs. They’re coarser and lighter than regular breadcrumbs, so they crisp up beautifully in the oven.
- Don’t skip the wire rack. It’s a small step that makes a huge difference by letting air circulate all around the tenders for even crisping.
- Drizzle oil or butter. It might seem minor, but a little fat helps the crust turn golden and crunchy instead of dull and dry.
- Season every layer. I season the flour, egg, and crumb mixture lightly to build flavor in every bite.
- Flip halfway through baking. Even with a wire rack, flipping ensures perfect color and texture on both sides.
- Customize your coating. For a flavorful twist, try mixing in some Parmesan or herbs like oregano or thyme into your panko.
- Make it ahead. You can prep the coated tenders and refrigerate them for a few hours before baking. Just add a couple extra minutes to the cook time.
Quick tip: I once forgot to flip my tenders halfway through baking and they were crispy on top but a little soggy underneath. Don’t make my mistake—flip ‘em!
Variations & Substitutions
Once you’ve nailed this basic crispy oven baked chicken tenders recipe, there’s plenty of ways to mix it up and keep dinner interesting.
Spicy Buffalo
Add 1 teaspoon cayenne pepper to the panko mix and serve with blue cheese dressing and celery sticks. Bonus: toss cooked tenders in buffalo sauce for full flavor.
Herb-Crusted
Mix fresh chopped herbs like parsley, thyme, and rosemary into the panko and Parmesan for a fragrant, fresh twist. Works great alongside herb-crusted chicken if you want more ideas.
Gluten-Free
Swap panko for crushed gluten-free crackers or almond flour. Make sure your flour is gluten-free too. The texture will be slightly different but still delicious.
Dairy-Free
Leave out the Parmesan or substitute with nutritional yeast for a cheesy flavor. Use olive oil instead of butter for drizzling.
Chicken Strip Salad
Slice leftover tenders over mixed greens with cherry tomatoes and a tangy vinaigrette for a quick Mediterranean-inspired bowl.
Serving & Storage
Serving Ideas: I usually serve these tenders straight off the rack with dipping sauces on the side. They go perfectly with a crisp green salad, roasted veggies, or even a side of creamy mac and cheese like the queso mac recipe when I want extra indulgence.
Storing Leftovers: Store any leftovers in an airtight container in the fridge for up to 3 days. The tenders will soften a bit, so I recommend reheating them in a hot oven or toaster oven at 400°F (200°C) for 5-7 minutes to bring back the crisp.
Reheating Tips: Avoid microwaving if you want to keep that crunch. If you have to microwave, do short bursts and then finish in the oven or a hot skillet with a bit of oil.
Freezing: You can freeze cooked tenders for up to 2 months. Reheat them in the oven straight from frozen, adding a few extra minutes to the cooking time.
Nutrition Information
I’m not a nutritionist, but here’s a rough breakdown per serving (based on 4 servings):
| Calories | 350 |
|---|---|
| Protein | 35g |
| Carbohydrates | 20g |
| Fiber | 1.5g |
| Sugar | 2g |
| Fat | 12g |
| Saturated Fat | 4g |
| Cholesterol | 110mg |
| Sodium | 500mg |
| Calcium | 120mg |
This recipe packs a good amount of protein and is moderately low in carbs, making it a satisfying and balanced meal. The fat mainly comes from the olive oil and Parmesan, so it feels indulgent without going overboard. Adding a side of veggies or a salad will boost the fiber and nutrients.
When I’m aiming for lighter, I sometimes swap olive oil for cooking spray and serve with a big fresh salad like Greek potato salad to round it out.
Final Thoughts
So there you have it—my go-to crispy oven baked chicken tenders recipe that’s become a lifesaver for easy weeknight meals. I’ve made these tenders so many times I’ve lost count, and each batch gets better as I tweak the seasoning and baking time.
This recipe hits that perfect balance between crispy and juicy without the fuss of frying. It’s simple enough to make on a hectic weeknight, kid-friendly enough to please even the pickiest eaters, and versatile enough to keep things interesting with different seasonings and dips.
Give it a try, and let it turn your dinner stress into dinner success. And hey, if you want to add some extra flavor or side ideas, check out my Cajun crispy chicken sandwich or the creamy smothered cheesy sour cream chicken for more inspiration.
If you make these tenders, please drop a comment and tell me how it went! I love hearing your tweaks, favorite dips, and even the “oops” moments. That’s how we all get better in the kitchen.
Happy cooking! May your oven baked chicken tenders always come out crispy and your weeknights a little easier.
Frequently Asked Questions
Q: Can I use chicken breasts instead of tenders?
A: Absolutely! Just slice boneless, skinless chicken breasts into 1-inch strips. The cooking time stays about the same, but keep an eye on them to avoid overcooking. The tenders just save time because they’re already perfectly portioned.
Q: How do I keep the coating from falling off?
A: Patting the chicken dry before coating and pressing the panko mixture firmly onto each piece helps a lot. Also, make sure to dredge in flour first and shake off excess, then dip in beaten egg before coating. This three-step process creates a sturdy crust.
Q: Can I make these ahead of time and bake later?
A: Yep! Coat the tenders and place them on a baking sheet covered with plastic wrap in the fridge for up to 24 hours. When ready to bake, just add a few extra minutes to the cooking time. This is great for meal prep or busy days.
Q: What dipping sauces go best with these chicken tenders?
A: The classics like honey mustard, ranch, and barbecue are always winners. For a little kick, try sriracha mayo or garlic aioli. I also love serving them with a fresh cucumber salad for a refreshing balance.
Q: Can I freeze the cooked tenders?
A: Yes, freeze cooked tenders in a single layer on a baking sheet, then transfer to a freezer bag for up to 2 months. Reheat in the oven straight from frozen at 400°F (200°C) for about 10-12 minutes, flipping halfway, to bring back the crunch.
Q: Why are my tenders sometimes soggy?
A: Usually it’s because they’re crowded on the baking sheet or there’s no wire rack to let air circulate. Make sure to space them out and flip halfway through baking. Also, drizzling oil or butter over the tenders before baking helps crisp the coating.
Q: Can I make this recipe gluten-free?
A: Definitely! Use gluten-free panko or crushed gluten-free crackers and swap the all-purpose flour for a gluten-free alternative. Season everything the same way for great flavor.
Pin This Recipe!


Crispy Oven Baked Chicken Tenders
- Total Time: 30-33 minutes
- Yield: 4 servings 1x
Description
A simple and delicious recipe for crispy oven baked chicken tenders that are juicy inside and crunchy outside, perfect for easy weeknight meals without frying.
Ingredients
- 1.5 pounds chicken tenders (about 680g) or chicken breast strips sliced into 1-inch strips
- 1.5 cups panko breadcrumbs (150g)
- ½ cup all-purpose flour (60g), or gluten-free flour as substitute
- ¼ cup Parmesan cheese, finely grated (25g)
- 1 teaspoon garlic powder
- 1 teaspoon onion powder
- 1 teaspoon smoked paprika
- 1 teaspoon salt, adjust to taste
- ½ teaspoon black pepper, freshly cracked if possible
- 2 large eggs, beaten
- 2 tablespoons olive oil or melted butter (30ml)
- Optional add-ins:
- ½ teaspoon cayenne pepper
- 1 tablespoon Dijon mustard (to mix into eggs)
- 1 tablespoon fresh herbs (chopped parsley or thyme)
Instructions
- Preheat oven to 425°F (220°C). Line a baking sheet with parchment paper and place a wire rack on top if available.
- Pat chicken tenders dry with paper towels to ensure better coating adhesion.
- Set up three shallow bowls: one with flour (seasoned lightly with salt and pepper if desired), one with beaten eggs (add Dijon mustard if using), and one with a mixture of panko, Parmesan, garlic powder, onion powder, smoked paprika, salt, and pepper.
- Dredge each chicken tender first in the flour, shaking off excess, then dip into the egg mixture, letting excess drip off.
- Press the tender into the panko mixture, ensuring it is fully coated and pressing gently so crumbs stick well.
- Place coated tenders on the wire rack or directly on the parchment-lined baking sheet, spacing them so they do not touch.
- Drizzle olive oil or melted butter evenly over the tenders to encourage browning and crispiness.
- Bake for 15 minutes, then carefully flip each tender and bake for an additional 5-8 minutes until golden brown and cooked through (internal temperature 165°F / 74°C).
- If no wire rack is used, flip tenders halfway through baking for even crisping.
- Serve immediately with your favorite dipping sauces.
Notes
[‘Pat chicken dry before coating for better adhesion and crispiness.’, ‘Use panko breadcrumbs for extra crunch.’, ‘A wire rack helps air circulate for even crisping; if unavailable, flip tenders halfway through baking.’, ‘Drizzle oil or melted butter before baking to promote browning.’, ‘Season each coating layer for maximum flavor.’, ‘Coated tenders can be refrigerated for up to 24 hours before baking; add a few extra minutes to cook time.’, ‘Freeze cooked tenders for up to 2 months; reheat in oven from frozen adding a few extra minutes.’, ‘Avoid microwaving leftovers to maintain crispiness; reheat in oven or skillet instead.’]
- Prep Time: 10 minutes
- Cook Time: 20-23 minutes
- Category: Main Course
- Cuisine: American
Nutrition
- Serving Size: About 4-5 chicken te
- Calories: 350
- Sugar: 2
- Sodium: 500
- Fat: 12
- Saturated Fat: 4
- Carbohydrates: 20
- Fiber: 1.5
- Protein: 35
Keywords: crispy chicken tenders, oven baked chicken, easy weeknight meal, chicken recipe, healthy chicken tenders, baked chicken strips