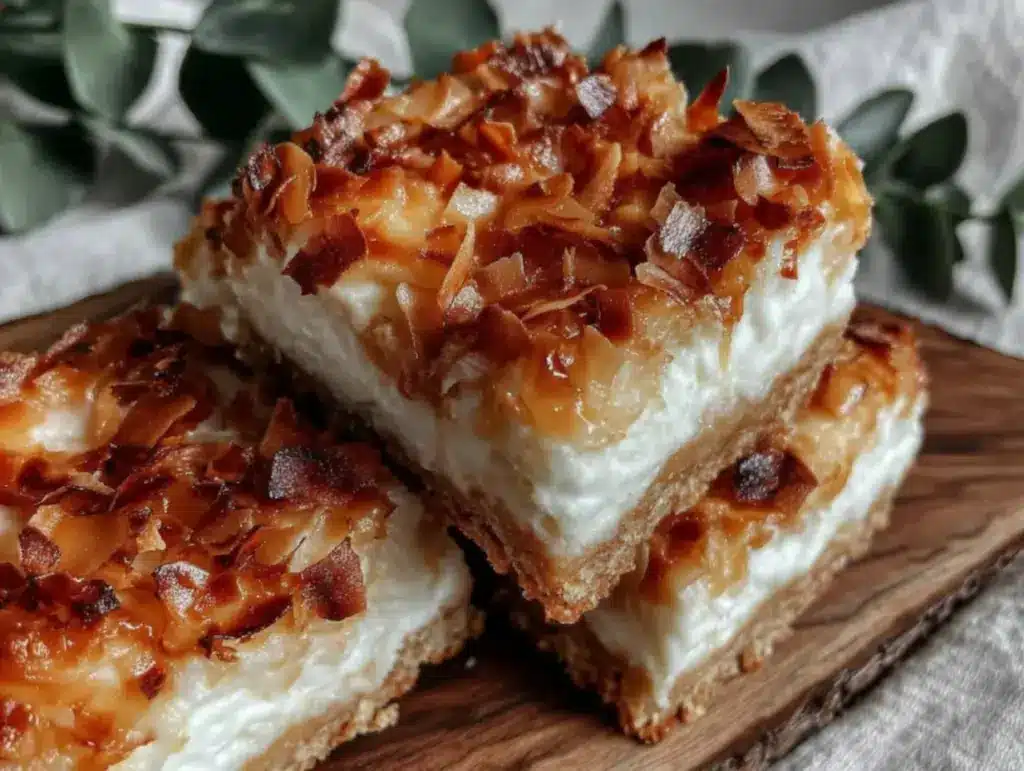
One humid summer afternoon, I found myself craving something sweet but light enough to handle the heat. I remembered a dusty old recipe card tucked away in my mom’s cookbook—a coconut cream bar that promised a tender, golden crust and a creamy coconut filling that melts in your mouth. I decided to give it a shot, mostly because I had a bag of shredded coconut begging to be used.
What happened next? Well, I burned the first batch (rookie mistake: too hot oven), but the second time around, these Coconut Cream Dream Bars with a Tender, Golden Crust came out so good that my family swooped in and devoured the whole pan in a day. Since then, I’ve made these bars a dozen times, tweaking the crust and filling to find that perfect balance of flaky, sweet, and creamy. They’re now my secret weapon when I want a dessert that’s impressive but far from complicated.
The best part? This recipe doesn’t require fancy ingredients or hours in the kitchen. It’s straightforward, uses pantry staples, and bakes up with a golden crust that’s both tender and just a little crisp at the edges. If you love coconut or just want to try a dreamy, homemade treat, you’re going to want to keep reading.
Why You’ll Love This Recipe
This recipe has totally changed my dessert game. Here’s why I keep coming back to these coconut cream dream bars:
- Tender, Golden Crust That Melts in Your Mouth — After some trial and error, I nailed the crust texture: flaky but soft, with a beautiful golden color that makes every bite feel special.
- Rich, Creamy Coconut Filling — The filling is silky smooth without being too sweet or heavy. It’s like a coconut custard but easier and more forgiving.
- Simple Ingredients, Big Flavor — No exotic coconut extracts or fancy dairy needed. You’ll mostly use pantry staples and canned coconut milk, which I always keep on hand.
- Perfect for Any Occasion — Whether it’s a casual family dessert or a treat for guests, these bars impress without stress. I’ve brought them to summer potlucks and cozy weekend dinners alike.
- Make-Ahead Friendly — You can bake these a day ahead—flavors deepen, and the crust stays tender. Great for prepping before busy days.
Honestly, these bars have saved me more than once when I needed a quick homemade treat that feels indulgent but doesn’t require me to baby the oven or fuss over too many steps. They’re a dream come true for coconut lovers and anyone who appreciates a good, buttery crust.
Ingredients You’ll Need
Here’s the thing: this list might look a little long at first glance, but almost everything is something you probably already have in your kitchen.
I’ll break down the key ingredients and why I use them, plus some substitutions if you want to mix it up.
- All-Purpose Flour (1 ½ cups / 190g) — The base of the crust. I use unbleached flour for a better texture. You can swap for gluten-free 1:1 flour if needed, but expect a slightly different crust.
- Granulated Sugar (½ cup / 100g) — Sweetens the crust and filling. I sometimes use coconut sugar for a deeper flavor, but granulated is classic and reliable.
- Unsalted Butter (½ cup / 115g, cold, cut into cubes) — This is what makes the crust tender and flaky. Cold butter, not melted, is crucial here.
- Salt (¼ teaspoon) — Balances the sweetness and enhances all the flavors.
- Canned Coconut Milk (1 cup / 240ml, full fat) — The star of the filling. Full-fat coconut milk gives that rich, creamy texture. Don’t use the watery stuff from the fridge shelf if you can help it.
- Eggs (2 large) — They bind the filling and help it set nicely without being rubbery.
- Shredded Sweetened Coconut (1 cup / 80g) — Adds texture and coconut flavor. I prefer sweetened for a little extra punch, but unsweetened works if you want less sugar.
- Vanilla Extract (1 teaspoon) — Brings warmth and depth to the filling.
- Powdered Sugar (optional, for dusting) — I love a light dusting on top once cooled for a pretty finish.
Pro tip: I always use a good quality vanilla extract because it really makes a difference—cheap vanilla can taste flat here. Also, if you want to make these vegan, swap eggs for flax eggs and use a vegan butter substitute.
Equipment Needed
You don’t need much to make these bars, and no fancy gadgets, either.
- 9×9-inch Baking Pan — I use a glass or metal pan with sides. Makes it easy to get those perfectly square bars.
- Mixing Bowls — One for the crust and one for the filling. I keep these simple.
- Pastry Cutter or Fork — For cutting the butter into the flour. You can also use your fingers if you don’t have one, but don’t overwork the dough.
- Whisk — To mix the filling ingredients until smooth.
- Measuring Cups and Spoons — Standard stuff. I recommend weighing flour for precision if you can.
- Spatula or Spoon — For spreading the filling evenly over the crust.
Honestly, I’ve made these bars in everything from my trusty old metal pan to a fancy ceramic dish, and they’ve turned out great every time. No need to stress about equipment.
How to Make It: Step-by-Step

Alright, let’s get to the good stuff. Here’s exactly how I make these Coconut Cream Dream Bars, including tips so you don’t end up with a burnt crust like I did the first time.
Step 1: Prep the Crust (10 minutes)
Preheat your oven to 350°F (175°C). In a mixing bowl, combine the all-purpose flour, granulated sugar, and salt. Add the cold butter cubes and use a pastry cutter or your fingers to work the butter into the flour until the mixture looks like coarse crumbs with some pea-sized pieces. Don’t overmix — those little butter bits are what make the crust tender and flaky.
Press this mixture evenly into your greased 9×9-inch baking pan, making sure to compact it well. You want a firm, even base.
Step 2: Bake the Crust (15 minutes)
Pop the crust into the oven and bake for about 15 minutes, or until it’s just turning golden around the edges. It shouldn’t be fully brown; you want it to finish baking under the filling later. Remove from the oven and set aside while you prepare the filling.
Step 3: Make the Coconut Cream Filling (5 minutes)
In a medium bowl, whisk together the eggs, sugar, vanilla extract, and full-fat coconut milk until smooth. Stir in the shredded coconut.
Make sure the coconut milk is well mixed (sometimes it separates in the can), so your filling is creamy and consistent.
Step 4: Assemble and Bake (30-35 minutes)
Pour the filling evenly over the warm crust. Spread gently with a spatula if needed. Return the pan to the oven and bake for 30 to 35 minutes, or until the filling is set but still slightly jiggly in the center. It will firm up as it cools.
You’ll know it’s done when the edges are golden and the center doesn’t look wet or raw.
Step 5: Cool and Serve (at least 1 hour)
This is the hardest part — let the bars cool completely at room temperature, then pop them in the fridge for at least an hour to fully set. When chilled, cut into squares and, if you want, dust with powdered sugar before serving.
The crust will be tender, the filling creamy and rich, and every bite will taste like a little tropical vacation.
Expert Tips & Tricks
- Don’t skip chilling before cutting — The filling is delicate and can be messy if you cut too soon. Patience pays off.
- Use cold butter — Warm or melted butter ruins the crust texture every time. Keep it cold, and don’t overwork the dough.
- Full-fat coconut milk is key — It’s what gives this recipe its creamy, rich texture. Light coconut milk won’t cut it.
- Press the crust firmly — I use the bottom of a glass to get an even layer. A crumbly crust is no fun.
- Try toasting the shredded coconut — If you want extra coconut flavor and crunch, toast the coconut separately until golden and sprinkle some on top before baking.
- Keep an eye on your oven — Every oven is different. If the crust edges brown too fast, cover loosely with foil.
These tips have saved me from multiple baking disasters and turned this recipe into a reliable favorite.
Variations & Substitutions
Once you’ve nailed the basic recipe, feel free to mix it up. Here are some variations I’ve tried (and loved):
- Tropical Twist — Add ½ cup chopped pineapple or mango chunks to the filling for extra fruity brightness.
- Chocolate Coconut Bars — Sprinkle mini chocolate chips on the crust before adding the filling. Chocolate and coconut are a classic combo.
- Lime Zest — Add 1 teaspoon of lime zest to the filling for a zesty lift. It pairs beautifully with coconut.
- Vegan Option — Use flax eggs (2 tablespoons ground flaxseed + 6 tablespoons water, set for 5 mins) and vegan butter. Use a plant-based milk alternative but make sure it’s thick, like canned coconut cream.
- Gluten-Free Crust — Substitute the flour with a gluten-free all-purpose blend. I recommend adding 1 teaspoon xanthan gum if your blend doesn’t contain it.
Serving & Storage
These bars are best served chilled straight from the fridge. They’re perfect on their own or with a dollop of whipped cream or a scoop of vanilla ice cream for extra indulgence.
For a tropical-themed gathering, serve alongside fresh fruit or a light lemon chicken romano dinner for a refreshing finish.
Storage: Keep leftover bars in an airtight container in the fridge for up to 4 days. They hold up well and the flavors deepen over time.
Reheat? Nah, these are best cold or at room temperature. If you must warm them, a few seconds in the microwave works, but you lose that tender crust texture a bit.
These bars don’t freeze well because the coconut cream filling can separate, so I recommend making them fresh or enjoying leftovers within a few days.
Nutrition Information
| Nutrient | Per Serving (based on 12 servings) |
|---|---|
| Calories | 210 |
| Protein | 3g |
| Carbohydrates | 22g |
| Fiber | 1g |
| Sugar | 13g |
| Fat | 11g |
| Saturated Fat | 9g |
| Cholesterol | 40mg |
| Sodium | 55mg |
| Calcium | 40mg |
Look, these bars are a treat, not a diet food. The calories mainly come from the butter and coconut milk fat, which give them that dreamy texture. If you want to lighten them up, try the vegan or lighter coconut milk options and load up on fresh fruit alongside your serving.
Final Thoughts
So that’s my Coconut Cream Dream Bars with a Tender, Golden Crust recipe! I know I’ve probably filled your head with enough baking tips to last a lifetime, but when a recipe becomes a kitchen staple, there’s a lot to say.
These bars have been my go-to sweet treat when I want something homemade but not complicated. They pair perfectly with a relaxed dinner like creamy smothered chicken and rice, which my family also adores. Together, they make an easy, comforting meal that feels a little special.
Make these bars your own. Add a sprinkle of toasted coconut, a touch of citrus zest, or a handful of chocolate chips if you like. This recipe is forgiving and flexible—just like good baking should be.
If you give these bars a try, leave a comment to tell me how they turned out or if you put your own spin on them. I’m always here to help if you hit any bumps along the way.
Happy baking! And I hope your kitchen smells as heavenly as mine does right now.
Frequently Asked Questions
Q: Can I use light coconut milk instead of full-fat?
A: You can, but the filling won’t be as creamy or rich. Full-fat coconut milk is what gives these bars that signature silky texture. If you only have light, you might want to add a tablespoon of cornstarch to help thicken the filling.
Q: My crust was crumbly and fell apart. What went wrong?
A: Most likely, the butter wasn’t cold enough or the crust wasn’t pressed firmly into the pan. Use cold butter straight from the fridge and press the dough evenly and firmly into the pan before baking. Also, don’t overwork the dough, or it can become tough.
Q: Can I make this recipe gluten-free?
A: Absolutely! Use a gluten-free all-purpose flour blend that includes xanthan gum for best results. The crust texture will be slightly different but still delicious.
Q: How long can I store these bars?
A: Store them in an airtight container in the fridge for up to 4 days. They actually taste better after a day or two when the flavors meld. Just resist the urge to cut them too soon after baking—they need time to set.
Q: Can I freeze Coconut Cream Dream Bars?
A: I don’t recommend freezing these bars because the coconut cream filling tends to separate when thawed, which affects texture and taste. It’s best to enjoy them fresh or refrigerated.
Q: What’s the best way to cut these bars cleanly?
A: Use a sharp knife and wipe it clean between cuts. For extra clean slices, chill the bars thoroughly before cutting and run the knife under hot water, drying it well before slicing.
Q: Can I add other flavors to the filling?
A: Definitely! Lime or lemon zest, a splash of rum extract, or even a teaspoon of almond extract can add unique twists. Just don’t overpower the coconut—it’s the star here.
Pin This Recipe!


Coconut Cream Dream Bars
- Total Time: 1 hour 15 minutes
- Yield: 12 servings 1x
Description
Tender, golden crust bars with a rich, creamy coconut filling that melts in your mouth. Easy to make with pantry staples and perfect for any occasion.
Ingredients
- 1 ½ cups (190g) all-purpose flour (unbleached recommended)
- ½ cup (100g) granulated sugar
- ½ cup (115g) unsalted butter, cold and cut into cubes
- ¼ teaspoon salt
- 1 cup (240ml) canned full-fat coconut milk
- 2 large eggs
- 1 cup (80g) shredded sweetened coconut
- 1 teaspoon vanilla extract
- Powdered sugar (optional, for dusting)
Instructions
- Preheat oven to 350°F (175°C). In a mixing bowl, combine flour, granulated sugar, and salt.
- Add cold butter cubes and use a pastry cutter or fingers to work butter into flour until mixture resembles coarse crumbs with some pea-sized pieces. Do not overmix.
- Press mixture evenly and firmly into a greased 9×9-inch baking pan to form the crust.
- Bake crust for 15 minutes or until edges are just turning golden. Remove from oven and set aside.
- In a medium bowl, whisk together eggs, sugar, vanilla extract, and full-fat coconut milk until smooth.
- Stir in shredded coconut, ensuring coconut milk is well mixed for a creamy filling.
- Pour filling evenly over the warm crust and spread gently with a spatula if needed.
- Bake for 30 to 35 minutes until filling is set but slightly jiggly in the center. Edges should be golden and center not wet.
- Cool bars completely at room temperature, then refrigerate for at least 1 hour to fully set.
- Cut into squares and dust with powdered sugar if desired before serving.
Notes
[‘Use cold butter and do not overwork the dough to ensure a tender, flaky crust.’, ‘Full-fat coconut milk is essential for a rich, creamy filling.’, ‘Chill bars thoroughly before cutting to avoid messy slices.’, ‘Toasted shredded coconut can be sprinkled on top before baking for extra flavor and crunch.’, ‘If crust edges brown too quickly, cover loosely with foil during baking.’, ‘For vegan option, substitute eggs with flax eggs and use vegan butter and thick plant-based milk like canned coconut cream.’, ‘For gluten-free crust, use a gluten-free all-purpose flour blend with xanthan gum.’]
- Prep Time: 15 minutes
- Cook Time: 45 minutes
- Category: Dessert
- Cuisine: American
Nutrition
- Serving Size: 1 bar (1/12 of recip
- Calories: 210
- Sugar: 13
- Sodium: 55
- Fat: 11
- Saturated Fat: 9
- Carbohydrates: 22
- Fiber: 1
- Protein: 3
Keywords: coconut bars, coconut cream bars, dessert bars, easy dessert, homemade bars, coconut dessert, golden crust bars