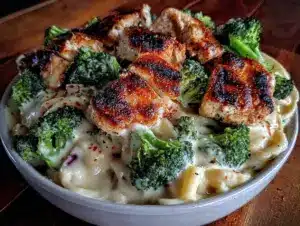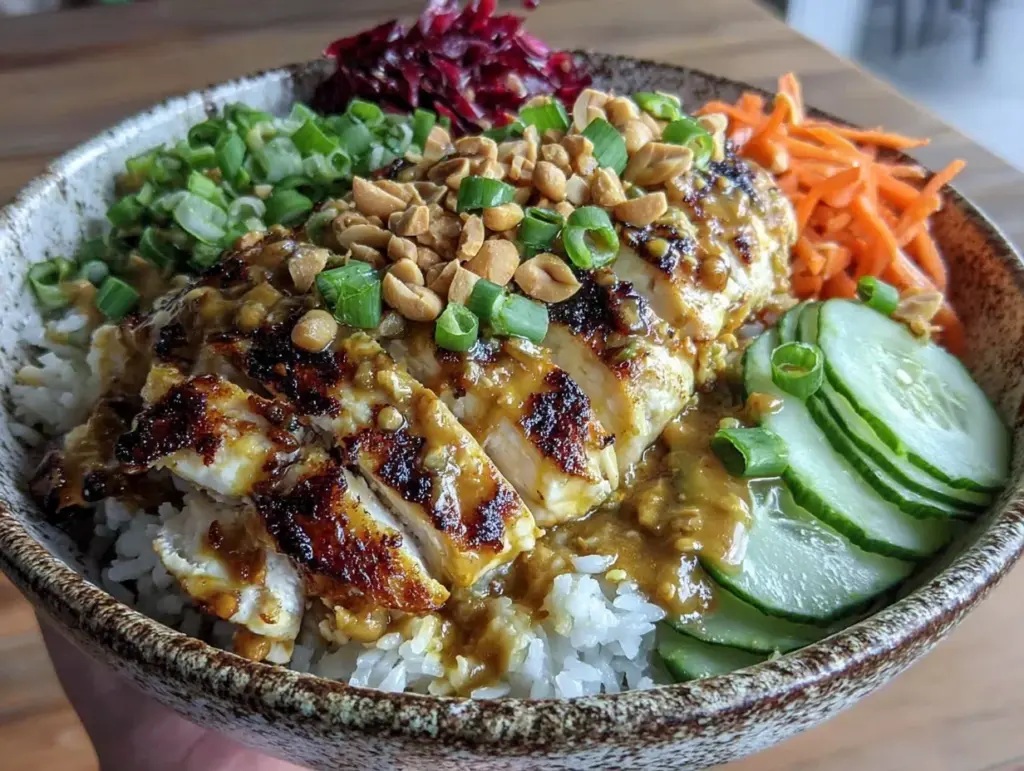
One rainy Thursday afternoon, I found myself craving something fresh but satisfying for lunch. The usual sandwiches and salads felt uninspired, and I didn’t want to spend hours in the kitchen. That’s when I threw together this Thai Peanut Chicken Buddha Bowl on a whim, using what I had in the fridge and pantry. The vibrant colors, the creamy peanut sauce with a hint of spice, and the perfect balance of protein and veggies all came together to create a bowl that felt both nourishing and indulgent.
After testing this recipe over a dozen times (because yes, I’m picky about my peanut sauce), it’s now my go-to healthy protein lunch that never disappoints. It’s quick, satisfying, and packed with flavor, making it perfect for busy workdays or meal prep. I promise once you try this Thai Peanut Chicken Buddha Bowl, you’ll be hooked too.
Why You’ll Love This Recipe
This Thai Peanut Chicken Buddha Bowl has completely changed my lunchtime game. Here’s why I keep coming back to it:
- Quick and Easy — From chopping to plating, it takes about 30 minutes max. I’ve made this on hectic workdays when I barely have time to breathe.
- Protein-Packed — The grilled chicken provides a satisfying protein boost that keeps me full all afternoon without feeling heavy.
- Vibrant and Fresh — Crisp veggies like bell peppers, shredded carrots, and cucumbers give it a fresh crunch and bright colors, making me excited to eat healthy.
- Flavor Explosion — The Thai peanut sauce is creamy, tangy, and just a little spicy — I accidentally doubled the chili once and now I’m hooked on the extra kick.
- Meal Prep Friendly — I’ve prepped several bowls for the week and they hold up well. The sauce keeps everything moist without sogginess.
- Customizable — You can swap in tofu for a vegetarian version or add extra greens like kale or spinach for a nutrient boost.
Honestly, this bowl feels like a treat but checks all the boxes for a healthy, balanced meal. It’s my answer when I want something that tastes like I ordered takeout but made at home with real ingredients.
Ingredients You’ll Need
Here’s the best part: most of these ingredients are pantry staples or easy to find at any grocery store. I’m very particular about my peanut sauce ingredients, so I’ll tell you why each one matters.
- Chicken breasts (1 lb / 450g) — Boneless, skinless. I like to pound them slightly for even cooking, but you can use thighs if you prefer juicier meat.
- Olive oil (2 tablespoons / 30ml) — For grilling the chicken and sautéing. You can substitute avocado oil for a neutral flavor.
- Cooked brown rice or quinoa (2 cups / 370g cooked) — I usually use brown rice for nuttiness, but quinoa adds an extra protein punch.
- Red bell pepper (1 medium, thinly sliced / about 150g) — Adds sweetness and crunch.
- Shredded carrots (1 cup / 120g) — For color and a subtle earthy sweetness.
- Cucumber (1 medium, diced / about 200g) — Keeps it refreshing and cool.
- Green onions (2 stalks, thinly sliced) — Adds a mild onion flavor without overpowering.
- Fresh cilantro (½ cup / loosely packed) — Totally optional but highly recommended for brightness.
- Crushed peanuts (¼ cup / 30g) — For garnish and extra texture. I always keep a small jar of roasted peanuts in my pantry for this.
- For the Thai Peanut Sauce:
- Natural peanut butter (½ cup / 125g) — Creamy, unsweetened. Avoid the overly sweet varieties.
- Low-sodium soy sauce (3 tablespoons / 45ml) — Controls saltiness and adds umami.
- Fresh lime juice (2 tablespoons / 30ml) — The acidity brightens the sauce.
- Honey or maple syrup (1 tablespoon / 15ml) — Balances the tang and spice.
- Rice vinegar (1 tablespoon / 15ml) — Adds a subtle tang.
- Garlic (2 cloves, minced) — Essential for depth of flavor.
- Fresh ginger (1 teaspoon, grated) — Adds warmth and zing.
- Red pepper flakes (½ teaspoon) — For a gentle kick. Adjust to taste.
- Warm water (3-4 tablespoons / 45-60ml) — To thin the sauce to a creamy, drizzle-able consistency.
Quick note: If you want to try tofu instead of chicken, press and marinate it similarly — it soaks up the peanut sauce beautifully.
Equipment Needed
You don’t need anything fancy — just the basics you probably already have.
- Grill pan or skillet — I prefer a grill pan to get those nice sear marks on the chicken, but a regular skillet works fine.
- Mixing bowls — For tossing the sauce and assembling the bowls.
- Sharp knife and cutting board — For slicing the veggies and chicken.
- Measuring cups and spoons — Accuracy matters for the sauce!
- Whisk or fork — To blend the peanut sauce until smooth.
How to Make It: Step-by-Step

Alright, here’s how I make this Thai Peanut Chicken Buddha Bowl come to life, with all the tips I’ve picked up along the way.
Step 1: Prepare the Chicken (10 minutes)
Start by seasoning the chicken breasts with a pinch of salt, pepper, and a drizzle of olive oil. Heat your grill pan over medium-high heat until hot. Place the chicken on the pan and cook for about 5-6 minutes per side, depending on thickness, until cooked through and nicely charred. (Pro tip: Let the chicken rest for 5 minutes before slicing thinly — it keeps the juices locked in.)
Step 2: Cook Your Grain (15 minutes)
If you don’t have cooked rice or quinoa ready, start this early. Follow package instructions for brown rice or quinoa. I usually make a batch ahead and keep it in the fridge for quick meals. Fluff it with a fork once done.
Step 3: Prep the Veggies (5-7 minutes)
While the chicken cooks and the grain simmers, slice the red bell pepper into thin strips, shred the carrots (or buy pre-shredded for ease), dice the cucumber, and slice your green onions. Chop the cilantro too, if you’re using it.
Step 4: Make the Thai Peanut Sauce (5 minutes)
In a mixing bowl, whisk together the peanut butter, soy sauce, lime juice, honey, rice vinegar, minced garlic, grated ginger, and red pepper flakes. Add warm water a tablespoon at a time until the sauce is smooth and pourable but still thick enough to coat. Taste and adjust for sweetness, salt, or spice. This sauce is the heart of the bowl, so don’t rush it.
Step 5: Assemble Your Buddha Bowl (5 minutes)
Start with a base of warm brown rice or quinoa in your bowl. Layer on the sliced grilled chicken, then arrange the bell peppers, shredded carrots, cucumber, and green onions around it. Drizzle generously with the peanut sauce, then sprinkle crushed peanuts and fresh cilantro on top.
Step 6: Serve and Enjoy
Serve immediately, or pack it for lunch. I like to keep some extra sauce on the side for dipping or adding later if I’m meal prepping.
Expert Tips & Tricks
- Make the sauce ahead: I keep a jar of this Thai peanut sauce in the fridge for up to a week. It’s great on salads, noodles, or as a dip.
- Don’t skip the acid: Lime juice and rice vinegar are what make the sauce pop. Without them, it tastes flat.
- Toast your peanuts: If you have time, lightly toast peanuts in a dry skillet for extra crunch and flavor.
- Use warm water for thinning: Cold water can make the sauce clump. Warm helps it blend silky smooth.
- Rest the chicken: Letting it sit after cooking keeps it juicy and easier to slice thinly.
- Save time: Use pre-cooked rotisserie chicken or leftover grilled chicken from recipes like my Crockpot Chicken Tortellini for an even faster lunch bowl.
Variations & Substitutions
Once you have the classic Buddha Bowl down, try these twists:
- Vegetarian: Swap chicken for crispy baked tofu or tempeh marinated in soy sauce and lime.
- Spicy Kick: Add a teaspoon of Sriracha or chili garlic sauce into the peanut sauce.
- Extra Veggies: Throw in steamed broccoli or snap peas for even more crunch and nutrition.
- Nut-Free: Use sunflower seed butter instead of peanut butter, and skip the crushed peanuts.
- Grain Swap: Cauliflower rice for a lower-carb option.
- Protein Swap: Grilled shrimp or salmon work beautifully here — check out my Healthy Grilled Shrimp Bowl for inspiration.
Serving & Storage
I usually eat this Thai Peanut Chicken Buddha Bowl fresh for lunch, but it’s great for meal prep too.
- To Store: Keep the peanut sauce separate if you can to prevent sogginess. Store chicken, veggies, and grain in airtight containers in the fridge for up to 4 days.
- To Reheat: Warm the chicken and grain gently in a microwave or skillet. Add peanut sauce right before eating.
- Serving Suggestions: Serve with lime wedges for extra brightness, or a side of crunchy Asian slaw. Garlic bread feels indulgent but pairs surprisingly well if you want a heartier meal (see my Garlic Parmesan Chicken Crockpot Recipe for a cozy dinner idea).
Nutrition Information
| Nutrient | Per Serving (6 servings) |
|---|---|
| Calories | 480 |
| Protein | 38g |
| Carbohydrates | 35g |
| Fiber | 6g |
| Sugar | 7g |
| Fat | 18g |
| Saturated Fat | 3g |
| Cholesterol | 75mg |
| Sodium | 550mg |
| Calcium | 70mg |
This bowl is rich in protein and fiber, thanks to the chicken and veggies. The peanut butter adds healthy fats and creaminess. It’s not a diet food, but it’s a balanced, wholesome meal that fuels you through the afternoon. Want it lighter? Use quinoa instead of brown rice and reduce the peanut sauce a bit.
Final Thoughts
So that’s my take on the perfect Thai Peanut Chicken Buddha Bowl — fresh, flavorful, and packed with protein. I’ve made this recipe so often that it’s become a staple in my lunch rotation, especially when I want something healthy but exciting. It’s saved me from boring sandwiches and uninspired salads more times than I can count.
Make it yours by swapping in your favorite veggies or proteins, and don’t be shy with the sauce — more peanut sauce is always better in my book. If you end up loving it as much as I do, drop a comment below. I’m always curious to hear how you customize it or if you have any questions.
Happy cooking! And may your lunch break be delicious and stress-free.
Frequently Asked Questions
Q: Can I use store-bought peanut sauce instead of making my own?
A: You can, but homemade peanut sauce is fresher and you control the sweetness, salt, and spice. Store-bought sauces can be overly sweet or salty. If you’re in a pinch, choose a natural one with minimal ingredients and add fresh lime juice to brighten it up.
Q: How long does this Buddha bowl keep in the fridge?
A: The components store well for up to 4 days separately. Keep the peanut sauce in a sealed container and add it right before eating to avoid soggy veggies or grain. Reheat the chicken and grain gently.
Q: Can I make this vegan?
A: Absolutely! Swap the chicken for tofu or tempeh, use tamari instead of soy sauce if gluten-free, and ensure your peanut butter is vegan-friendly (most are). Add extra veggies or beans for protein.
Q: What’s the best way to warm leftovers without drying them out?
A: Reheat in a skillet over low heat with a splash of water or extra peanut sauce to add moisture. Stir frequently. Microwaving works too but can dry out the chicken if you’re not careful.
Q: Can I use other grains besides brown rice or quinoa?
A: Sure! Jasmine rice, wild rice, or even couscous work well. Just adjust cooking times accordingly. If you want a low-carb option, cauliflower rice is a great substitute.
Q: How spicy is this recipe? Can I make it milder?
A: The red pepper flakes add a gentle kick, but it’s easy to dial down or up. Start with half the amount if you’re sensitive to spice, or add more if you like heat. You can also add a drizzle of honey to balance spice.
Q: Can I grill the chicken outdoors for this recipe?
A: Definitely! Grilling chicken outdoors adds a smoky flavor that complements the peanut sauce beautifully. Just be sure to slice it thinly after resting for the best texture.
Pin This Recipe!


Thai Peanut Chicken Buddha Bowl
- Total Time: 30 minutes
- Yield: 6 servings 1x
Description
A quick, healthy, and protein-packed lunch bowl featuring grilled chicken, fresh veggies, and a creamy, tangy Thai peanut sauce.
Ingredients
- 1 lb (450g) boneless, skinless chicken breasts
- 2 tablespoons (30ml) olive oil
- 2 cups (370g cooked) brown rice or quinoa
- 1 medium red bell pepper (about 150g), thinly sliced
- 1 cup (120g) shredded carrots
- 1 medium cucumber (about 200g), diced
- 2 stalks green onions, thinly sliced
- ½ cup fresh cilantro, loosely packed (optional)
- ¼ cup (30g) crushed peanuts
- For the Thai Peanut Sauce:
- ½ cup (125g) natural peanut butter, creamy and unsweetened
- 3 tablespoons (45ml) low-sodium soy sauce
- 2 tablespoons (30ml) fresh lime juice
- 1 tablespoon (15ml) honey or maple syrup
- 1 tablespoon (15ml) rice vinegar
- 2 cloves garlic, minced
- 1 teaspoon fresh ginger, grated
- ½ teaspoon red pepper flakes
- 3–4 tablespoons (45-60ml) warm water
Instructions
- Season chicken breasts with salt, pepper, and a drizzle of olive oil.
- Heat grill pan over medium-high heat until hot.
- Cook chicken for 5-6 minutes per side until cooked through and charred.
- Let chicken rest for 5 minutes, then slice thinly.
- Cook brown rice or quinoa according to package instructions; fluff with a fork.
- Slice red bell pepper, shred carrots, dice cucumber, slice green onions, and chop cilantro if using.
- In a mixing bowl, whisk together peanut butter, soy sauce, lime juice, honey, rice vinegar, garlic, ginger, and red pepper flakes.
- Add warm water a tablespoon at a time until sauce is smooth and pourable.
- Assemble bowl with a base of warm rice or quinoa.
- Layer sliced chicken, bell peppers, carrots, cucumber, and green onions.
- Drizzle generously with peanut sauce.
- Sprinkle crushed peanuts and fresh cilantro on top.
- Serve immediately or pack for lunch with extra sauce on the side.
Notes
[‘Make the peanut sauce ahead and store in the fridge for up to a week.’, ‘Toast peanuts lightly for extra crunch and flavor.’, ‘Use warm water to thin the sauce for a smooth consistency.’, ‘Let chicken rest after cooking to keep it juicy.’, ‘Use pre-cooked chicken for faster assembly.’, ‘Keep peanut sauce separate when storing to avoid sogginess.’, ‘Reheat chicken and grain gently to avoid drying out.’]
- Prep Time: 15 minutes
- Cook Time: 15 minutes
- Category: Main Course
- Cuisine: Thai
Nutrition
- Serving Size: 1 bowl (approximatel
- Calories: 480
- Sugar: 7
- Sodium: 550
- Fat: 18
- Saturated Fat: 3
- Carbohydrates: 35
- Fiber: 6
- Protein: 38
Keywords: Thai peanut chicken, Buddha bowl, healthy lunch, protein-packed, peanut sauce, quick recipe, meal prep